3-Min Guide: Remove White Glue Lines from Scanned Photos with AI
Discover how to remove white glue lines from scanned photos with AI. Follow our manual restoration steps or use Vmake Labs for fast, flawless results! Start enhancing your old photos today.

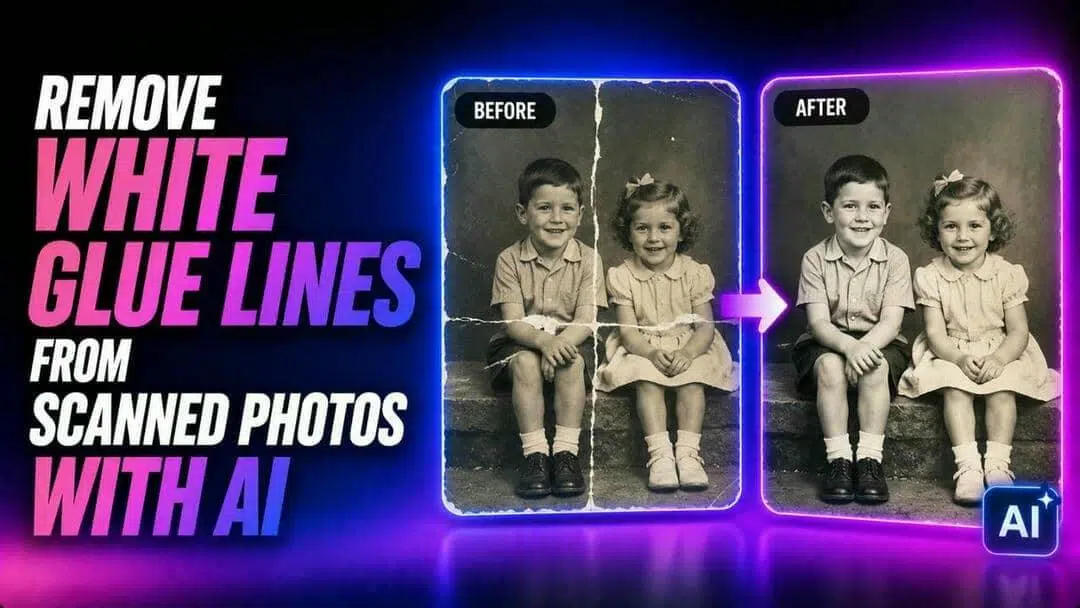
White glue lines can become more noticeable after old printed photographs are scanned, making treasured memories appear damaged or uneven. These marks often result from aging adhesives, reflective surfaces, or paper deterioration rather than the scanning process itself. While traditional photo editors can reduce their appearance, AI-powered restoration tools provide a faster way to clean scanned photos while preserving surrounding details.
Why do white glue lines appear on scanned photos?
White glue lines are usually linked to the way old adhesives age and interact with scanner lighting. Understanding the cause helps you choose the most suitable restoration method without making unnecessary edits.
|
Cause |
Technical Mechanism |
|---|---|
|
Adhesive Crystallization |
Older rubber- or starch-based adhesives dry, harden, and crystallize over time, causing aged residues to reflect scanner light differently than the surrounding paper. |
|
Scanner Glare |
High-intensity, even flatbed scanner lighting reflects off transparent or glossy glue residues much more intensely than off the photo itself, producing bright streaks. |
|
Emulsion Tears |
Removing photos from old albums tears the printed emulsion or separates paper fibers, which scatters scanner light unevenly to mimic adhesive marks. |
|
Adhesive Migration |
Degrading adhesive under clear plastic sheets in magnetic albums spreads onto photo surfaces, changing local surface reflectivity during scans. |
|
Chemical Oxidation |
Long-term exposure to heat, humidity, and pollutants alters the texture and transparency of both the paper and adhesive compounds, highlighting old glue lines. |
These are among the most common causes observed during photo restoration. In some cases, white lines may also result from scanner settings, surface scratches, previous restoration attempts, or other forms of physical deterioration. Identifying the underlying cause can help you choose the most appropriate restoration approach.
Practical situations where removing white glue lines from scanned photos is useful
-
Digitizing family photo albums: Older family albums often contain photographs attached with glue or adhesive pages. Removing white glue lines creates cleaner digital copies that are easier to archive, share with relatives, or include in printed family history collections.
-
Restoring historical and genealogy archives: Libraries, museums, and genealogy enthusiasts frequently scan vintage photographs for preservation. Eliminating glue residue improves image clarity while making portraits, handwritten notes, and background details easier to study and document.
-
Preparing old photos for reprinting: When restoring cherished photographs for new prints, calendars, or framed enlargements, visible glue lines can become more noticeable at larger sizes. Cleaning scanned images beforehand produces more natural-looking reproductions suitable for printing.
-
Creating digital albums and photo books: Many people convert printed photographs into digital albums or personalized photo books. Removing adhesive marks before designing these projects helps maintain a consistent appearance across images and reduces distracting visual imperfections.
How to remove glue lines from images that are scanned manually?
Manual editing works best for light glue marks or isolated defects. Most photo editing software, such as Windows-built-in Microsoft Photos, includes adjustment and retouching tools that help reduce the visibility of adhesive lines with careful editing.

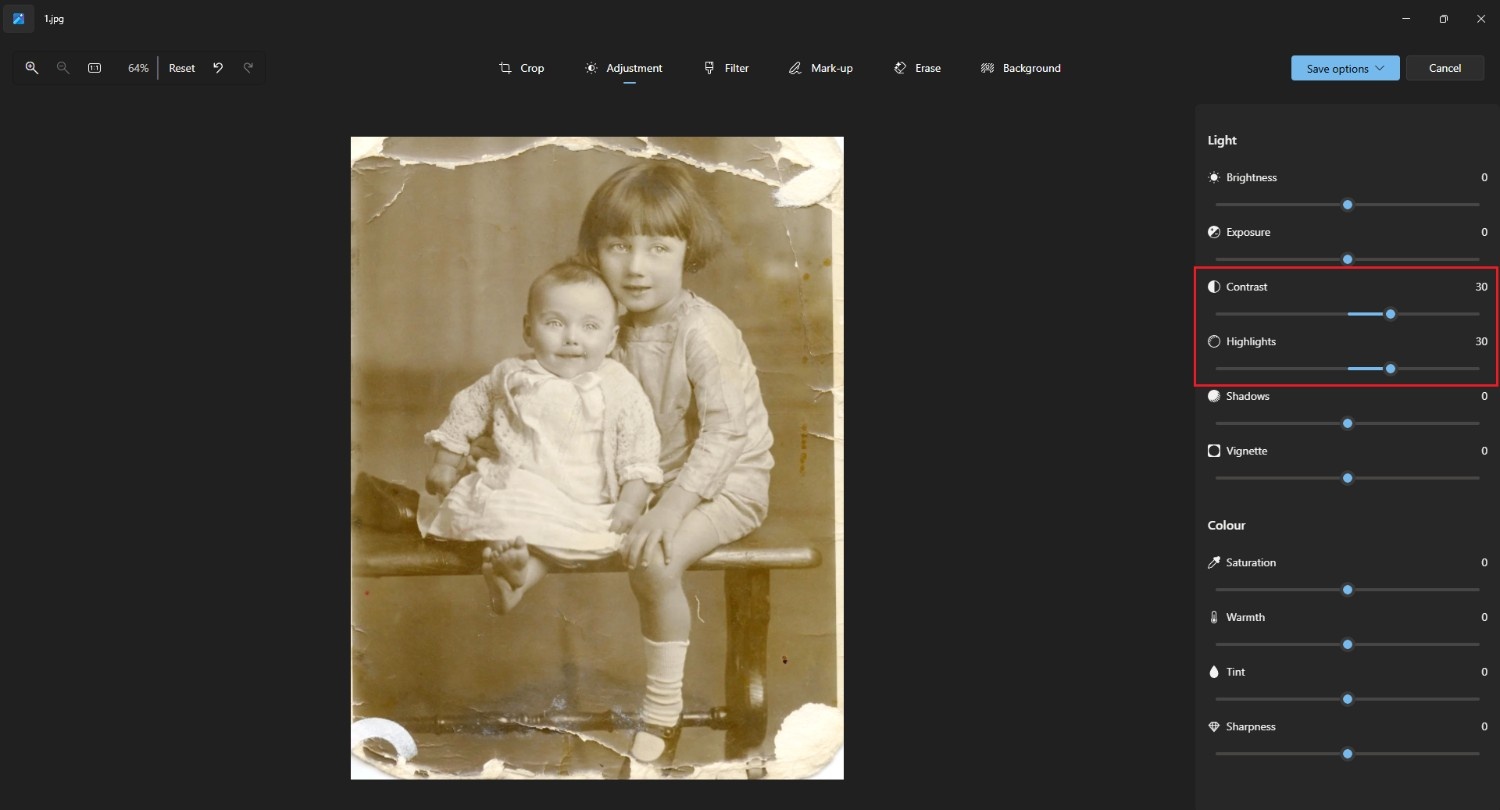
Step 1: Neutralize scanner glare via highlight and contrast suppression
Lowering highlights while adjusting contrast can reduce excessive brightness caused by reflective glue residue. Selective masking helps limit edits to affected areas, preserving the original exposure and detail across the remaining portions of the scanned photograph.
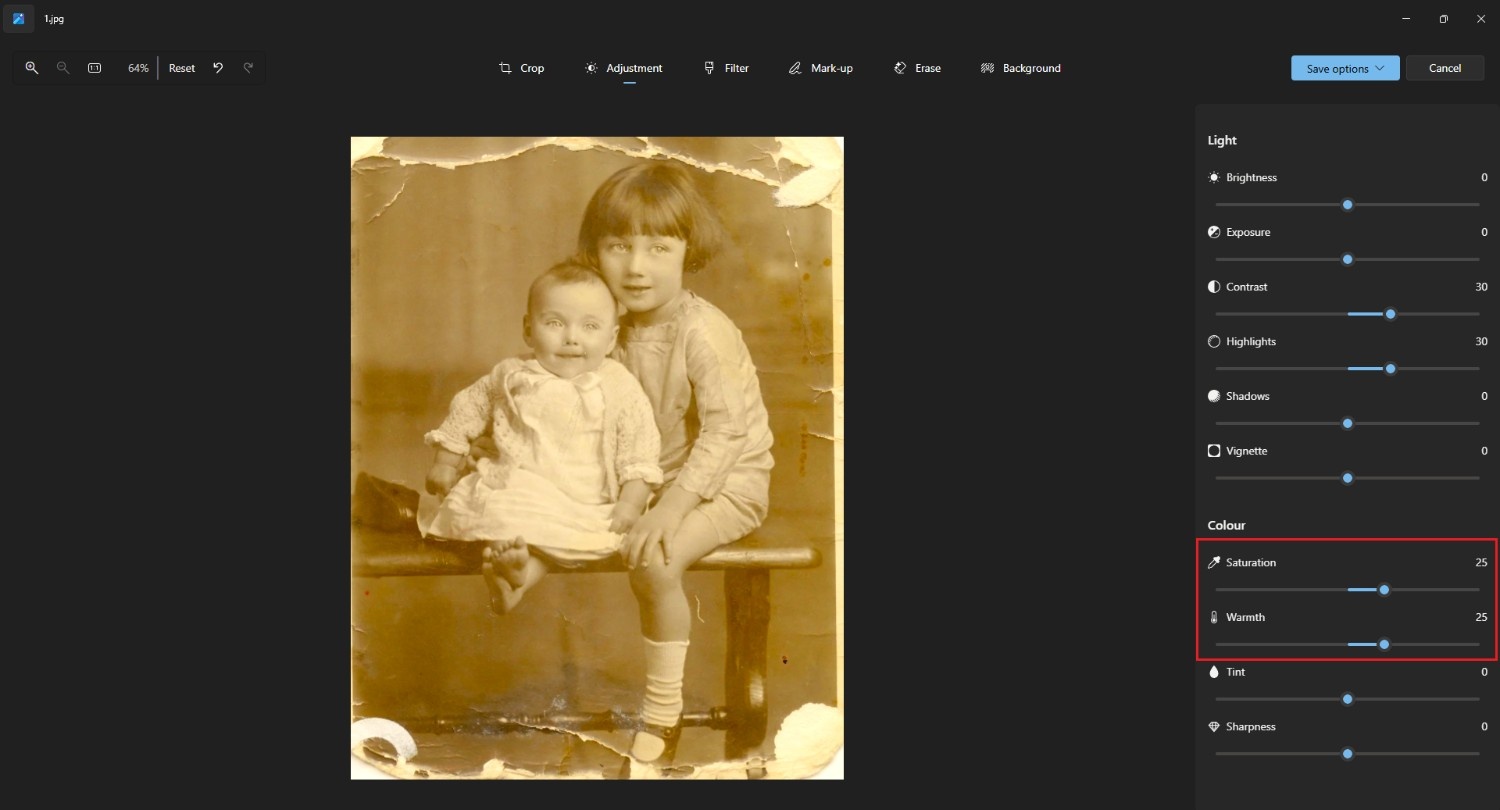
Step 2: Balance yellowed adhesive color with selective white balance adjustments
Old glue often leaves yellowish discoloration alongside bright white marks. Adjusting localized white balance, saturation, and color temperature helps blend these affected regions more naturally with nearby paper and printed tones.
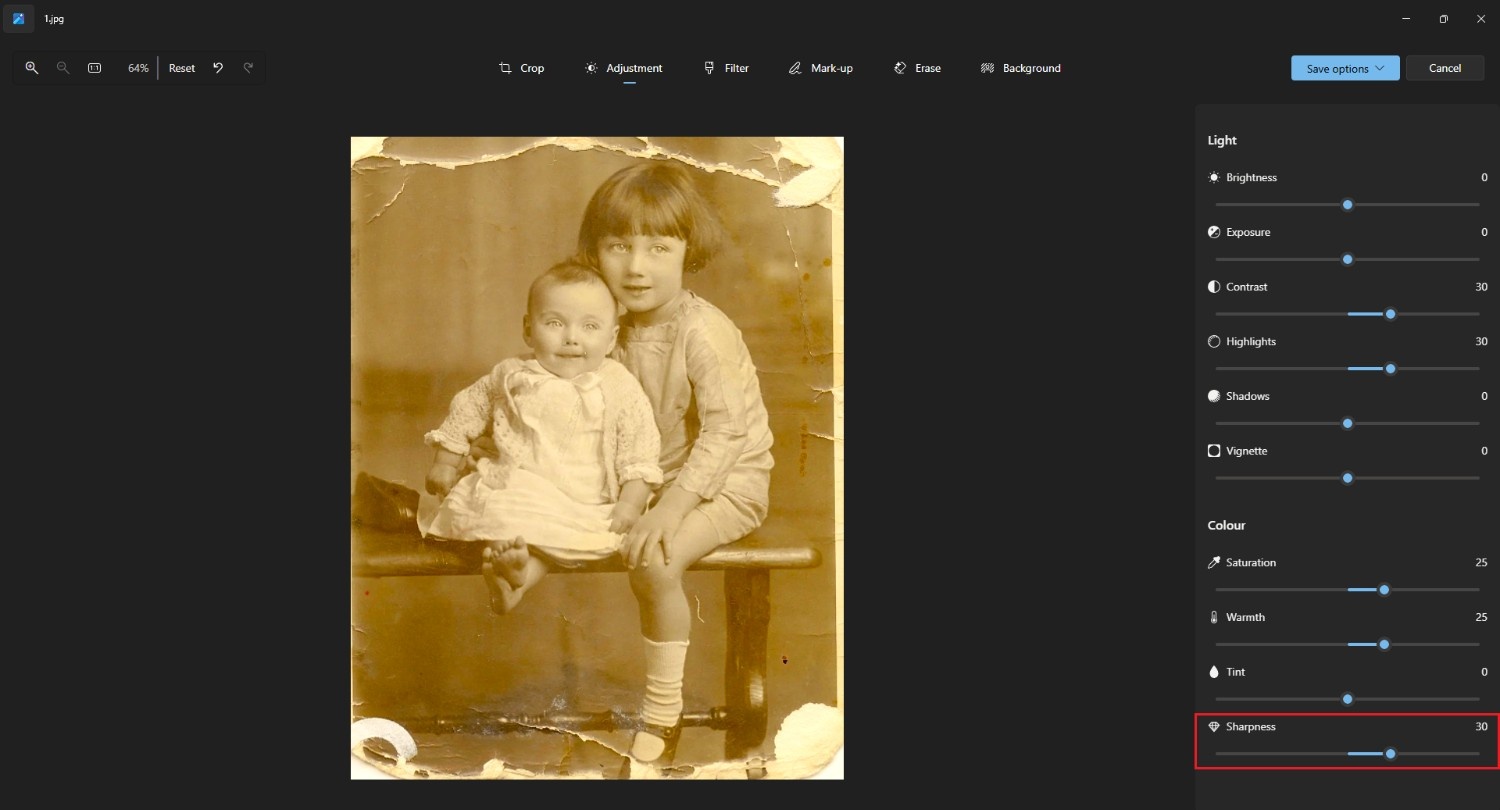
Step 3: Blend hard edges and match photo grain with selective softening and sharpening
Healing brushes, clone tools, and localized sharpening can soften harsh glue edges while restoring consistent texture. Matching surrounding film grain or paper detail produces smoother transitions without changing unaffected areas of the scanned photograph. These adjustments help reduce the appearance of glue marks but cannot completely remove thick adhesive residue.
How to remove white glue lines on scanned photos using AI?
Scanned photographs with extensive glue marks often require more than manual touch-ups. Vmake Labs Image Remover as a glue line remover from images combines image and video object removal in a browser-based workflow that simplifies digital restoration.
Users can mark unwanted glue lines with several selection tools, allowing AI to rebuild affected areas using nearby textures and colors. Since processing happens online, the tool works across major desktop and mobile platforms without installing additional software.
It can be useful for restoring family photographs, archival images, or scanned prints before sharing or printing cleaned copies.
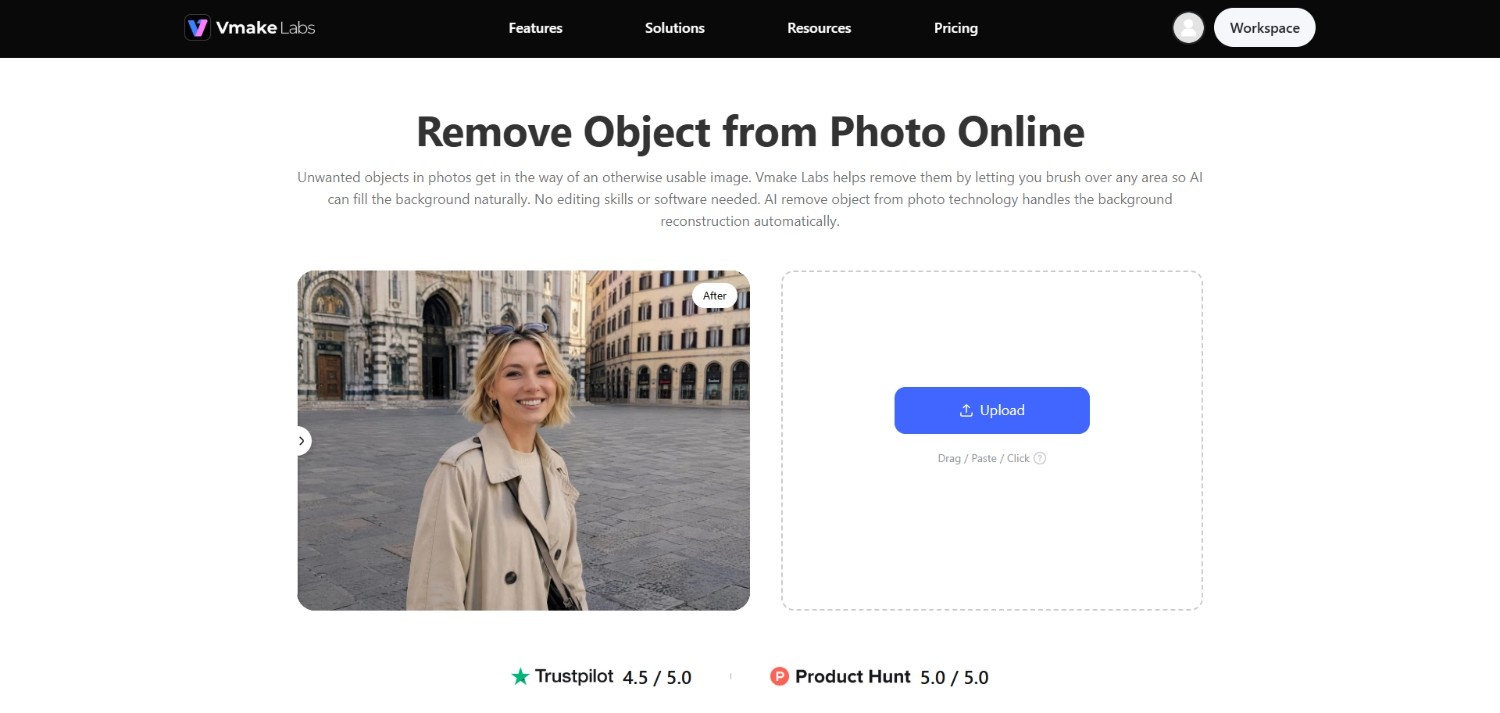
Major features of Vmake Labs image remover
-
Upload or import images from links with batch processing: Users have the option to either upload the image or simply paste a link to import the picture. Additionally, there is the option to batch upload up to 30 images at once.
-
Smart brush selection with adjustable sizing: An adjustable brush, together with Smart, Box, and Eraser selection modes, helps users mark glue lines accurately. This flexibility makes it easier to handle both broad adhesive streaks and smaller photo restoration areas.
-
Context-aware AI background reconstruction: The AI examines nearby colors, textures, lighting, and image patterns before rebuilding selected regions. This approach helps generate replacement content that blends with surrounding portions of the scanned photograph.
-
High-fidelity, full-resolution image export options: Completed restorations can be exported in HD or full resolution using common formats such as JPG and PNG. This helps preserve image quality for digital archiving, sharing, or future printing purposes.
-
Zero-install cloud processing for fast access: The tool operates entirely through a web browser across multiple devices. Since processing occurs online, users do not need dedicated software or specialized computer hardware.
How to use Vmake Labs to clean scanned photos?
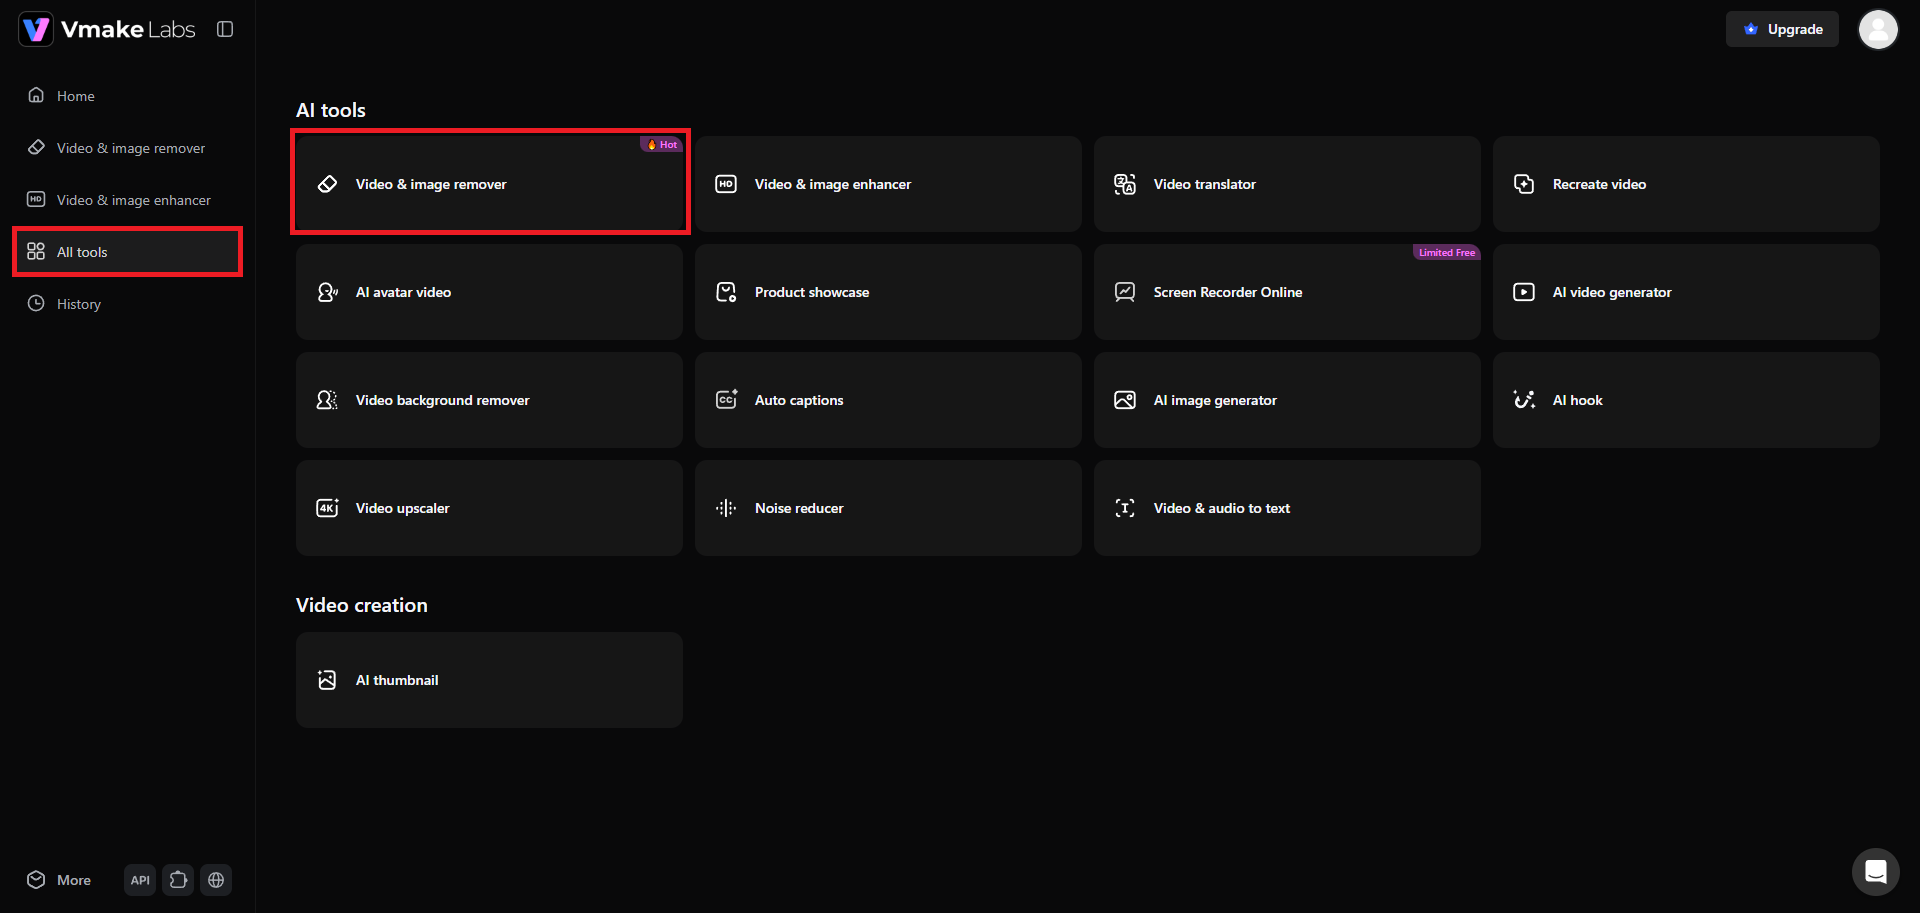
Step 1: Access Vmake Labs "Video & image remover" tool
Begin your journey by first heading over to the official website of Vmake Labs. Once done, proceed to sign-in to your account and then from the dashboard, access the "All tools" option. From the "All tools" menu, you need to select the "Video & image remover" tool.
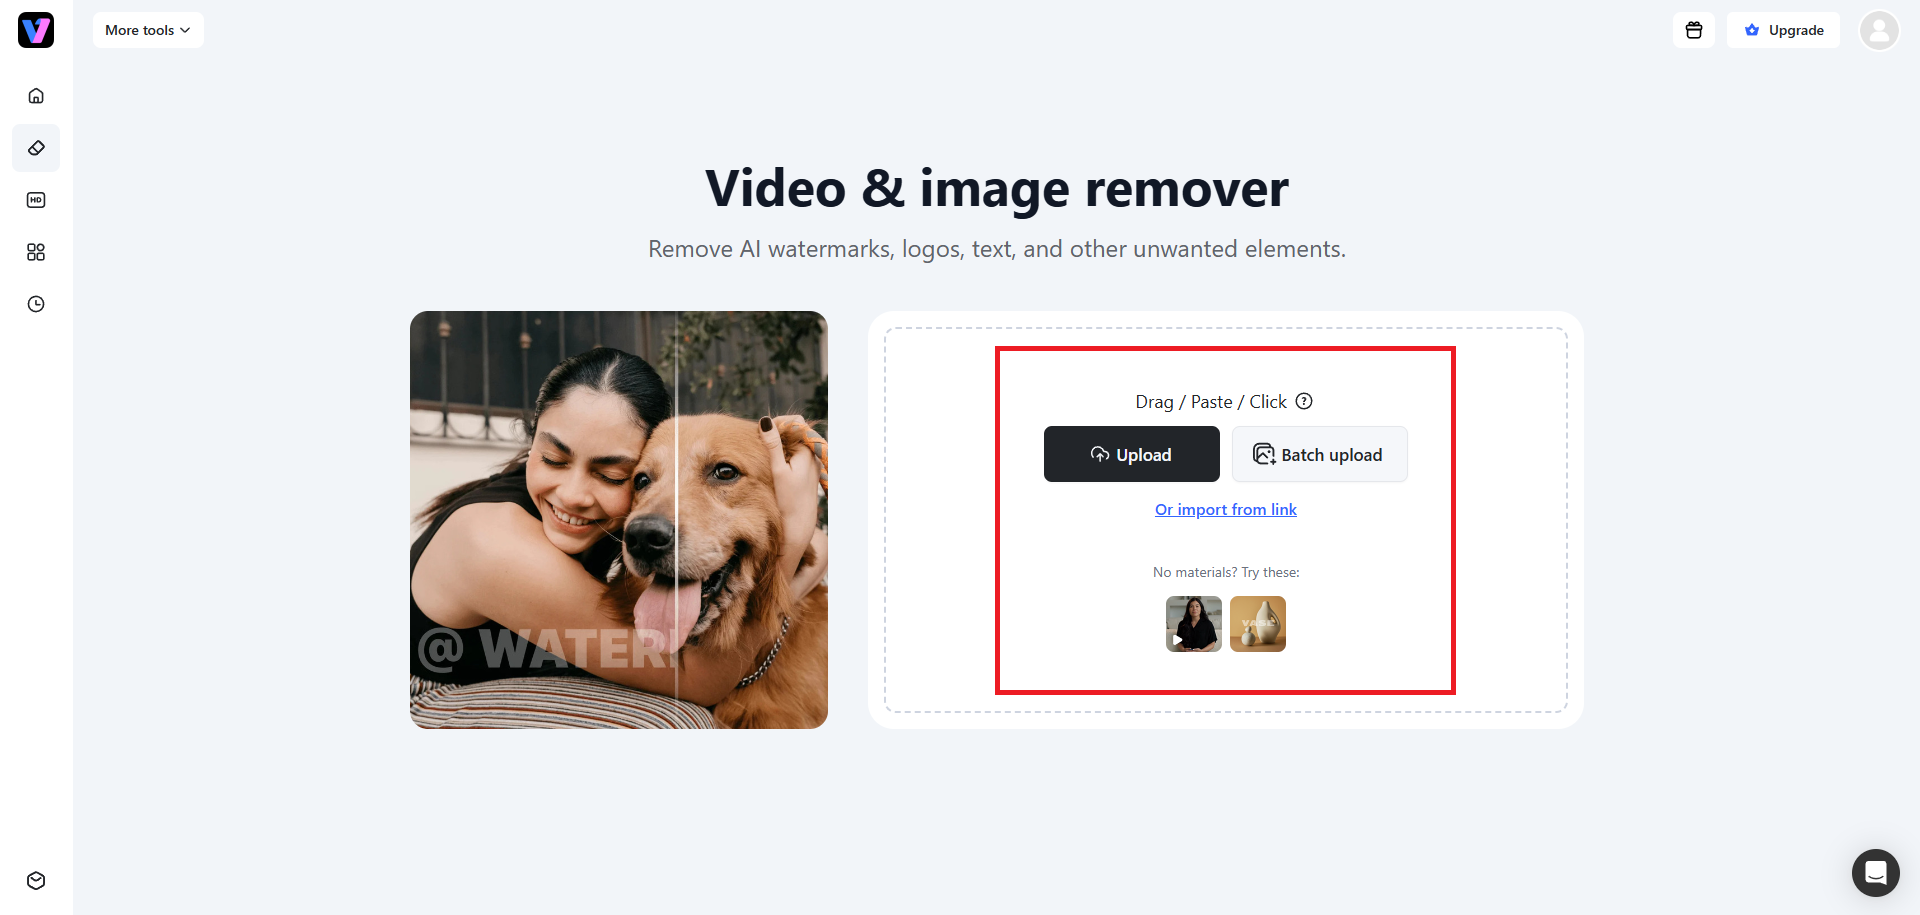
Step 2: Upload your image or paste a weblink
A new web page will open where you will be required to upload your scanned photo with glue marks. Conversely, you can also import your image via a weblink. In addition to that, Vmake Labs supports batch uploading up to 30 images, so that you can edit photos in one go.
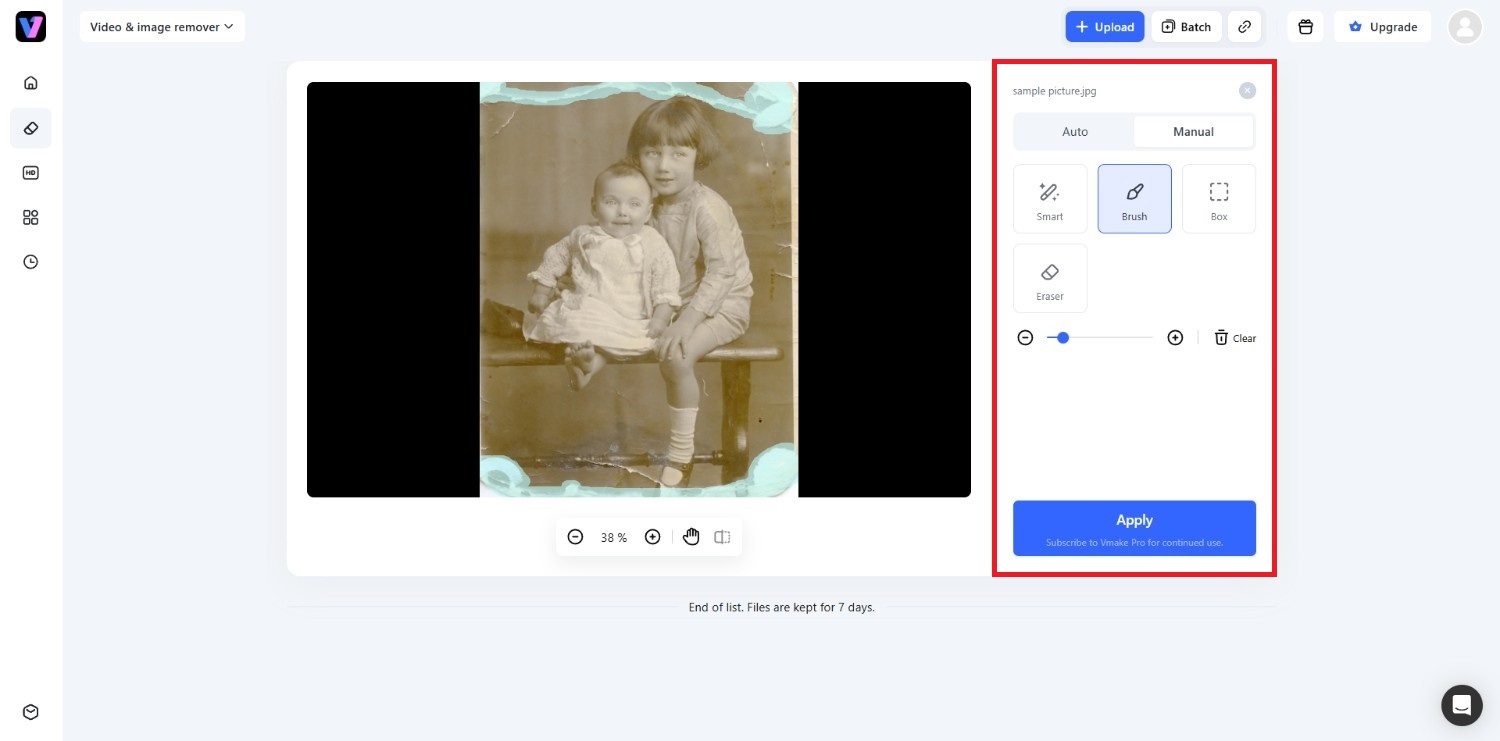
Step 3: Download the finalized clean picture
After successfully uploading, you will be presented with two options to remove glue lines from your scanned image. You can either choose the "Auto" option, or pick the "Manual" option, which is the recommended procedure.
Under "Manual", select the "Brush" option and then adjust the brush size. After that, use the brush to draw over the glue lines to manually remove them. Once done, hit "Apply". Finally, if you are happy with results, you can decide to download the clean photo to your local device for sharing.
Microsoft Photos vs. Vmake Labs: which method is better for removing white glue lines?
Microsoft Photos includes basic editing adjustments that can reduce the appearance of minor glue marks by changing brightness, contrast, and color. However, it does not offer dedicated object removal for complex adhesive damage. Vmake Labs Image Remover uses AI-assisted object removal to reconstruct selected areas, making it more suitable when glue lines cover larger portions of a scanned photograph.
|
Feature |
Microsoft Photos |
Vmake Labs Image Remover |
|---|---|---|
|
Editing approach |
Manual brightness, contrast, and color adjustments |
AI-assisted object removal with manual selection tools |
|
Suitable for |
Light glare and minor discoloration |
Thin to moderately visible glue lines and adhesive residue |
|
Precision |
Limited to global or localized image adjustments |
Brush, Smart, Box, and Eraser selection modes for targeted edits |
|
AI reconstruction capability |
Not available |
AI reconstructs selected areas using nearby image information |
|
Batch editing |
Not supported for object removal tasks |
Supports batch processing for multiple images (where available) |
|
Browser access |
No, desktop application |
Yes, runs directly in a web browser |
|
Ease of use |
Requires manual adjustment and repeated fine-tuning |
Simple upload, select, process, and export workflow |
|
Platform |
Windows Photos app |
Browser-based on Windows, macOS, iOS, and Android |
|
Best use case |
Minor photo corrections and basic color adjustments |
Cleaning scanned photos with visible glue lines, adhesive residue, and other unwanted objects |
This comparison keeps the discussion balanced while showing that Microsoft Photos is useful for basic corrections, whereas Vmake Labs is designed for removing unwanted objects such as glue lines from scanned photographs.
Tips and tricks to follow when fixing white glue lines on scanned photos
Following a few restoration practices can improve editing accuracy while preserving the original appearance of vintage photographs. These habits also reduce the need for repeated corrections during the restoration process.
-
Always create and save a high-resolution raw backup scan
Before making edits, keep an untouched high-resolution scan. The original file provides a reliable backup, supports future restoration attempts, and preserves details that may be useful if improved editing techniques become available later.
-
Work in smaller, iterative brush strokes for intricate areas
Rather than selecting large damaged regions at once, restore smaller sections individually. Short, controlled selections allow more accurate reconstruction and make it easier to correct any areas that require additional refinement afterward.
-
Utilize high zoom levels to maintain pixel-perfect precision
Zooming into affected areas helps identify narrow glue lines, damaged paper fibers, and subtle texture differences. Careful close-up editing reduces accidental selections and improves consistency between restored regions and surrounding photograph details.
-
Pair minimal physical prep with deep digital restoration
Remove loose dust using a soft microfiber cloth before scanning, but avoid scraping old adhesive. After digitization, rely on digital restoration techniques to address glue lines without risking additional physical damage to the original photograph.
Conclusion
White glue lines are a common issue when scanning older photographs, especially those removed from vintage albums or stored with aging adhesives.
While manual editing tools can reduce glare, discoloration, and surface inconsistencies, AI-based restoration offers a practical alternative for handling larger or more complex adhesive marks. Vmake Labs Image Remover provides browser-based tools for selecting unwanted glue lines and reconstructing affected areas using nearby image information.
Combined with careful scanning practices and high-resolution backups, these methods can help preserve family photographs and archival prints for future viewing, sharing, and long-term digital storage.
FAQs
Why do transparent glue lines look bright white on a scanned photo?
Transparent glue reflects the scanner's strong light more intensely than surrounding paper or printed areas. This reflection increases brightness in the digital scan, making previously subtle adhesive residue appear as noticeable white lines.
Is it safer to fix adhesive damage digitally using AI rather than physically?
Digital restoration avoids additional handling of fragile photographs, reducing the risk of tearing paper or damaging the printed surface. Physical adhesive removal should only be attempted when appropriate conservation methods are available.
Can Vmake Labs accurately reconstruct details covered by thick glue lines?
Vmake Labs offers smart and manual selection tools for marking glue lines before AI reconstruction. Results vary depending on the thickness, size, and complexity of the damaged area and surrounding image details.
Will using an AI object remover decrease the resolution of my digitized photo?
Not necessarily. Vmake Labs supports exporting restored images in HD or full resolution, allowing users to maintain image quality while removing unwanted glue marks from scanned photographs.
What scanning resolution (DPI) is recommended for photos with heavy adhesive damage?
Scanning at 600 DPI is generally recommended for restoration work because it captures finer textures and damage details. Higher-resolution scans also provide more information for manual editing and AI-assisted restoration.
You May Be Interested

123APPS Watermark Remover Review (2026): Pros, Cons, and Pricing

AI Editing Images Remove Paper Creases: Easy Guide
AniEraser Watermark Remover by Media.io: 2026 Hands-On Review
BeeCut Review: Watermark Remover + Editor Tested (2026)