How to Get Back Clear Noise in Premiere Pro & One-Click AI Solutions
Learn how to get back clear noise in Premiere Pro using Enhance Speech, Essential Sound, and manual audio cleanup techniques. Also discover an AI-powered way to clean noisy videos in just a few clicks.

Background noise ruins otherwise great videos, whether the source involves wind, traffic, keyboard clicks, or room hum. This guide explains how to get back clear audio in Premiere Pro step by step, alongside exploring when an AI-powered workflow saves valuable editing time.
Why background noise happens in Premiere Pro projects
Persistent background distractions immediately lower the perceived production value of any visual project. Audiences struggle to focus on the primary message when competing frequencies mask important dialogue. This loss of clarity forces viewers to strain their ears, often leading to immediate drop-offs.
Common sources of unwanted audio noise:
-
Wind: Outdoor microphones easily pick up gusts, masking speech.
-
HVAC systems: Air conditioning units create persistent low-end hums.
-
Traffic: Passing cars introduce unpredictable volume spikes.
-
Keyboard clicks: Office environments frequently capture mechanical typing sounds.
-
Electrical hum: Poorly shielded cables generate constant static.
-
Crowd noise: Background chatter interferes with primary dialogue tracks.
How to clean up background noise in Premiere Pro
Audio restoration involves navigating specific built-in tools designed to isolate speech. Learning how to get back clear audio in Premiere Pro efficiently requires applying these exact steps.
-
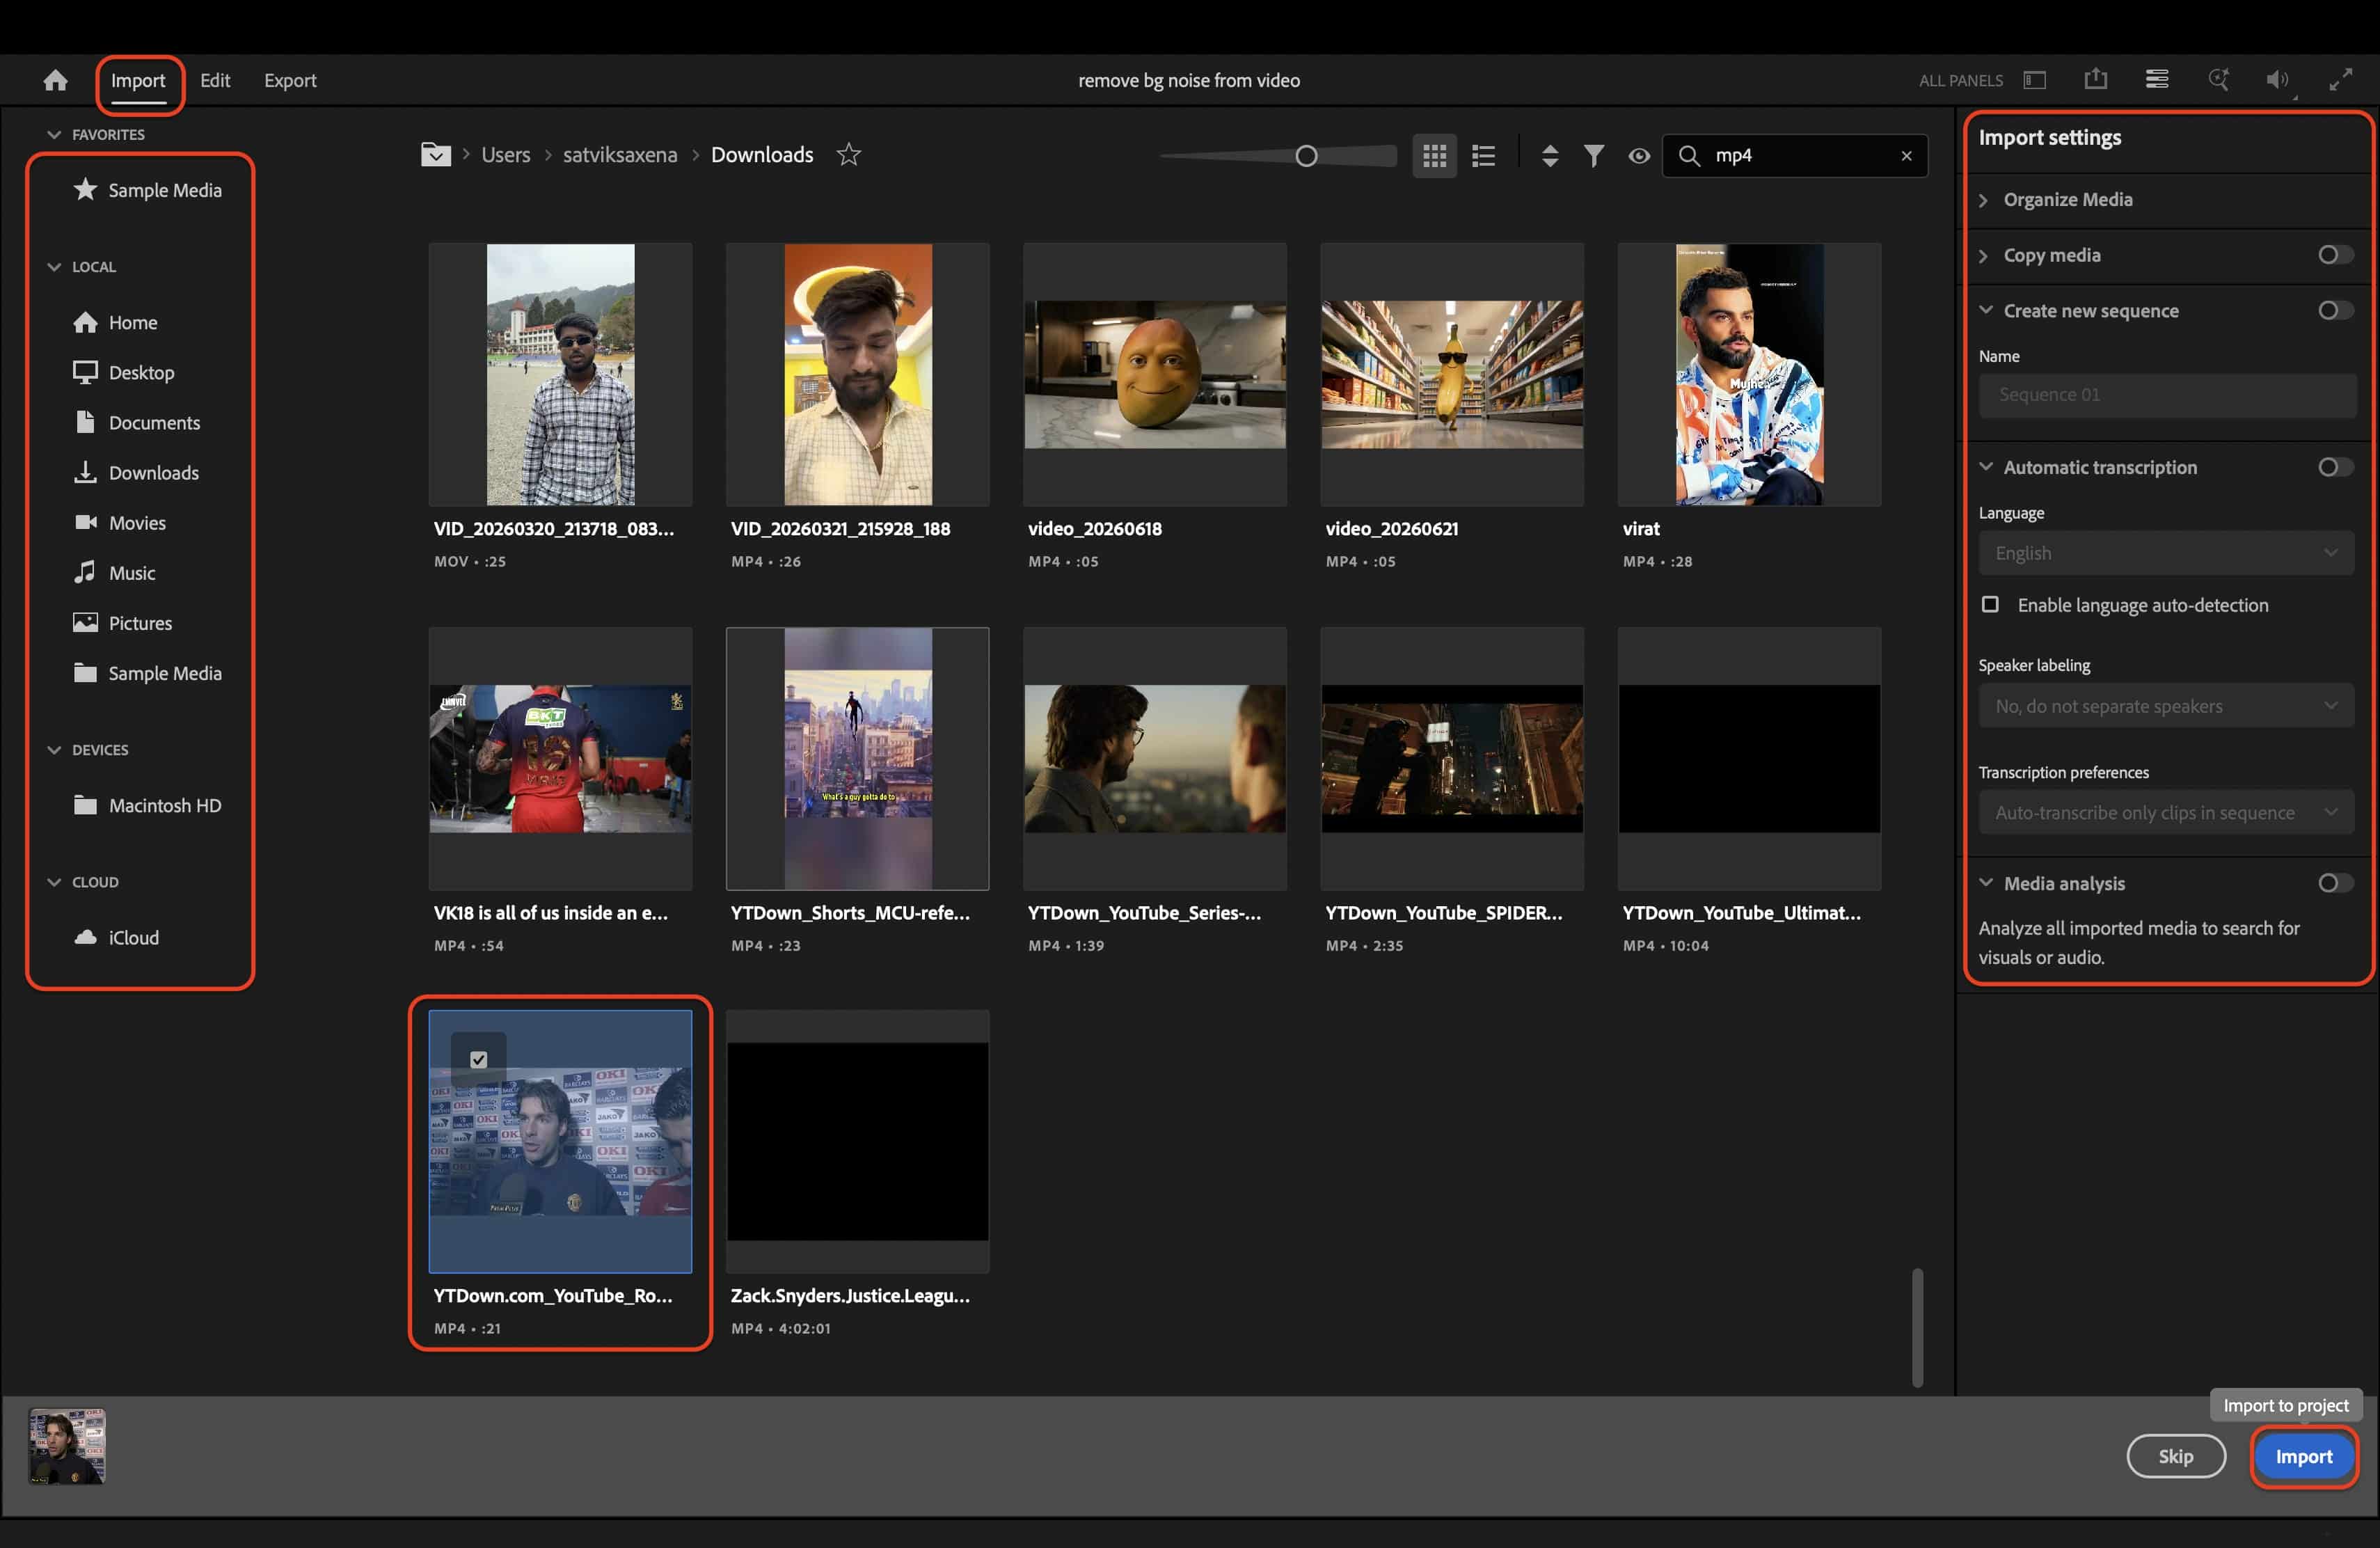
Step 1: Import the video file
Navigate to the Import tab in the top left corner, locate the media from your local drive, select your target file, and click the blue Import button in the bottom right to begin.
-
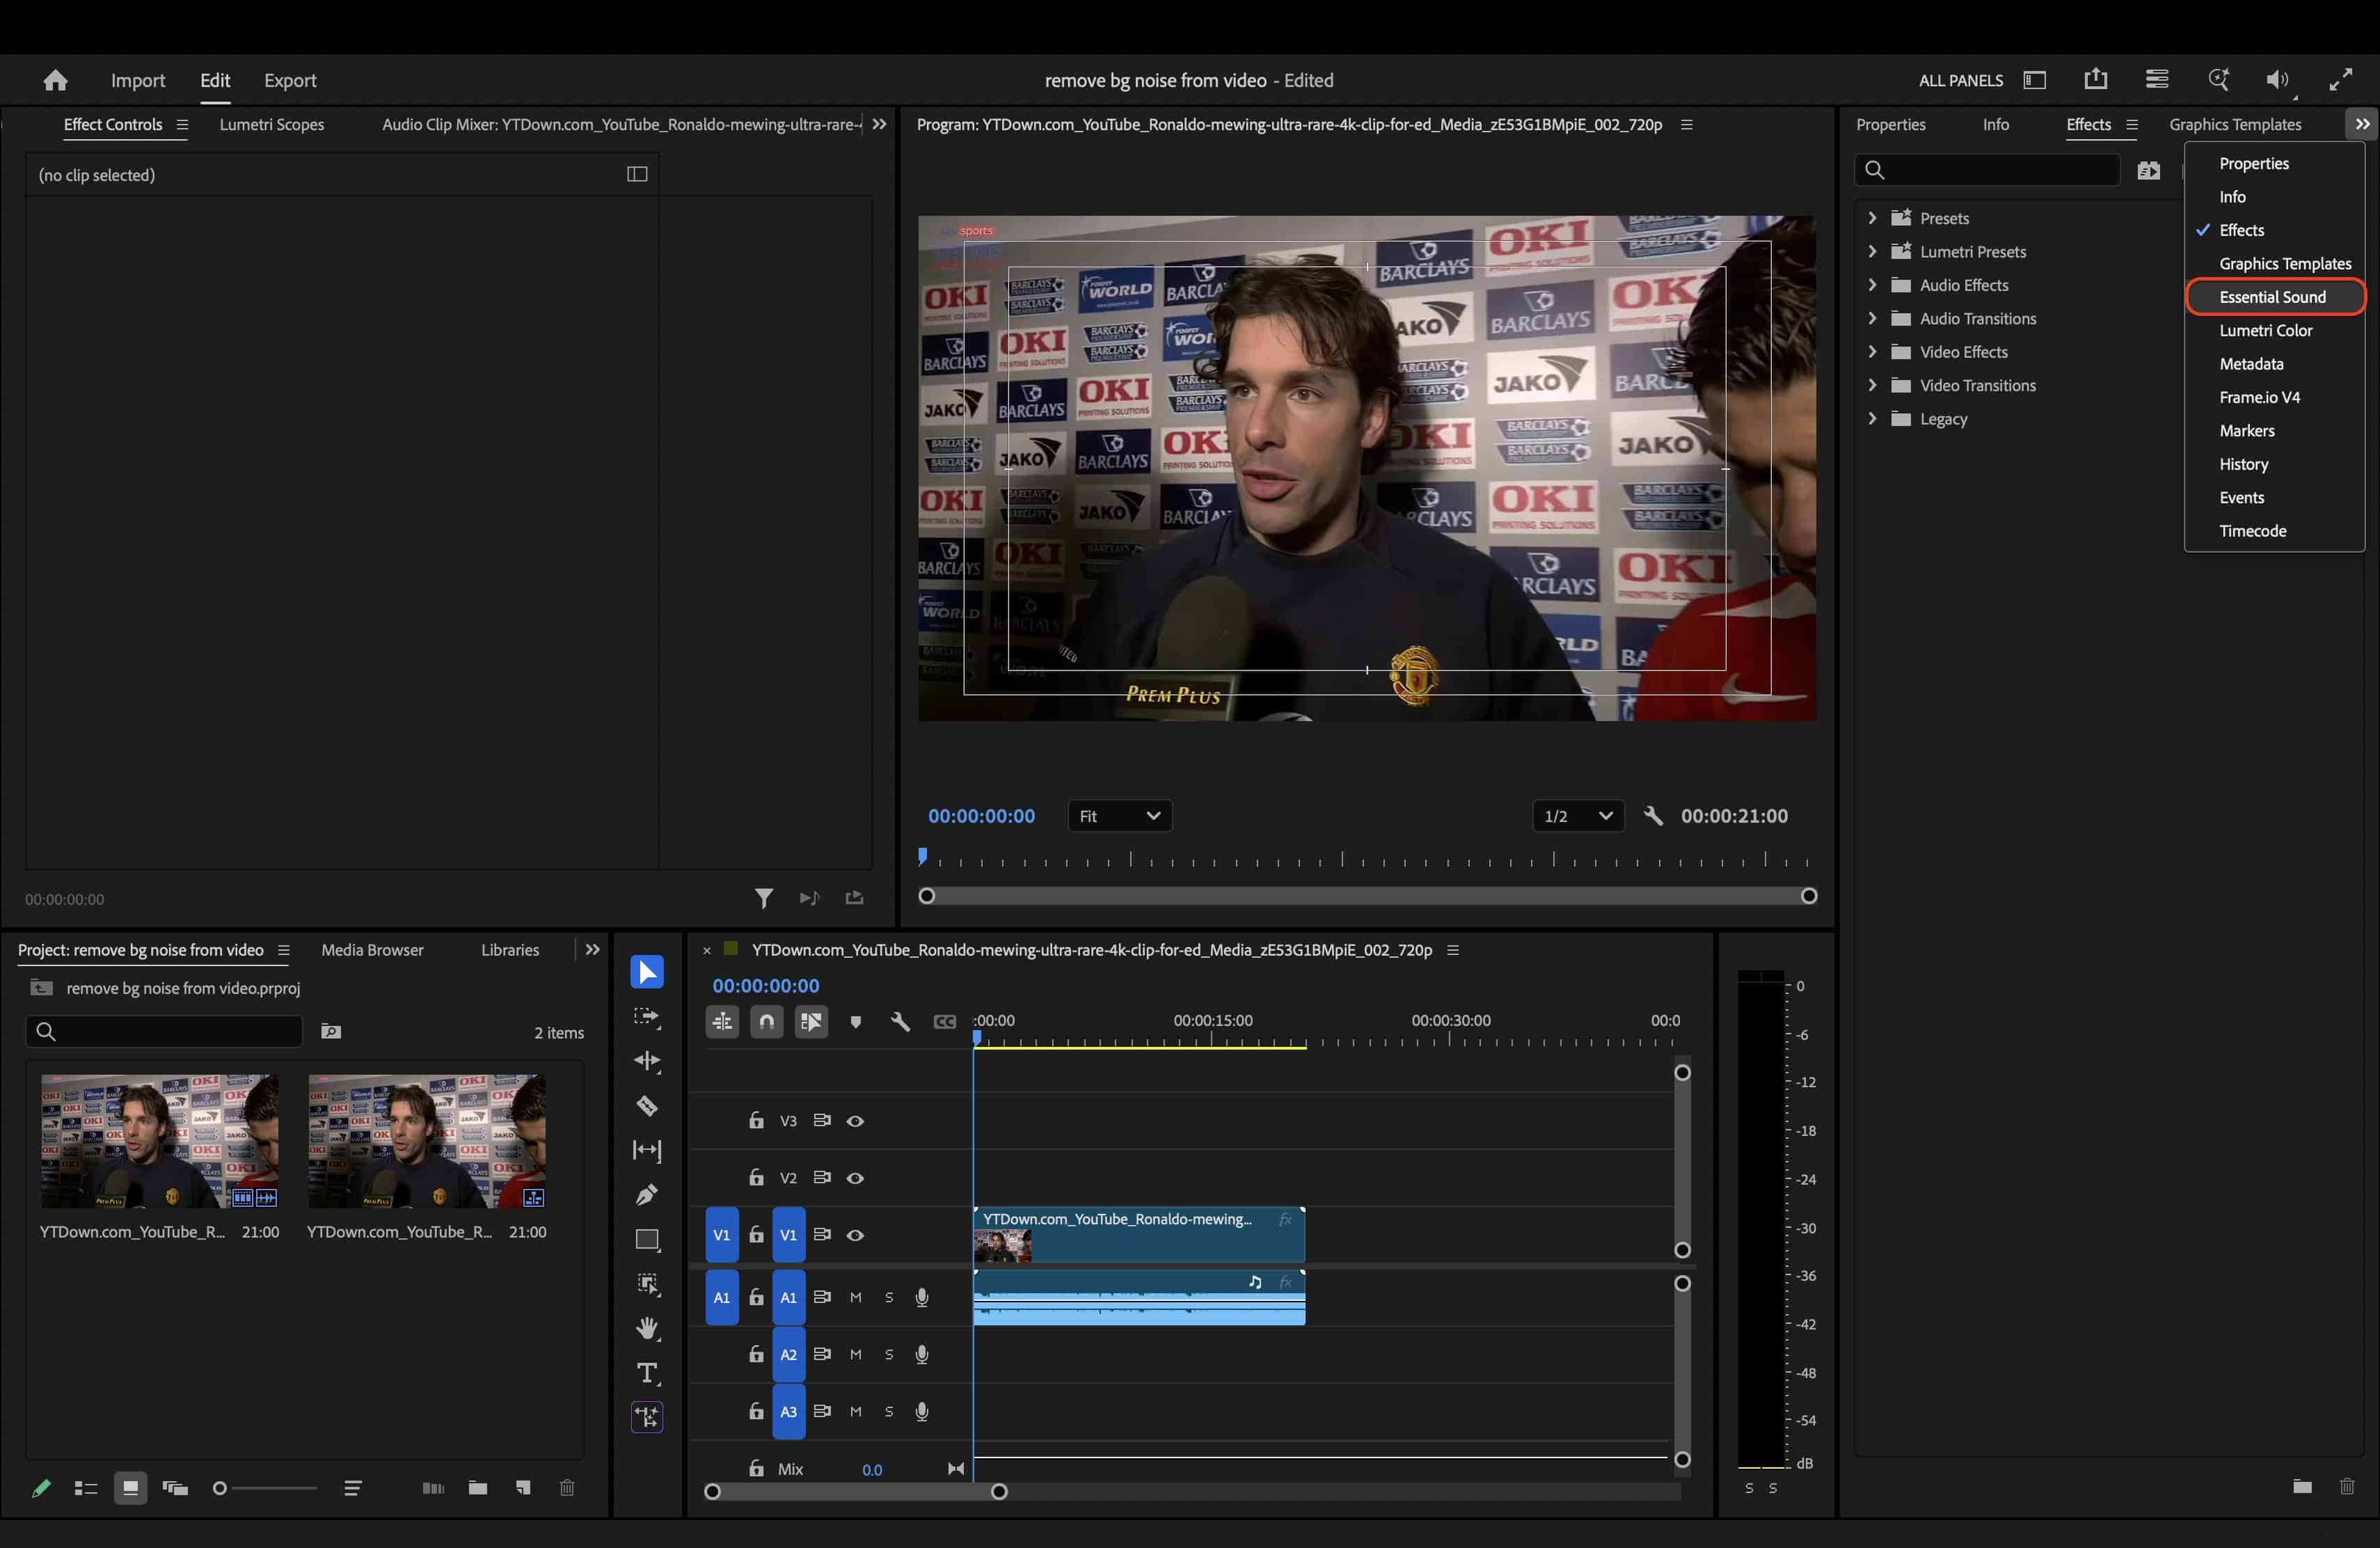
Step 2: Open the Essential Sound panel
Once your clip is on the timeline, ensure you are in the Edit workspace. Look to the panel options on the right side of your screen and select Essential Sound to reveal the dedicated audio workspace.
-
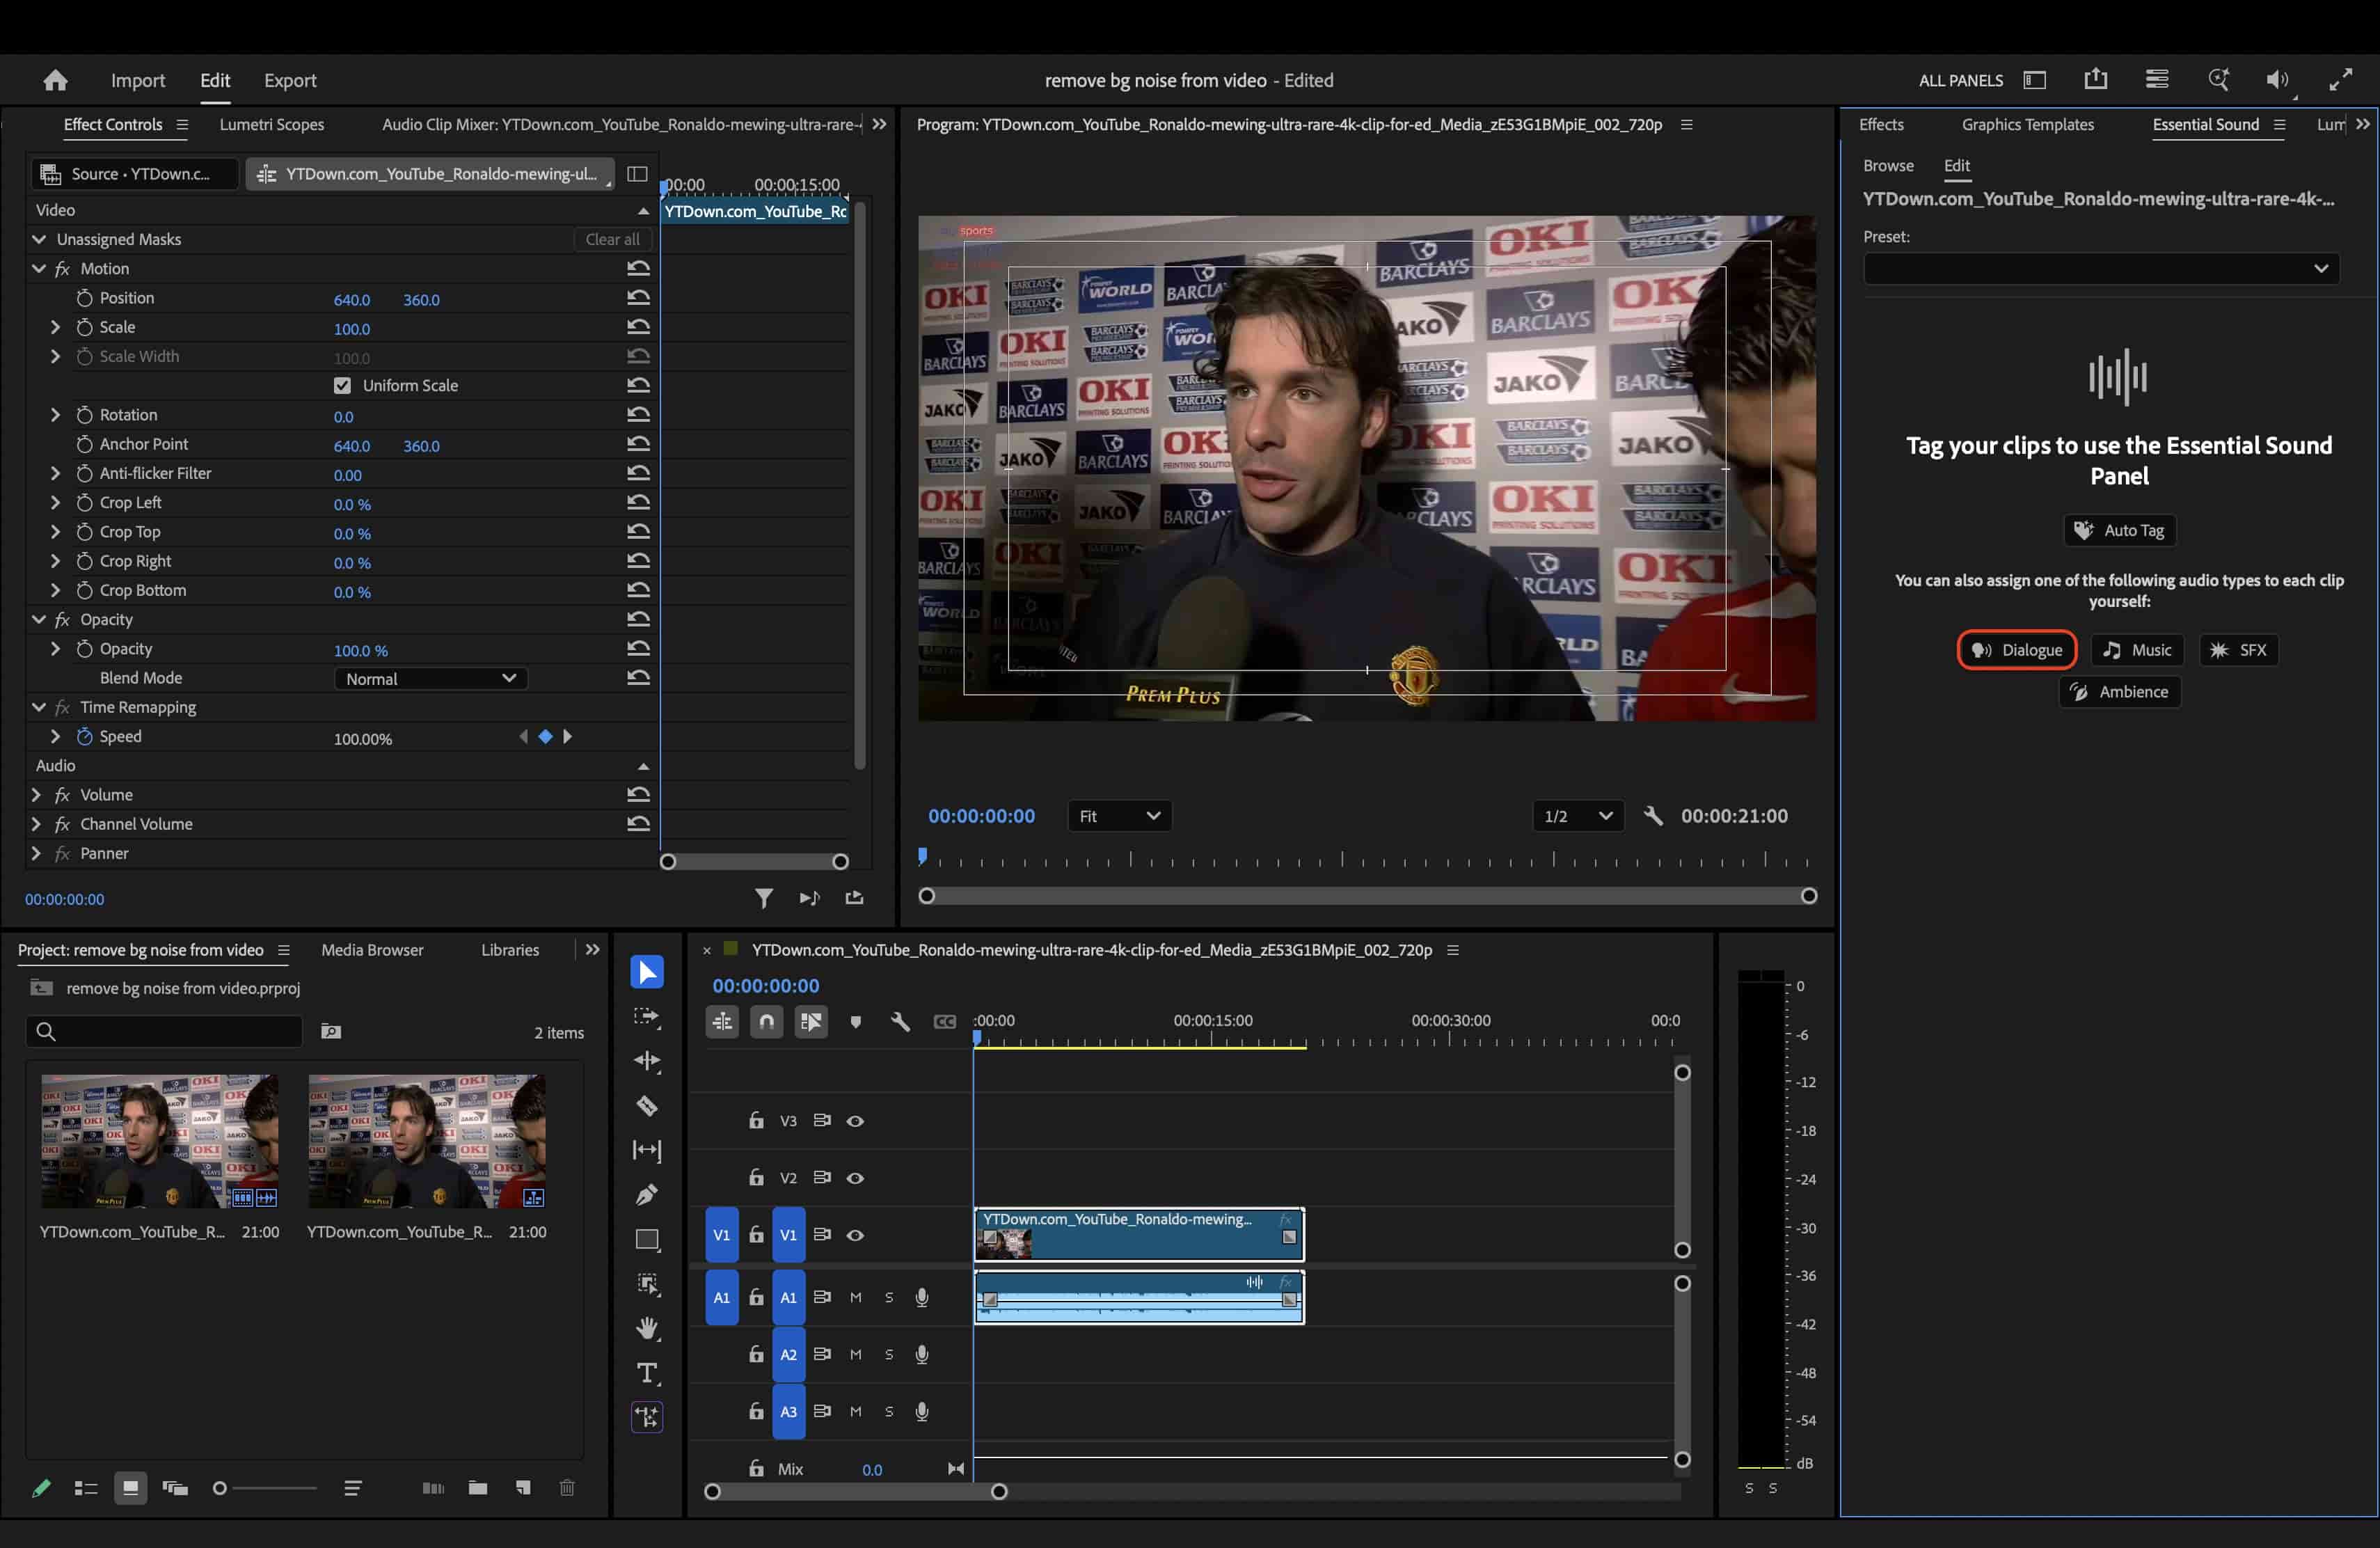
Step 3: Assign the Dialogue audio type
Select the specific audio clip down in your timeline. Moving back to the Essential Sound panel, click the Dialogue button to properly tag the clip and unlock specialized vocal repair features.
-
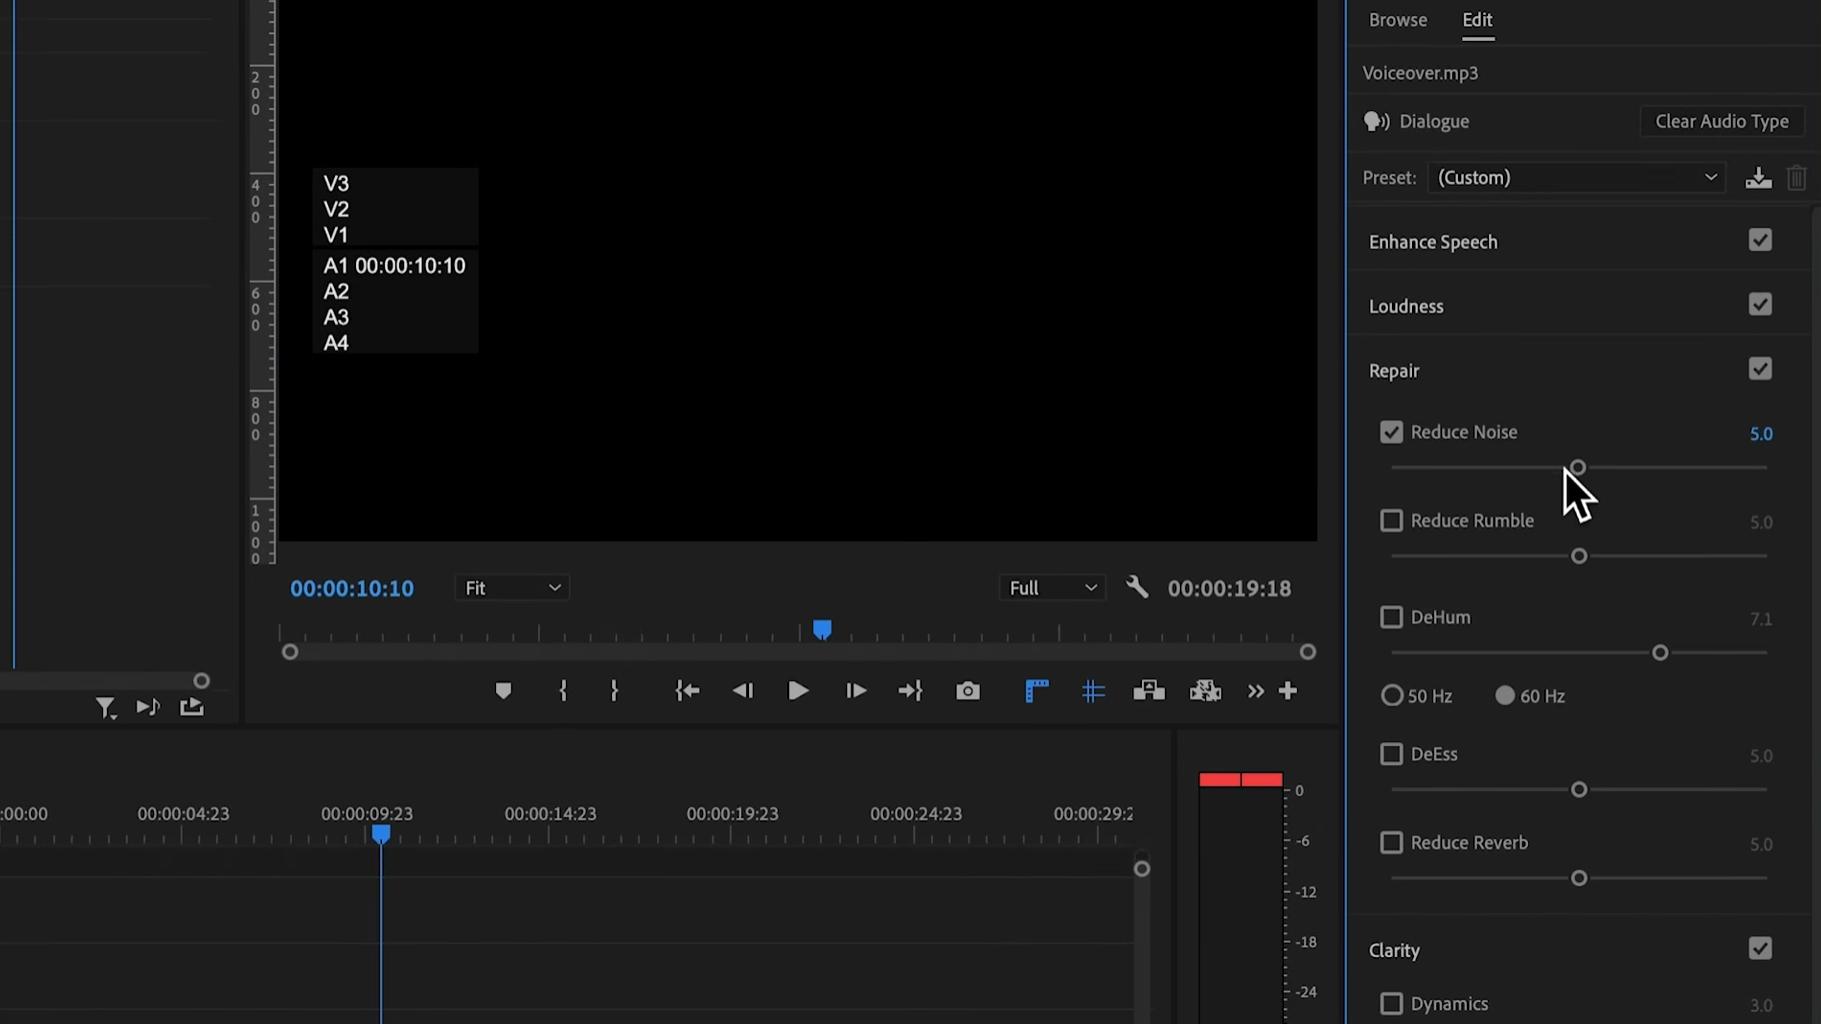
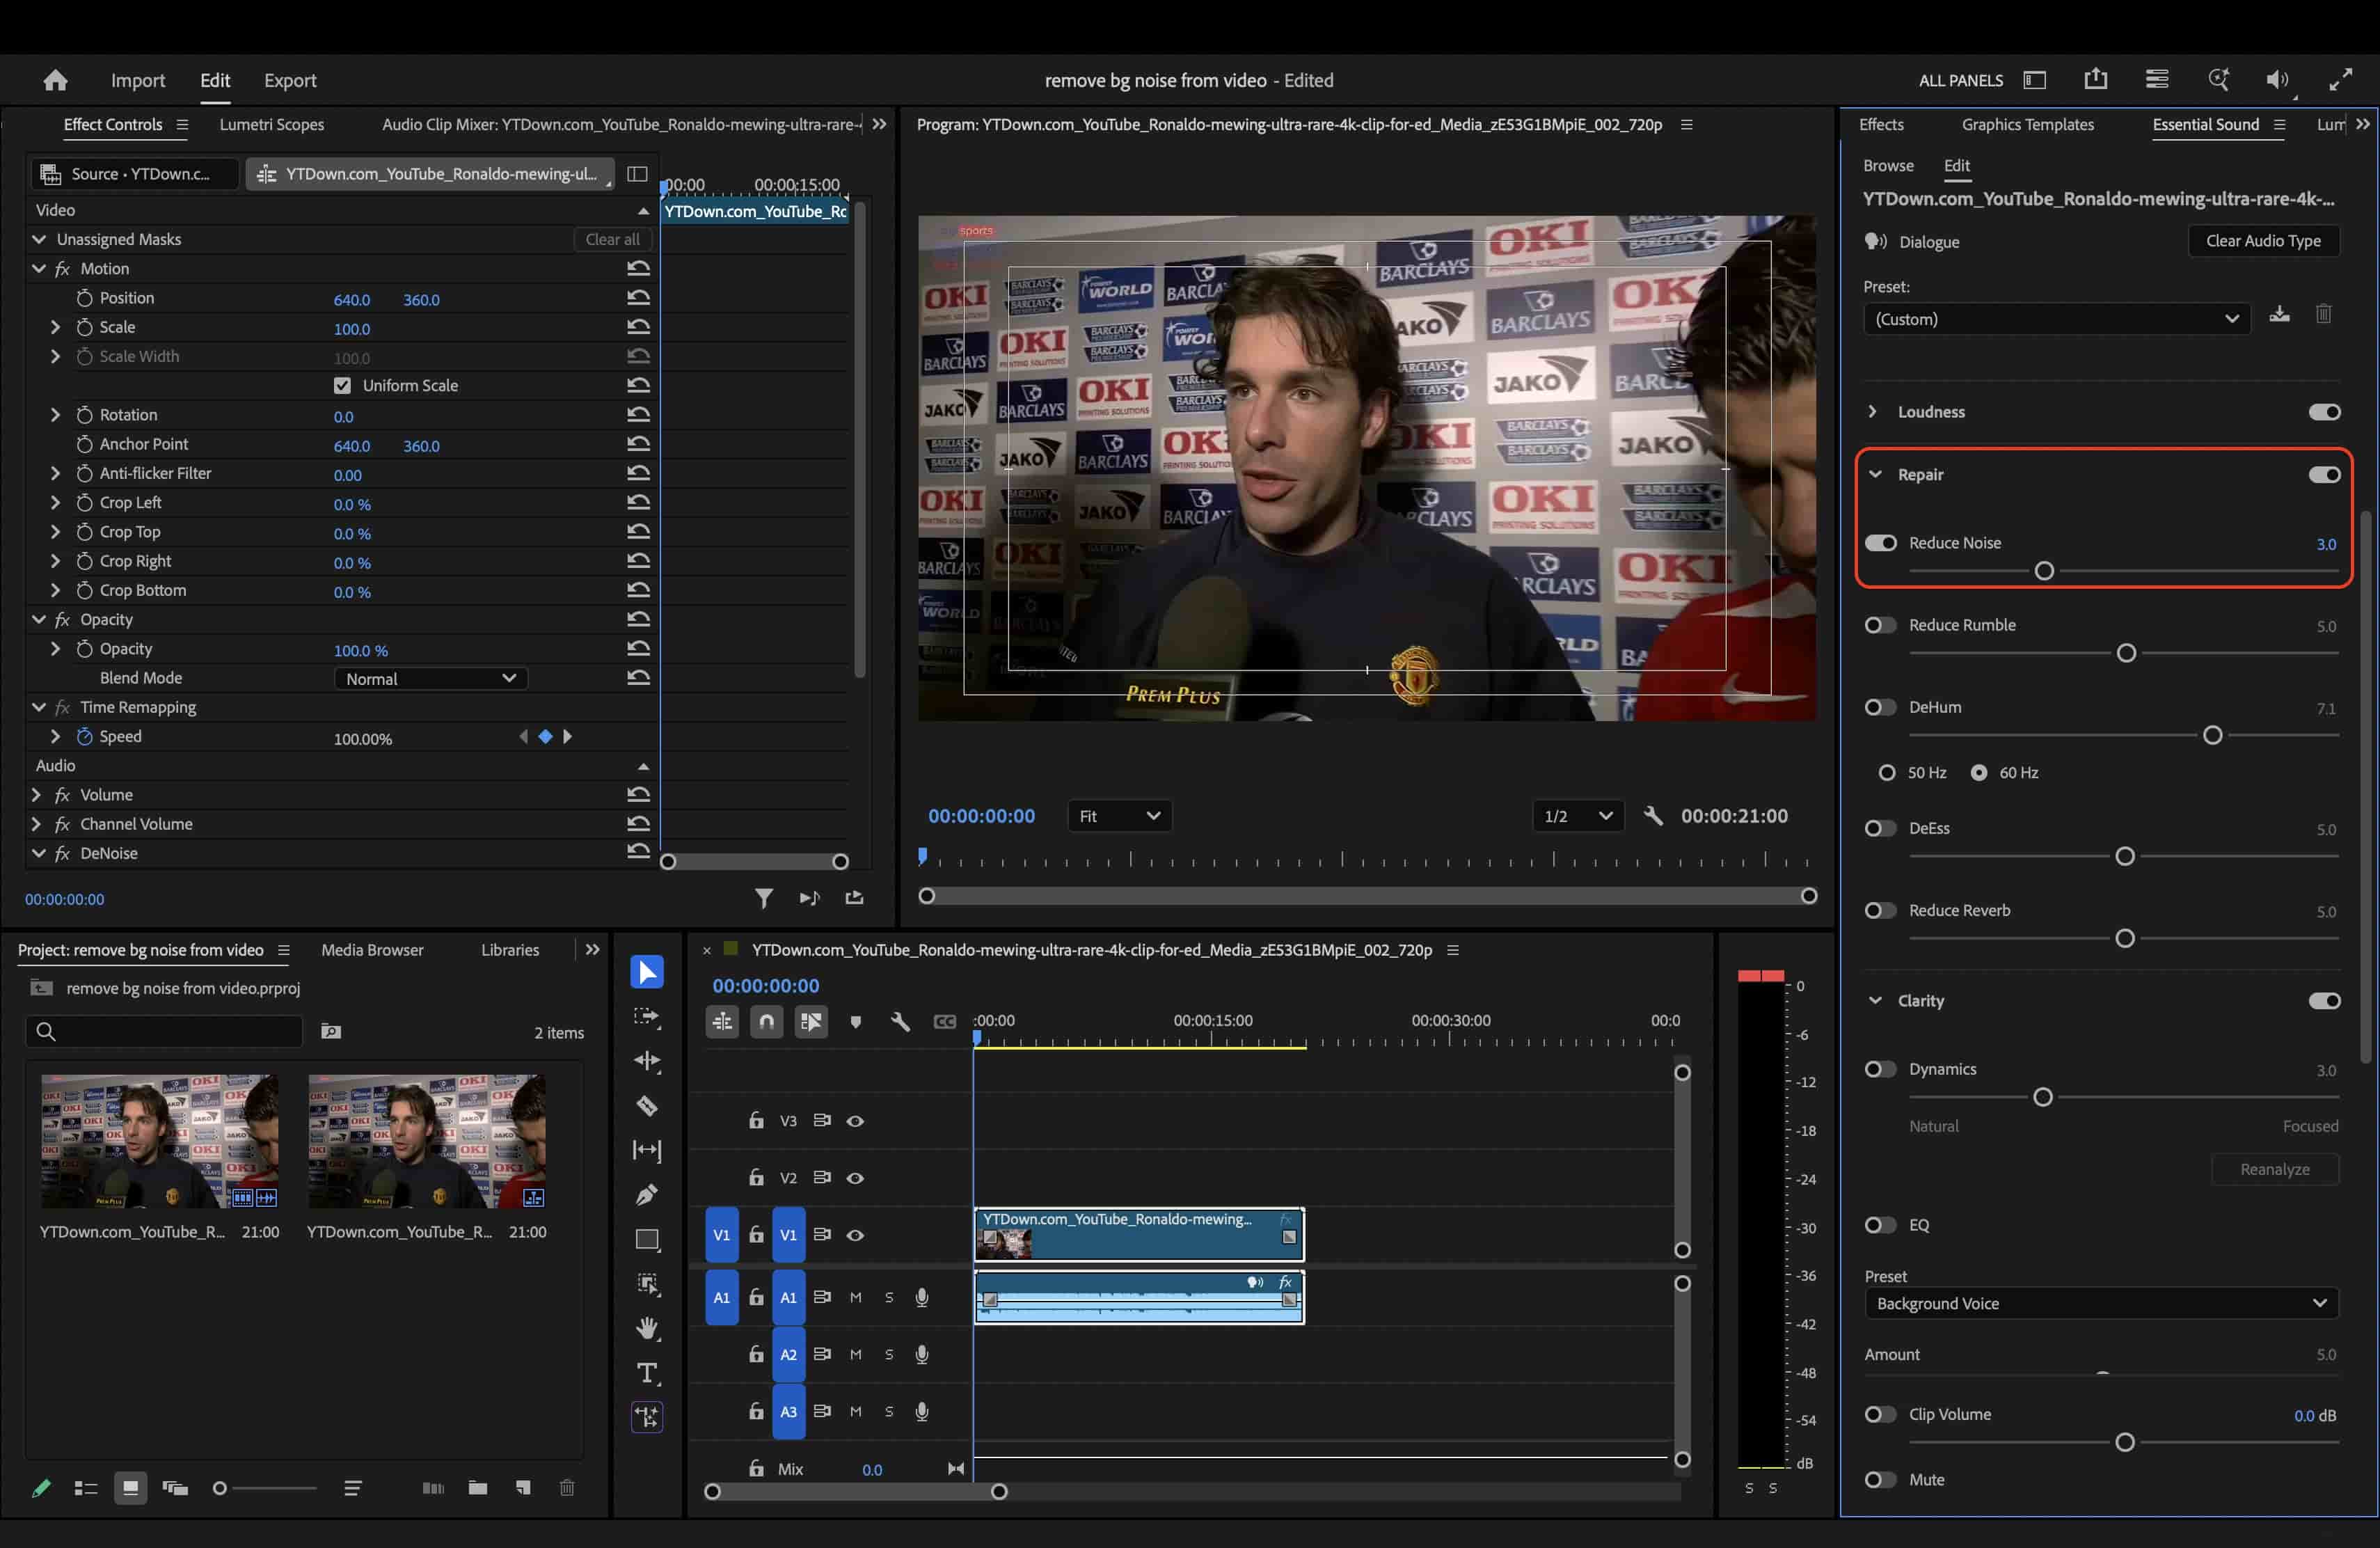
Step 4: Enable the Reduce Noise slider
Scroll down within the Essential Sound panel and expand the Repair section. Check the Reduce Noise box to activate the tool. For the best results, start with the slider set around 3.0. Pushing the slider to higher values may introduce unwanted robotic artifacts or accidentally remove natural vocal frequencies, so adjust it gradually while monitoring the playback.
-
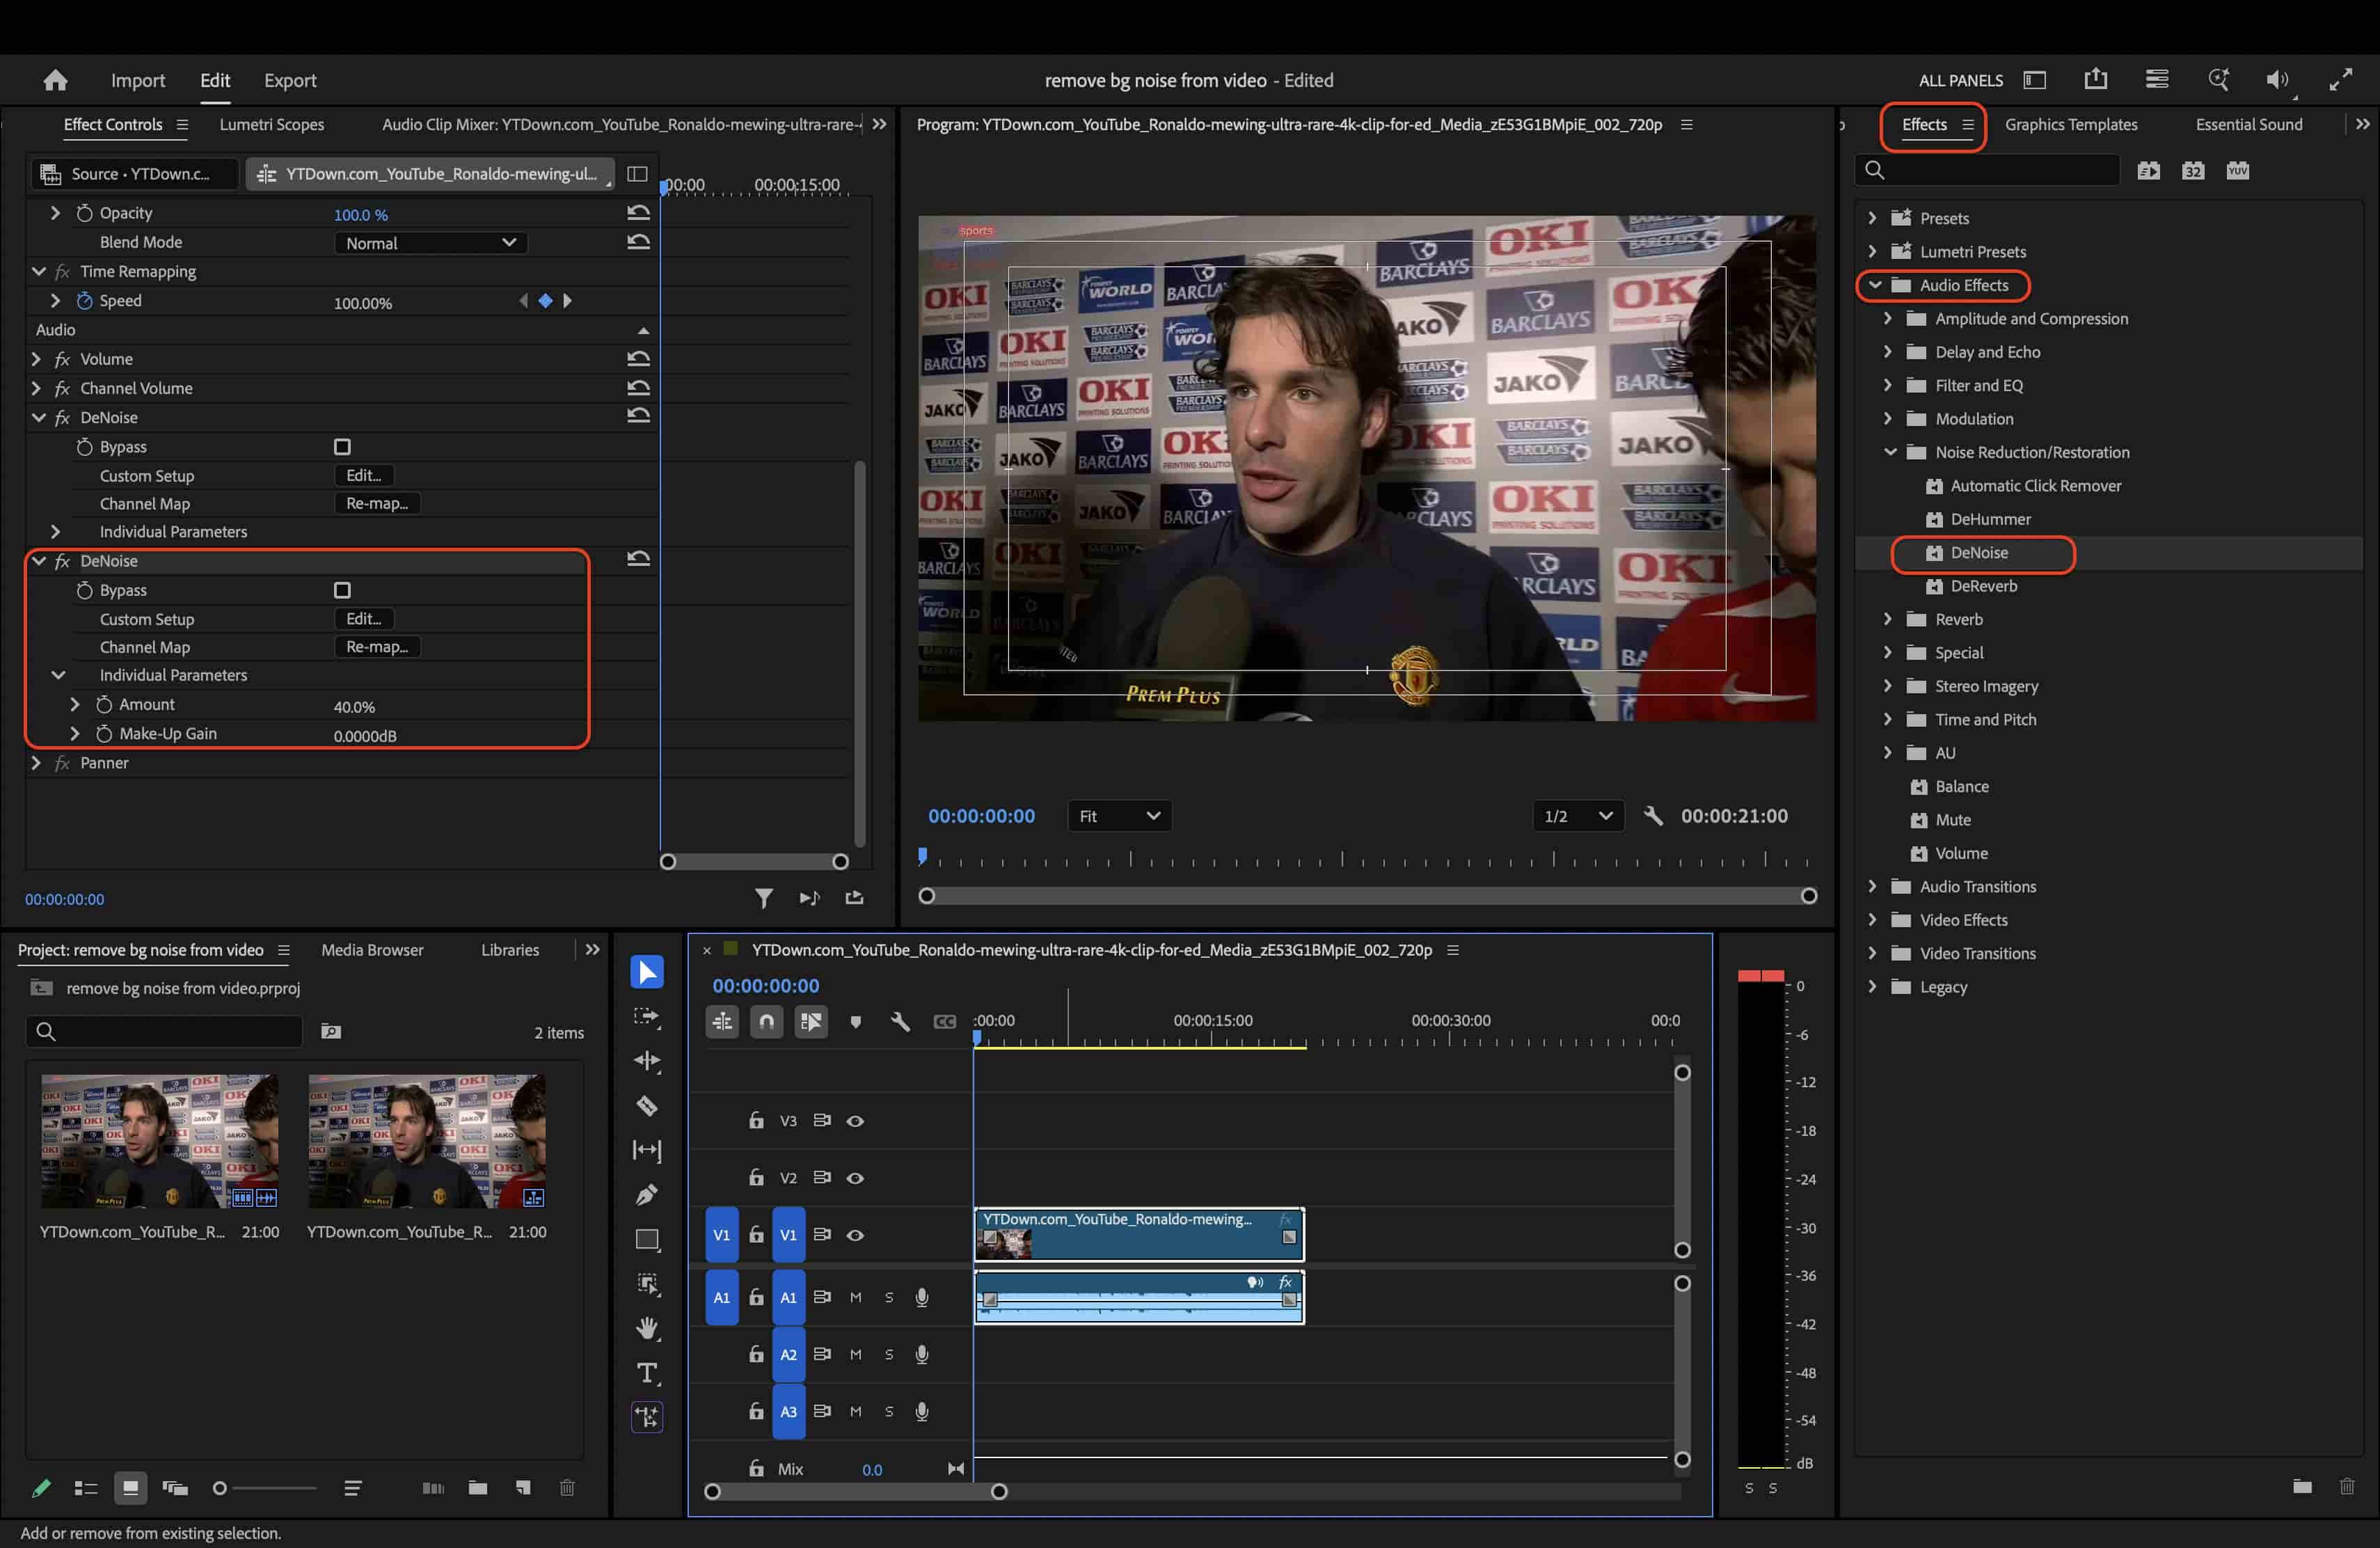
Step 5: Apply the DeNoise effect and export
Use the dedicated DeNoise effect to eliminate persistent background interference like constant hums, computer fans, or HVAC drones that remain after your initial tweaks. Open the Effects panel, navigate to Audio Effects, and drag DeNoise directly onto your clip. Adjust the reduction amount manually in the Effect Controls panel. Once finished, press "Cmd+M" (Mac) or "Ctrl+M" (Windows) to export your video.
Best practices for getting clearer audio in Premiere Pro
Applying restoration effects properly prevents robotic sounding dialogue and preserves natural tone. Combining good recording habits with subtle editing yields professional results.
|
Practice |
Why it helps |
|---|---|
|
Duplicate the original audio |
Preserves a raw backup file before applying any heavy processing that might accidentally degrade the voice. |
|
Monitor with headphones |
Reveals subtle background artifacts and frequencies that standard laptop speakers completely mask. |
|
Apply noise reduction gradually |
Prevents the dialogue from taking on an unnatural, robotic tone caused by heavy, single-pass processing. |
|
Normalize after noise removal |
Restores proper volume levels to the voice only after the unwanted background interference is eliminated. |
|
Remove hum before boosting |
Ensures that low-frequency electrical interference isn't accidentally amplified alongside the main speech. |
|
Record close to the speaker |
Captures a much stronger primary voice signal, making the isolation process significantly easier. |
|
Start in a quiet environment |
Drastically reduces the overall editing workload and reliance on heavy software fixes from the start. |
When Premiere Pro alone may not be enough:
-
Extremely noisy recordings: Heavily distorted files lack enough original signal for manual equalizers to rescue. Essential sound sliders often eliminate the voice entirely alongside the static.
-
Wind-heavy outdoor footage: Gusts register across multiple frequencies, making them exceptionally difficult to isolate. Standard reduction tools struggle to remove wind without muddying the primary speech track.
-
Multiple overlapping voices: Traditional software has trouble distinguishing a primary speaker from background conversationalists. Frequencies overlap too much for basic noise gates to process cleanly.
-
Heavy background music: Separating dialogue from a baked-in instrumental track requires complex phase cancellation. Standard editors cannot smoothly extract speech from loud melodic elements.
-
Audio clipped during recording: Once audio peaks and distorts into the red zone, the digital data is destroyed. Utilizing external techniques becomes vital to attempt frequency reconstruction.
When facing these severe audio limitations, spending hours manually tweaking sliders often results in diminishing returns (and heavily distorted vocals). Rather than abandoning the footage or struggling through complex frequency isolation, turning to a dedicated AI-powered audio restorer becomes the most practical next step. This exact scenario is where an automated tool like Vmake Labs steps in to salvage otherwise unusable media effortlessly.
Vmake Labs: Remove background noise from videos with AI
Vmake Labs serves as an online AI solution designed to seamlessly remove background noise from videos directly within a web browser. The platform streamlines post-production tasks significantly.
Vmake Labs provides an automated solution that removes unwanted background noise from uploaded videos while preserving speech clarity. The browser-based platform isolates human voices, stripping away environmental distractions without requiring complex timeline adjustments or manual slider tuning. Creators simply upload their media, and the cloud server analyzes the audio frequencies to suppress interference automatically.
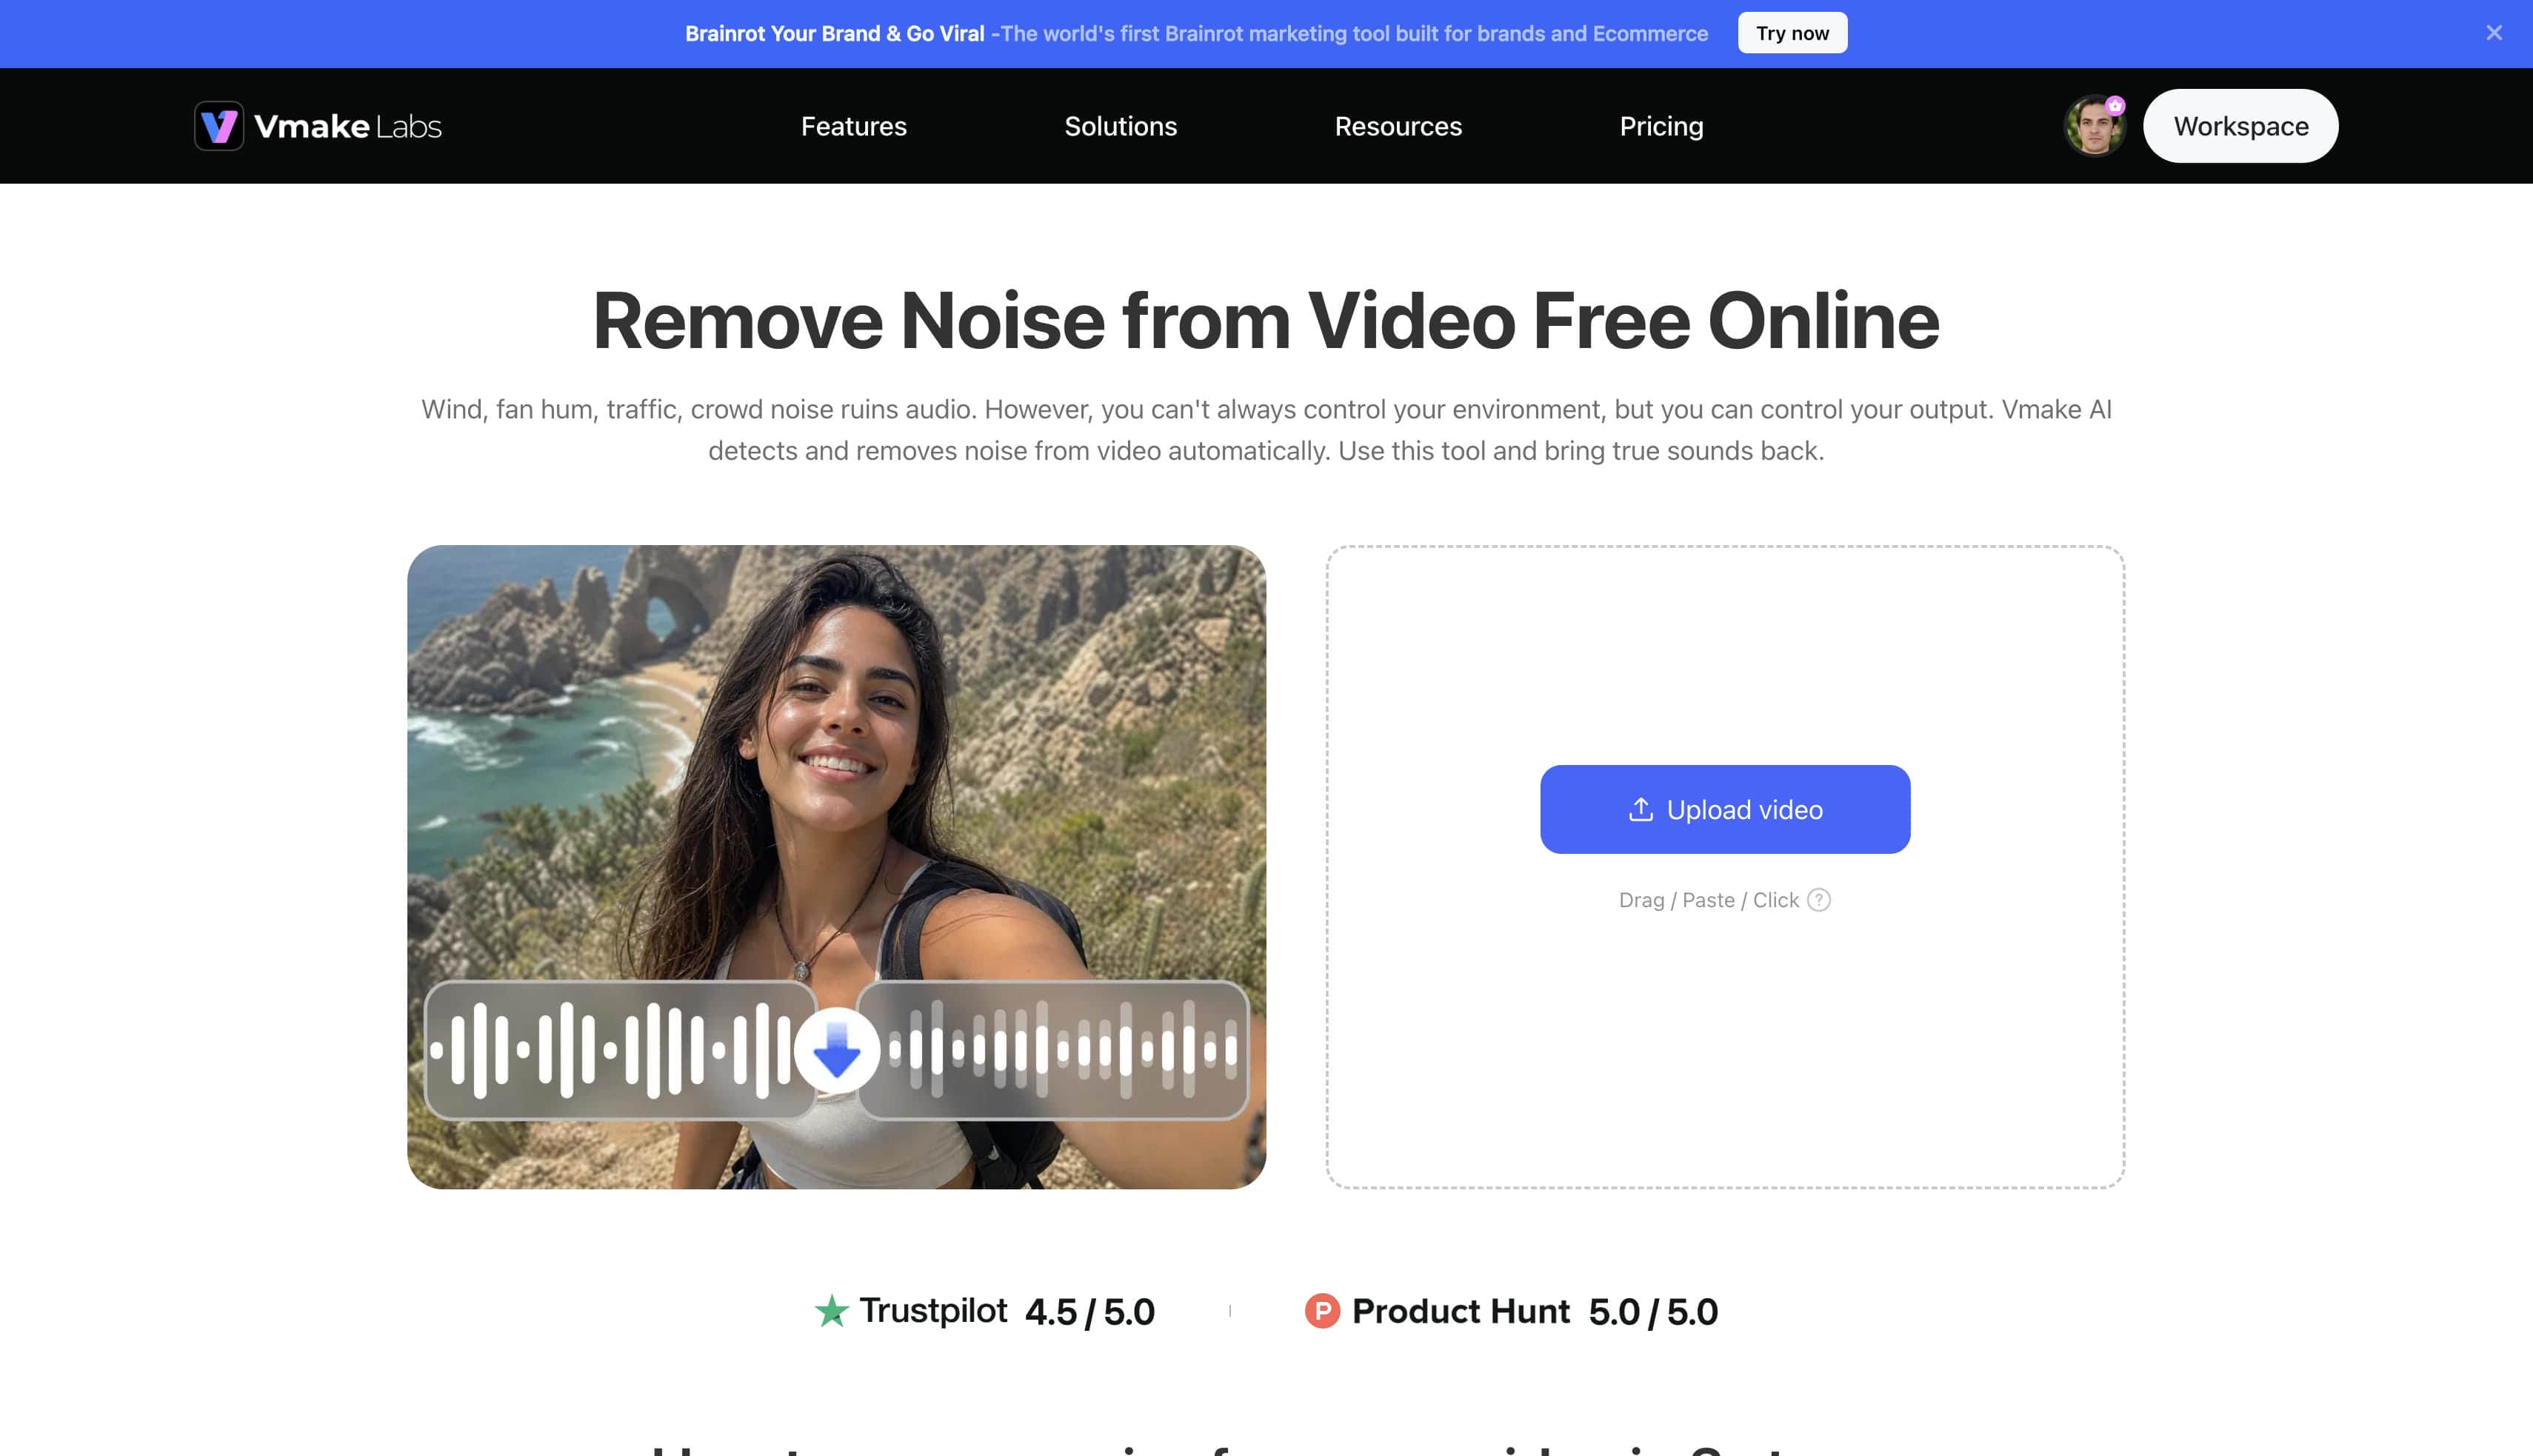
Features for removing background noise from videos:
-
Automatic background noise detection: The system identifies wind, utilizing a specialized remove wind from video algorithm, along with fan interference, traffic, keyboard clicks, and crowd sounds without manual tagging. This automatic recognition instantly processes complex audio environments upon upload.
-
Speech-focused audio enhancement: Voices remain perfectly clear while the algorithm actively minimizes surrounding distractions. Processing separates vocal frequencies from ambient sounds, utilizing a video audio enhancer to preserve natural dialogue cadence.
-
High-quality video export: The platform maintains the original visual resolution entirely after the audio cleanup concludes. Creators receive an exported file ready for immediate platform distribution without worrying about unexpected compression drops.
How to remove background noise with Vmake Labs:
-
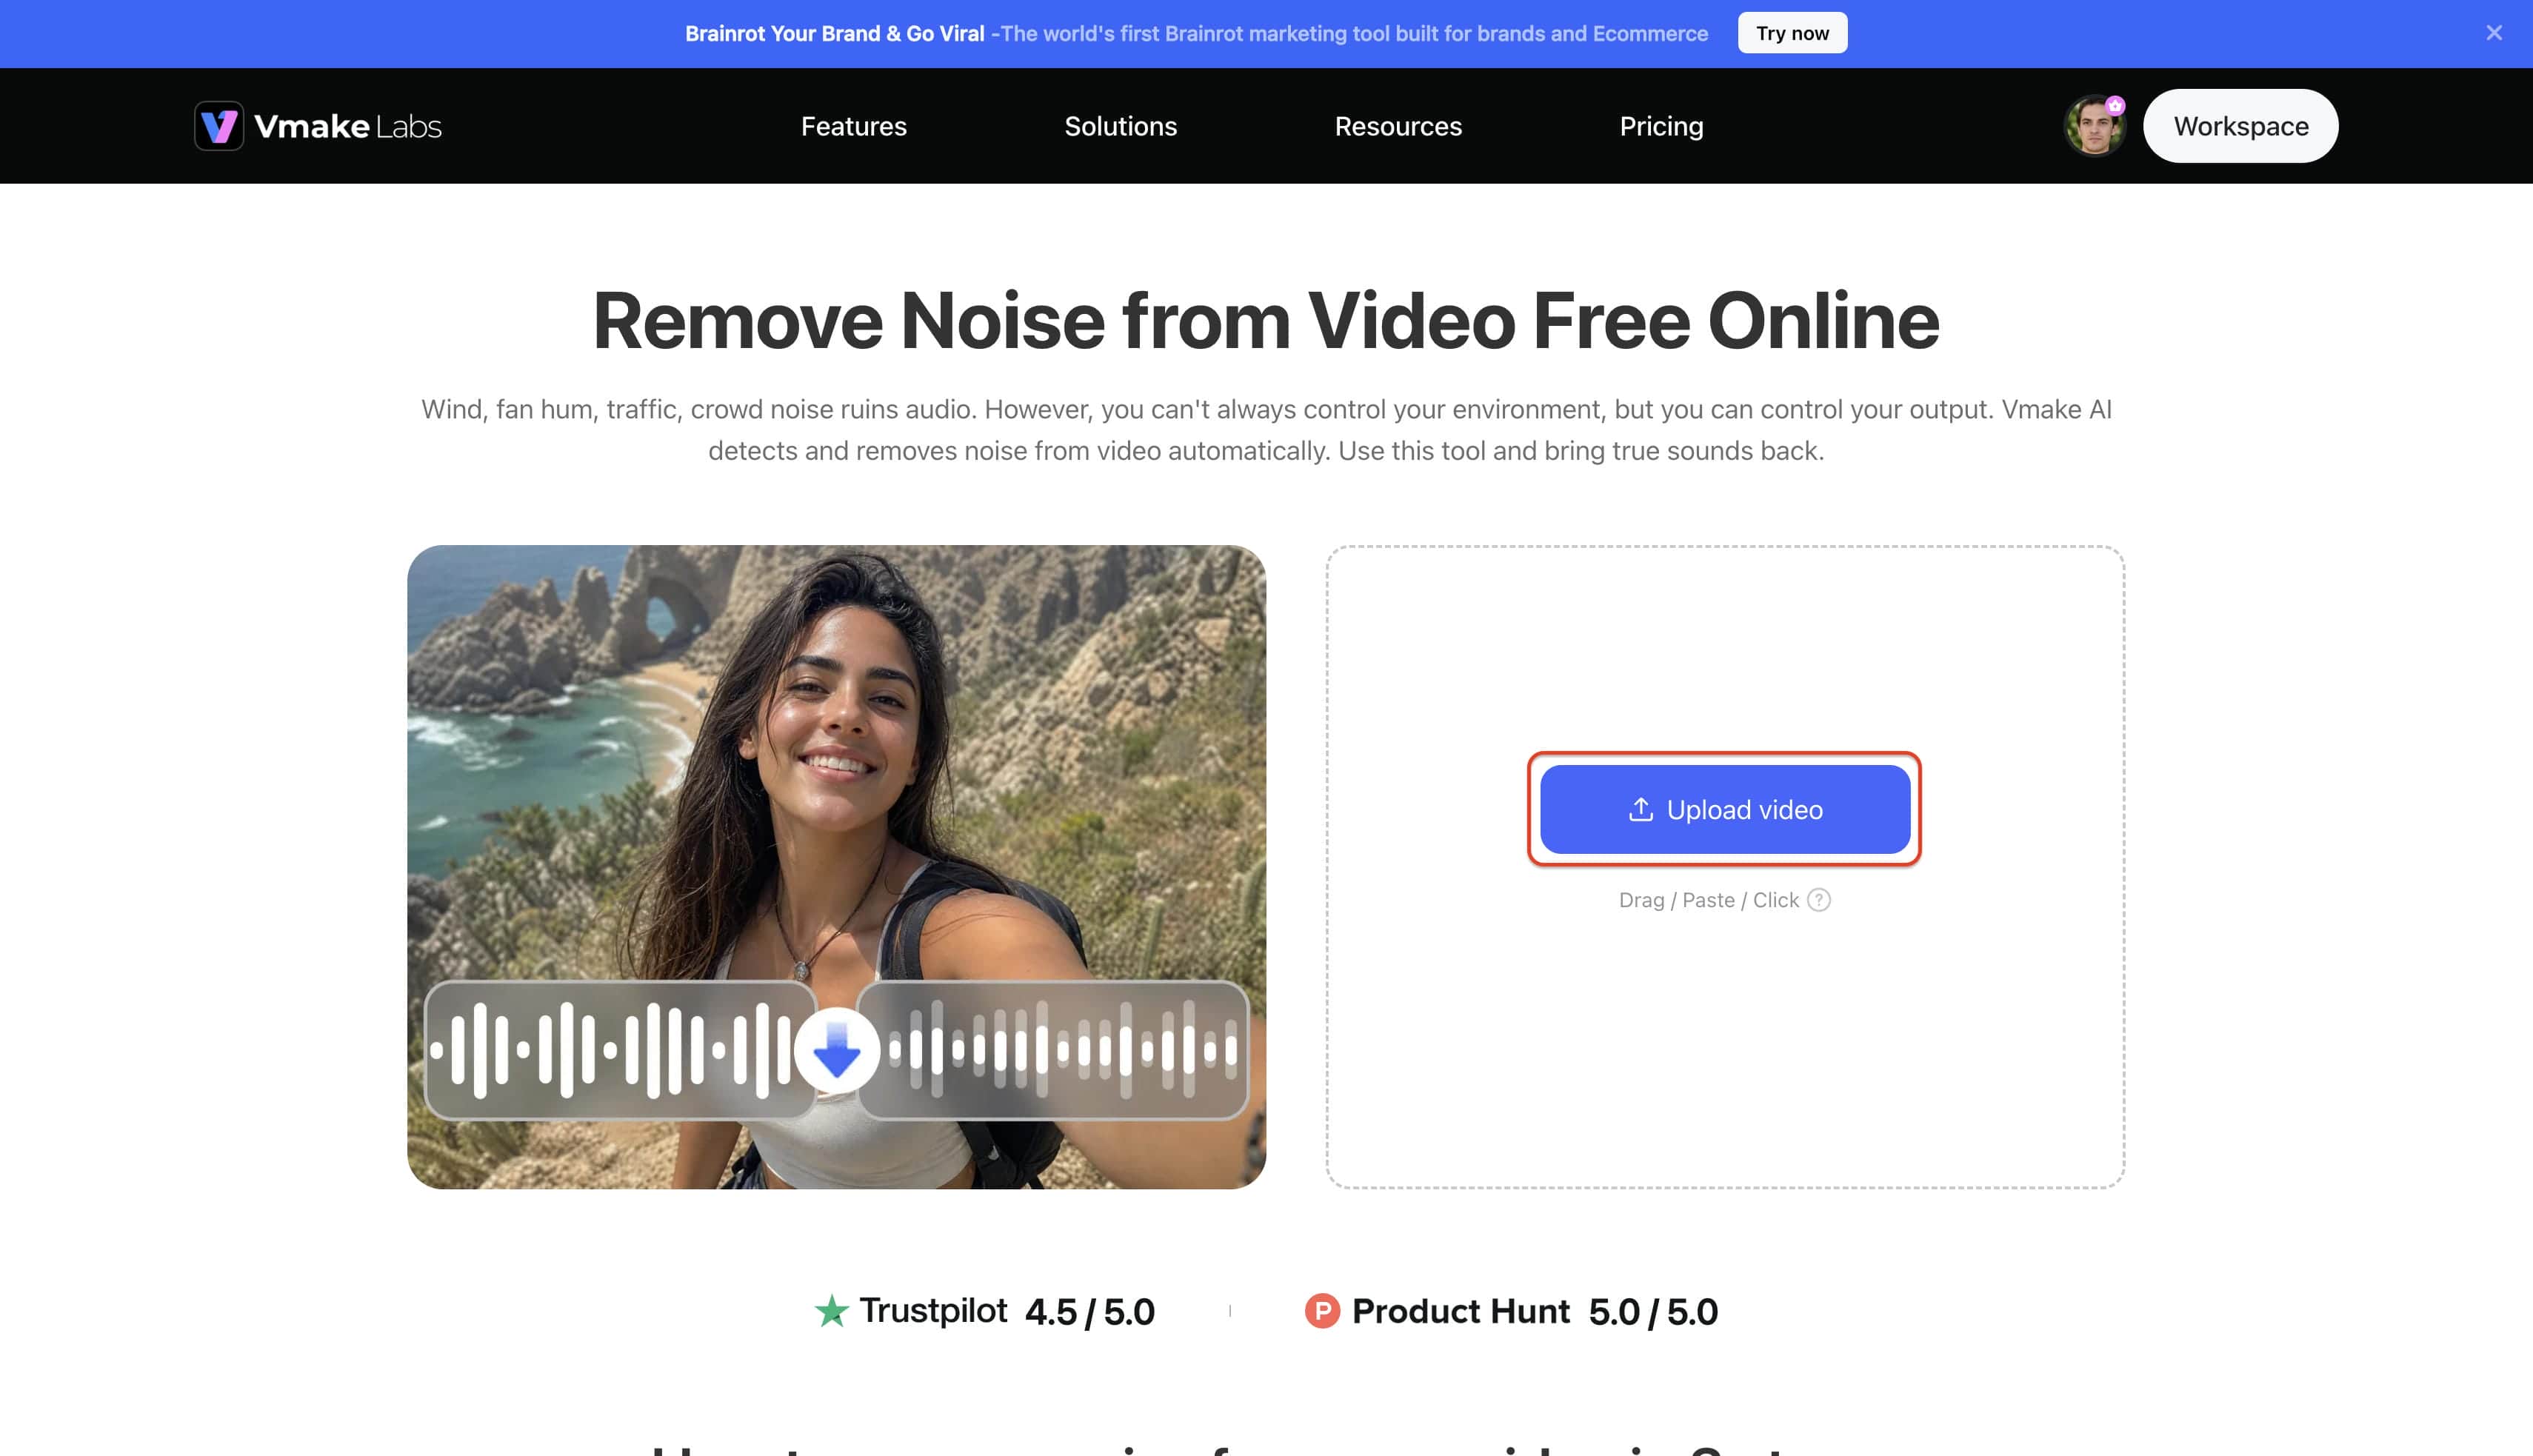
Step 1: Upload your video file
Head over to the Vmake Labs noise removal tool and just hit the "Upload video" button. Don't worry about converting anything beforehand, as the tool plays nice with plenty of different formats.
-
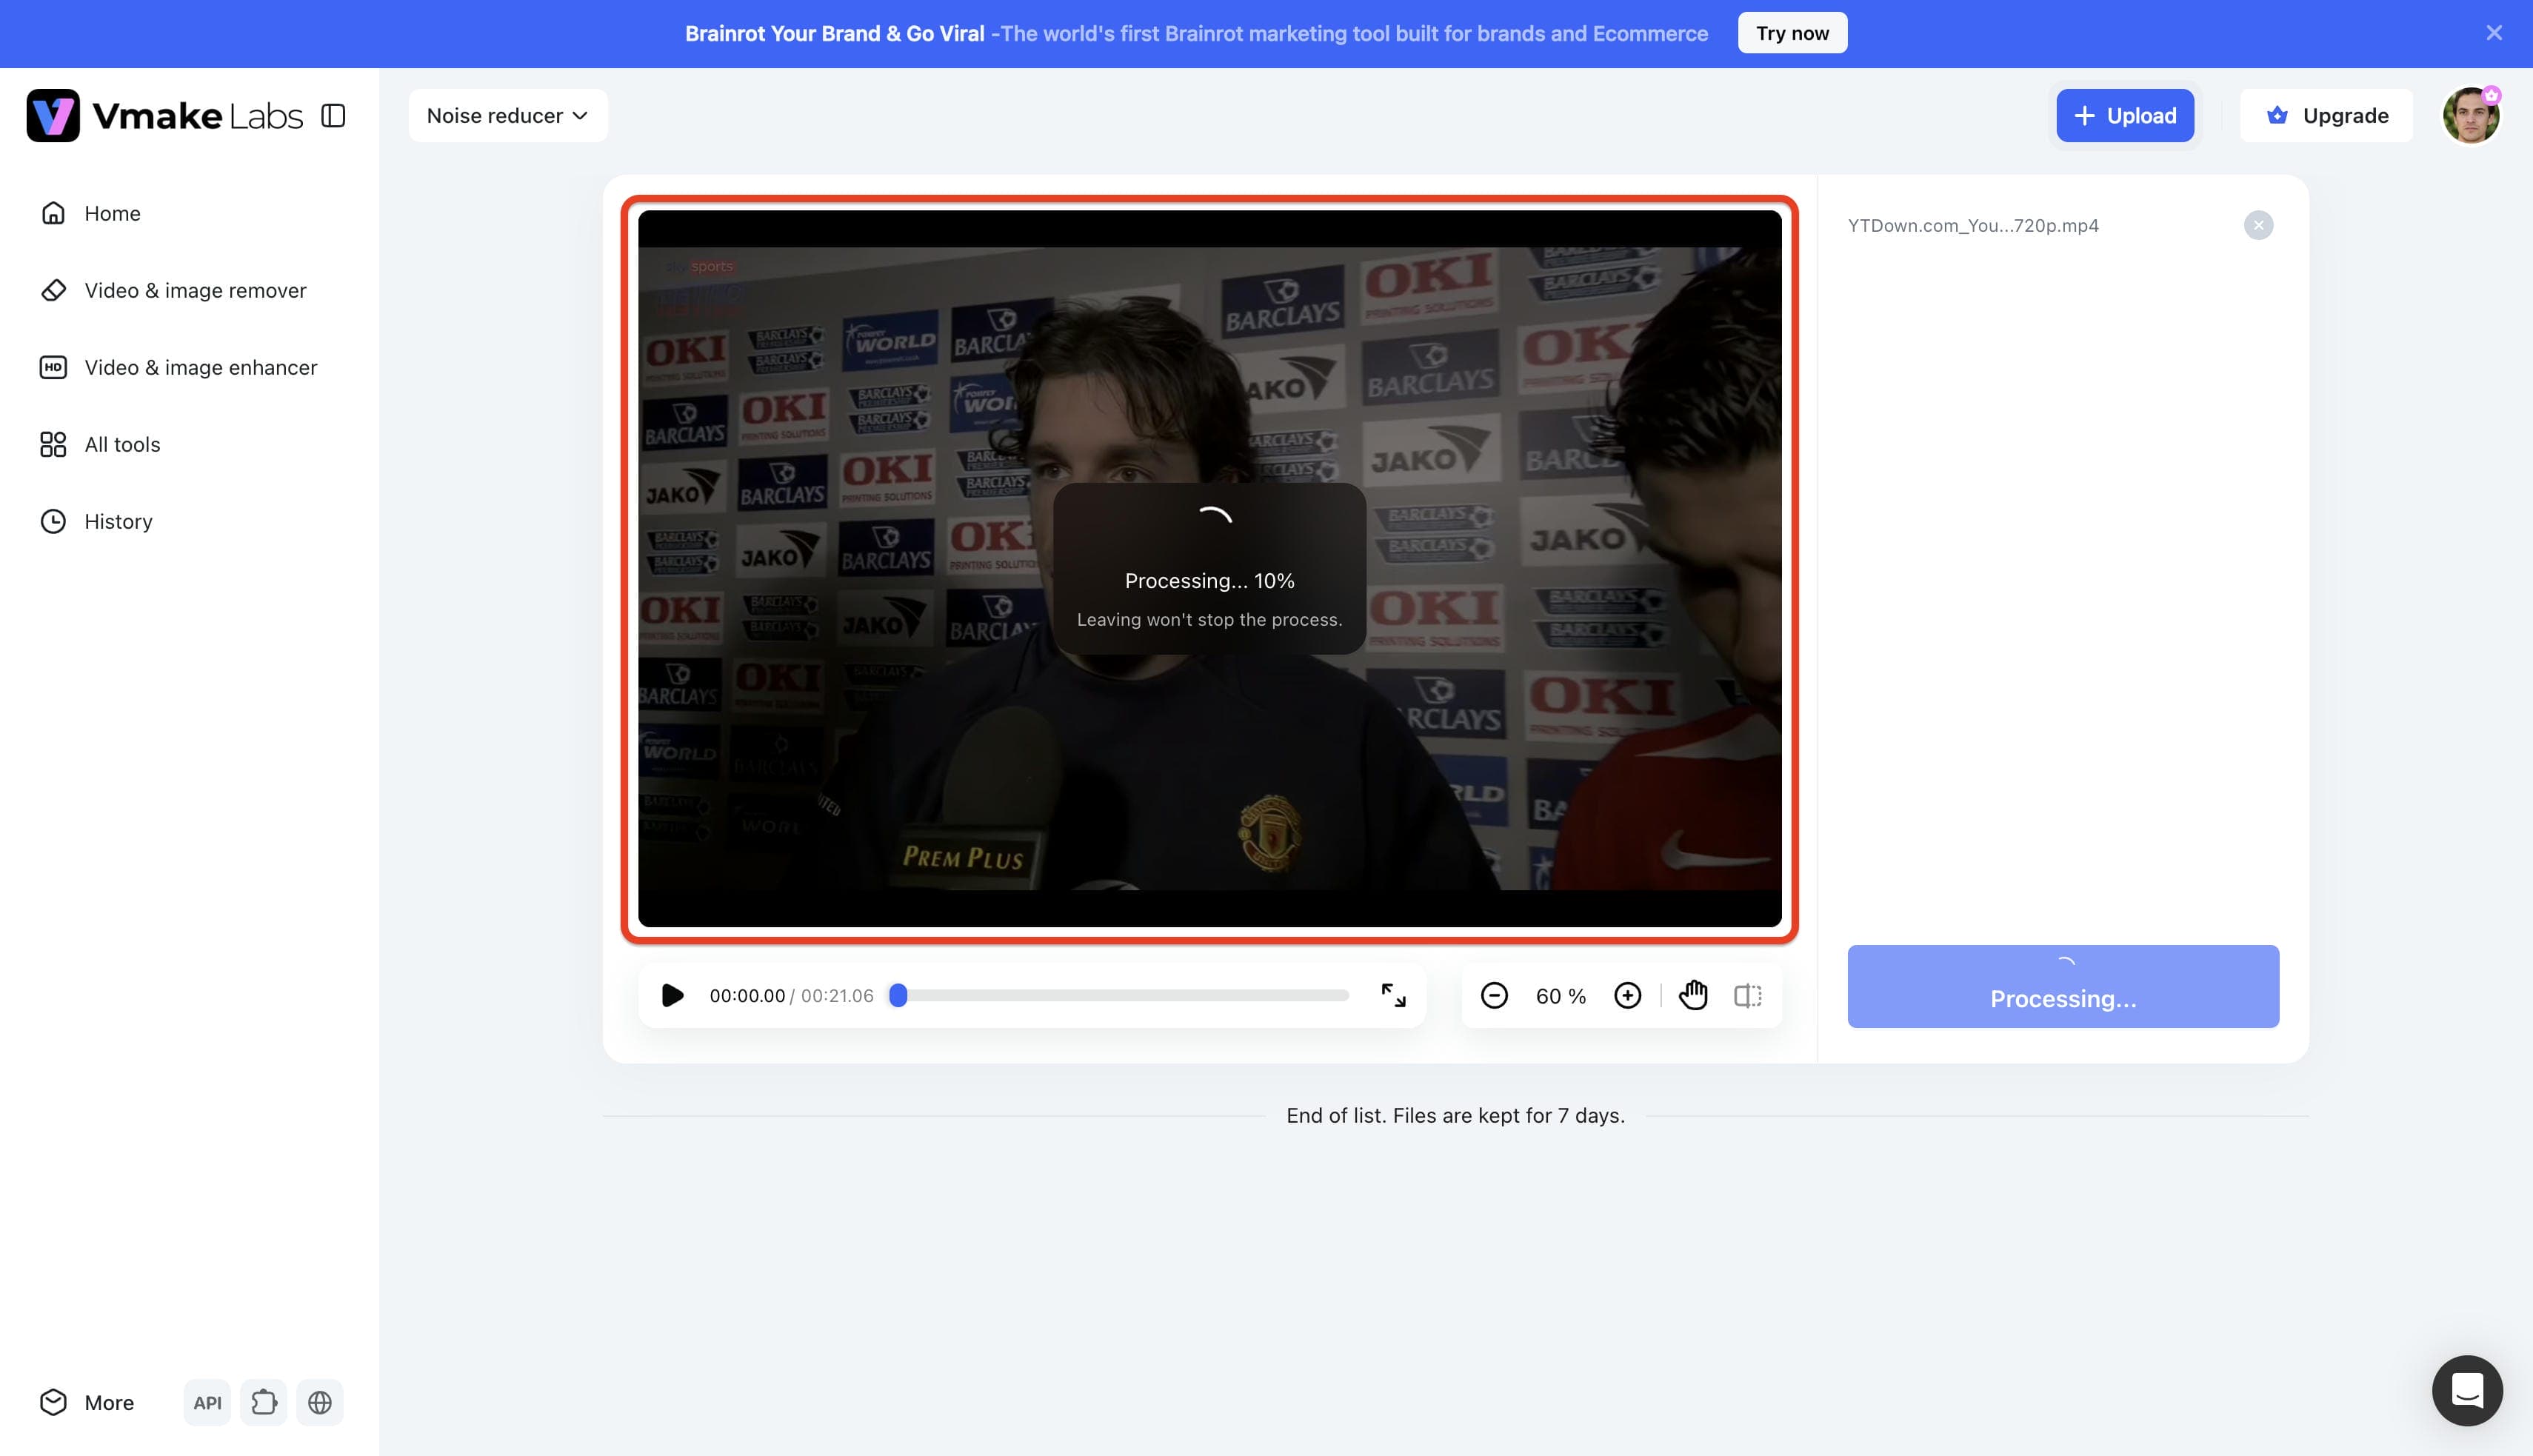
Step 2: Let the AI process the audio
The second your video hits the system, the automation takes over. It immediately starts scanning the audio to isolate whatever junk is burying your speech, whether that's a harsh gust of wind, a whirring desk fan, traffic rumble, or a noisy crowd.
-
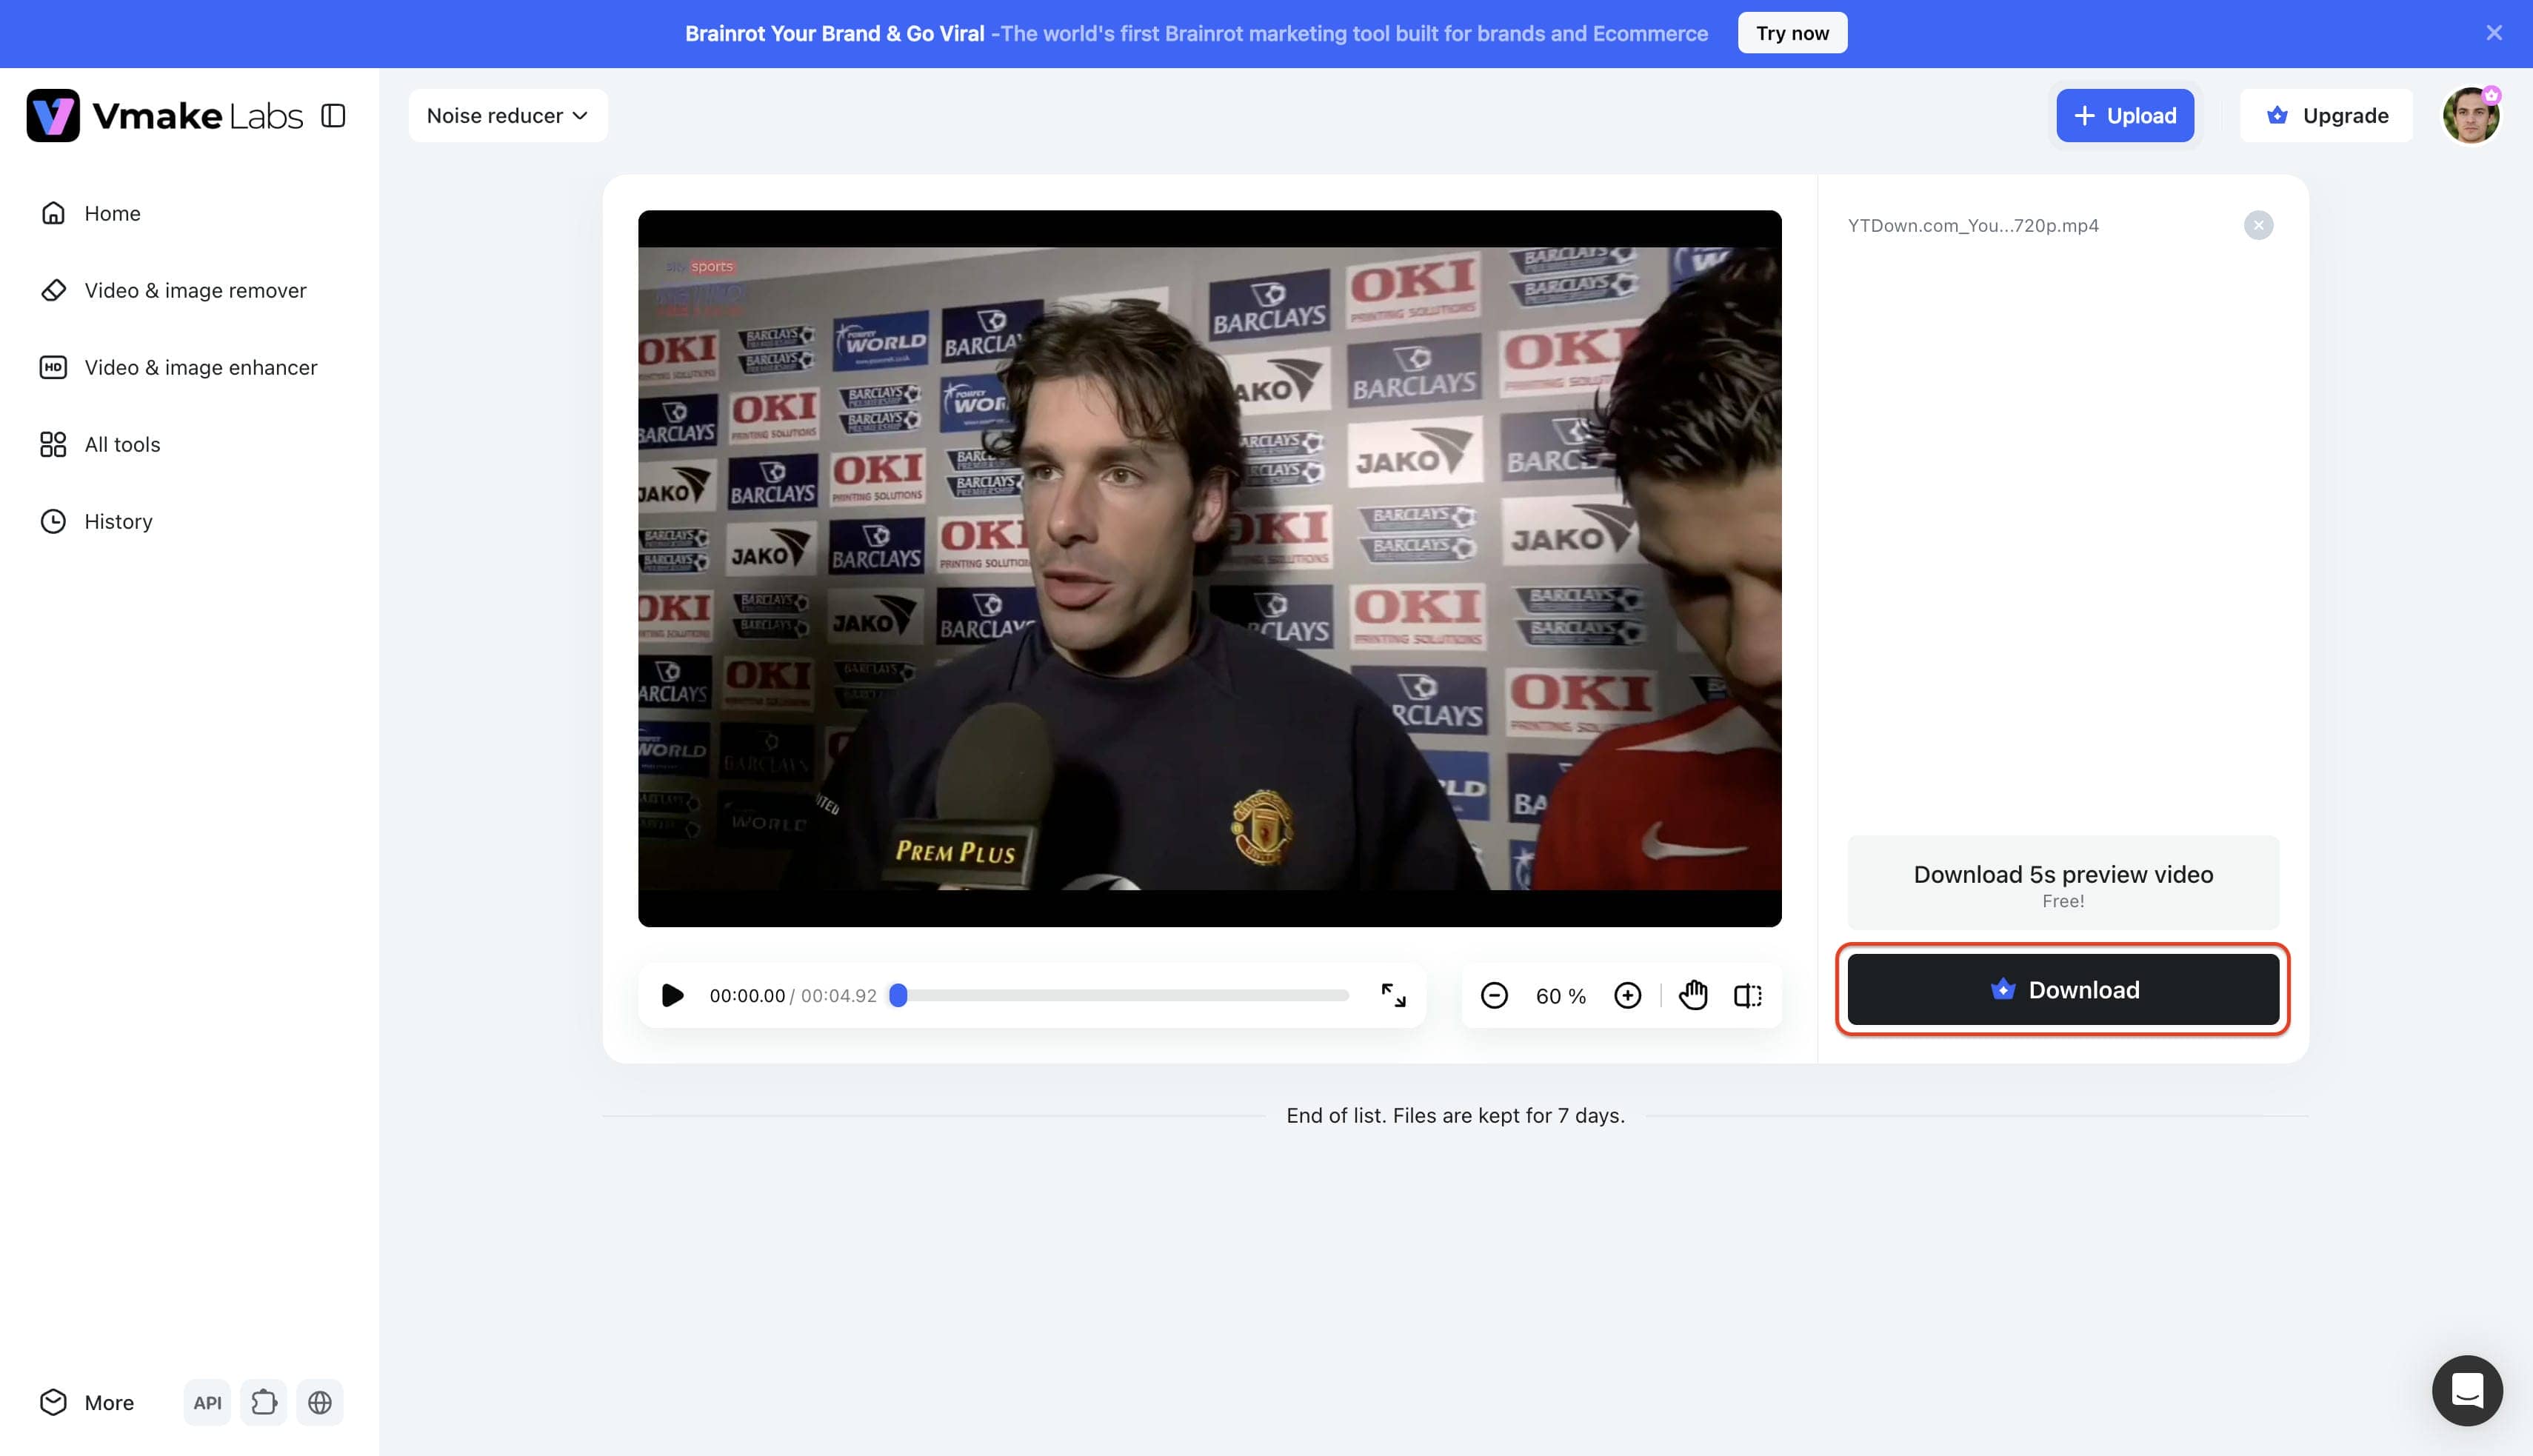
Step 3: Preview and download your polished media
Before you wrap up, use the preview window to listen back and make sure the audio sounds right. If the speech is clear and you're happy with it, go ahead and hit the "Download" button to save the fresh, cleaned-up file.
Premiere Pro vs Vmake Labs AI noise remover
Choosing between manual software and AI automation depends on project timelines and desired control levels. Comparing both approaches helps determine the best fit for specific audio restoration tasks.
|
Feature |
Premiere Pro |
Vmake Labs AI noise remover |
|---|---|---|
|
Noise removal approach |
Manual controls with Enhance Speech, Essential Sound, and audio effects. |
AI automatically detects and removes unwanted background noise. |
|
Ease of use |
Requires familiarity with complex audio editing tools. |
Beginner-friendly with a simple upload-and-process workflow. |
|
Editing control |
Extensive manual adjustments for dialogue and effects. |
Automatic optimization with minimal manual intervention. |
|
Processing speed |
Depends on manual editing and fine-tuning. |
One-click processing for faster audio cleanup. |
|
Speech preservation |
Good results with proper manual adjustments. |
AI prioritizes speech while reducing background distractions. |
|
Best for |
Professional video editing projects requiring precise control. |
Quickly cleaning existing videos with minimal effort. |
|
Learning curve |
Moderate to advanced. |
Very low. |
|
Platform |
Desktop application. |
Browser-based online tool. |
|
Ideal users |
Video editors, filmmakers, and content creators needing advanced editing. |
Creators, educators, marketers, and anyone wanting fast background noise removal. |
If a project demands detailed control over every aspect of the audio mix, Premiere Pro remains the stronger choice.
Alternatively, if the goal involves cleaning up files rapidly, an AI audio enhancer like Vmake Labs provides a significantly faster one-click workflow while keeping speech incredibly clear.
Conclusion
Understanding how to get back clear audio in Premiere Pro using Enhance Speech, Essential Sound, and targeted audio effects solves many common sound issues. High quality initial recordings consistently produce better results than aggressive post-production editing. For individuals desiring a quicker workflow on existing media, Vmake Labs offers a highly efficient AI-powered option to remove unwanted background noise while keeping speech perfectly natural. Evaluating project deadlines and technical familiarity ultimately determines the best approach for achieving crisp, professional audio outcomes.
FAQs
How do I clean up background noise in Premiere Pro?
Using the Essential Sound panel allows editors to assign audio as dialogue and apply the Reduce Noise slider. Adding the DeNoise effect provides further control over specific frequency reductions.
Does Premiere Pro have an AI noise removal feature?
Adobe introduced Enhance Speech, which utilizes AI algorithms to clarify dialogue. It processes audio directly within the timeline to isolate voices from background environments.
Why does a voice sound robotic after noise reduction?
Robotic artifacts occur when reduction sliders are pushed too high. The software begins cutting out vocal frequencies along with the noise, creating a distorted, unnatural tone.
Can Premiere Pro remove wind noise completely?
Completely removing wind proves difficult because gusts cover a wide frequency spectrum. While tools lessen the impact, severe wind often requires specialized plugins or AI restoration to fix fully.
When to use an AI noise remover instead of Premiere Pro?
AI solutions provide faster results for creators lacking advanced audio mixing skills. Automated tools easily solve how to clean up noise in Premiere Pro alternative workflows by isolating speech from complex ambient sounds without manual keyframing.

You May Be Interested

How to Add Subtitles in Premiere Pro: A Complete Guide
How to Give a Video a Transparent Background in Premiere

How to Reduce Noise in Videos: Guide to Clear Audio and Visuals
How to Remove Background Noise in Audacity: A Complete Guide