How to Remove Background Noise from Audio: Improve Voice Clarity
Discover how to remove background noise from audio in just a few clicks. Learn how Vmake Labs can help you achieve cleaner, more professional audio without complicated editing.

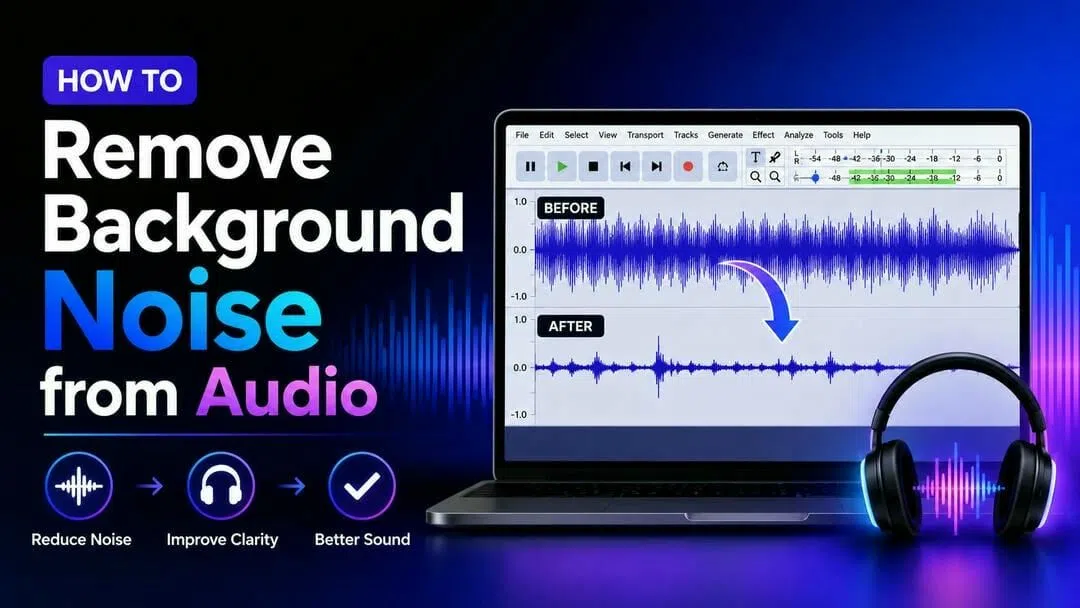
Background noise ruins a recording faster than almost anything else. People will watch a video with mediocre lighting, but if the audio sounds like static or echoes like a tiled bathroom, they will tune out within seconds. Getting rid of that unwanted noise and making your voice actually sound clear doesn't require a degree in acoustic engineering. It really comes down to a few practical tactics and knowing which tools actually work without overcomplicating things. Here's how to remove background noise from audio with a few effective methods.
What is the background noise in audio?
Background noise is the random, unwanted junk that hitchhikes a ride on your recording alongside your voice. It's stuff that forces people to strain just to hear what you're saying. Usually, it comes from three places: your immediate environment (think air conditioning or traffic outside), cheap or poorly configured recording equipment, and sometimes just weird electronic interference running through your cables.
Types of background noise
-
Environmental noise: This is just the world being loud around you. It's the traffic outside your window, wind hitting a mic, or a neighbor's lawnmower.
-
Electronic noise: If you hear a persistent buzz, hiss, or hum, it's almost always a hardware issue. This happens when cheap microphones, bad cables, or weird electrical interference bleed into your signal chain.
-
Room noise: People often forget about this one, but the actual room you're in changes everything. It's the echo and hollow reverberation you get when sound waves bounce off hard, bare walls and floors.
-
Mechanical noise: This is the stuff right on your desk. Think clicky keyboards, computer cooling fans kicking into high gear, or the vibration of an old external hard drive spinning up.
-
Background conversations: The absolute worst if you're trying to record in a coffee shop or a busy office. It's just those stray, unintended voices and chatter bleeding into your background.
3 ways to remove background sound from audio
When it comes to actually fixing bad audio, you have a few different routes you can take. Most professional audio and video editing software packages come packed with advanced noise reduction tools, thus making the whole thing sound way more polished. Lean toward specific methods depending on what you are actually working on.
Method 1: Remove noise using Adobe Premiere Pro
The built-in audio panel in Adobe Premiere Pro is perfect for removing background noise from an audio recording. Its noise reduction effects let you pull out a lot of that background junk right on your timeline. You can sharpen up the dialogue and improve the overall voice quality without breaking your workflow. Here's how to remove background noise from audio in Premiere Pro.
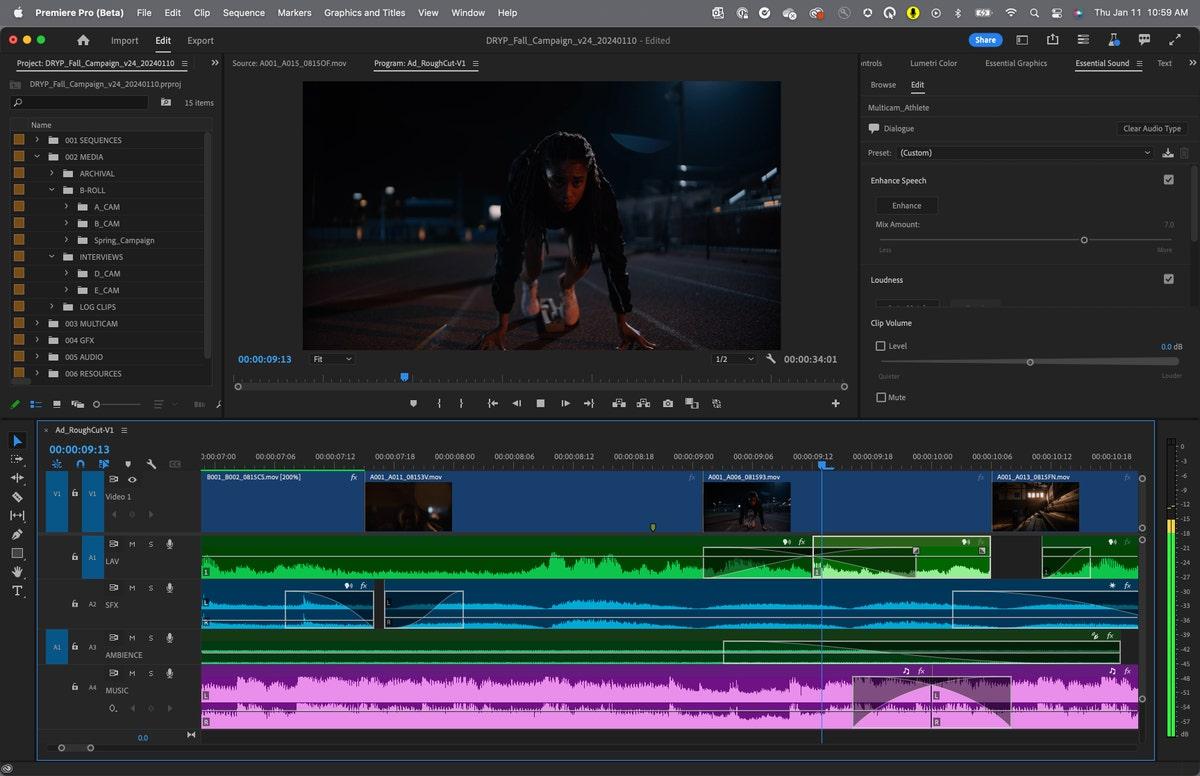
Step 1: Import the audio file and select the audio clip
Drag your audio or video recording right into Premiere and drop it onto the timeline. Just make sure everything is cut, organized, and exactly where you want it before you start messing with effects. Click on the specific audio clip that's giving you trouble. You want to be precise here; isolating just the noisy clip ensures you aren't accidentally changing the settings on your clean audio tracks.
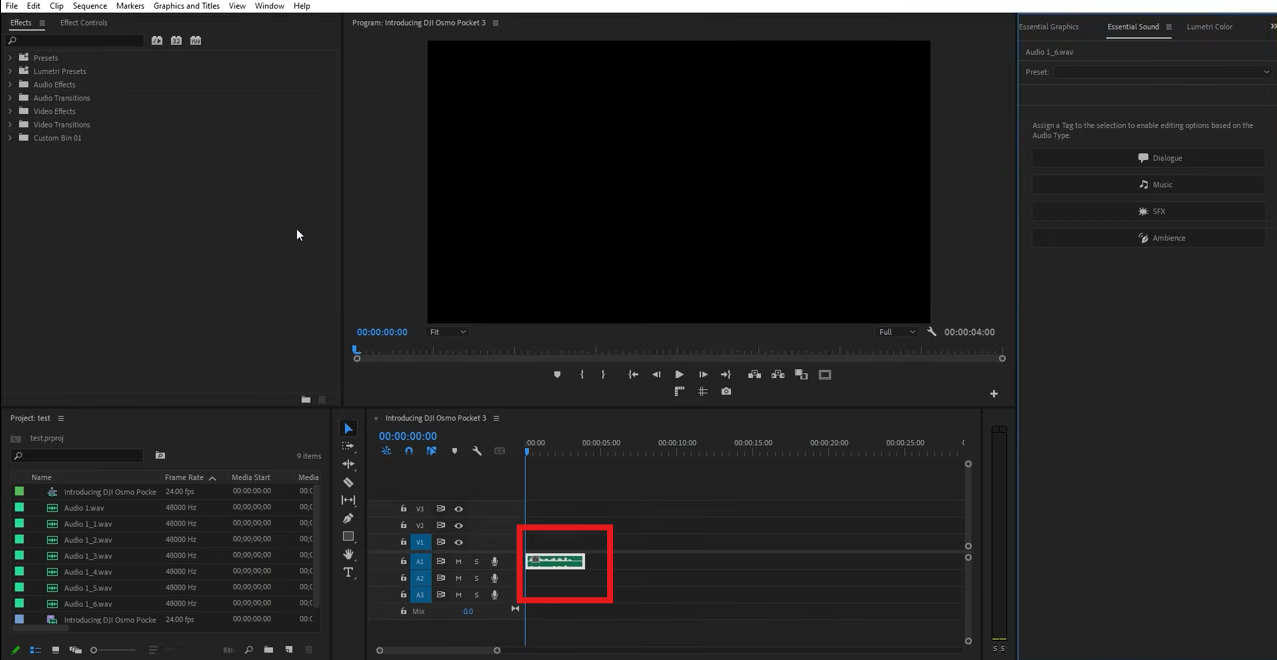
Step 2: Open the Essential Sound panel
Open up the "Essential Sound" panel and click the "Dialogue" button. This basically tells Premiere Pro about the main voice, which unlocks the exact tools you need for speech.
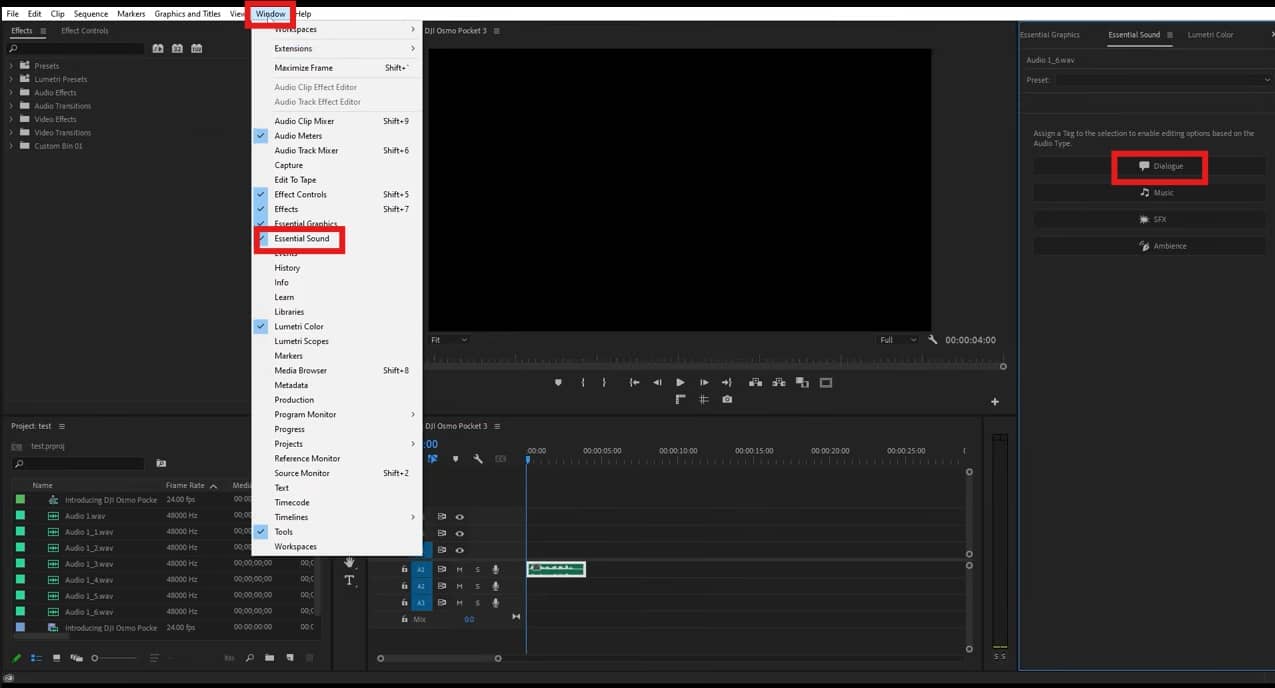
Step 3: Apply noise reduction effect
Look under the "Repair" tab in that same panel and check the box for "Reduce Noise." It will immediately try to scrub out background hums, fan whines, or room hiss, making the voice stand out.
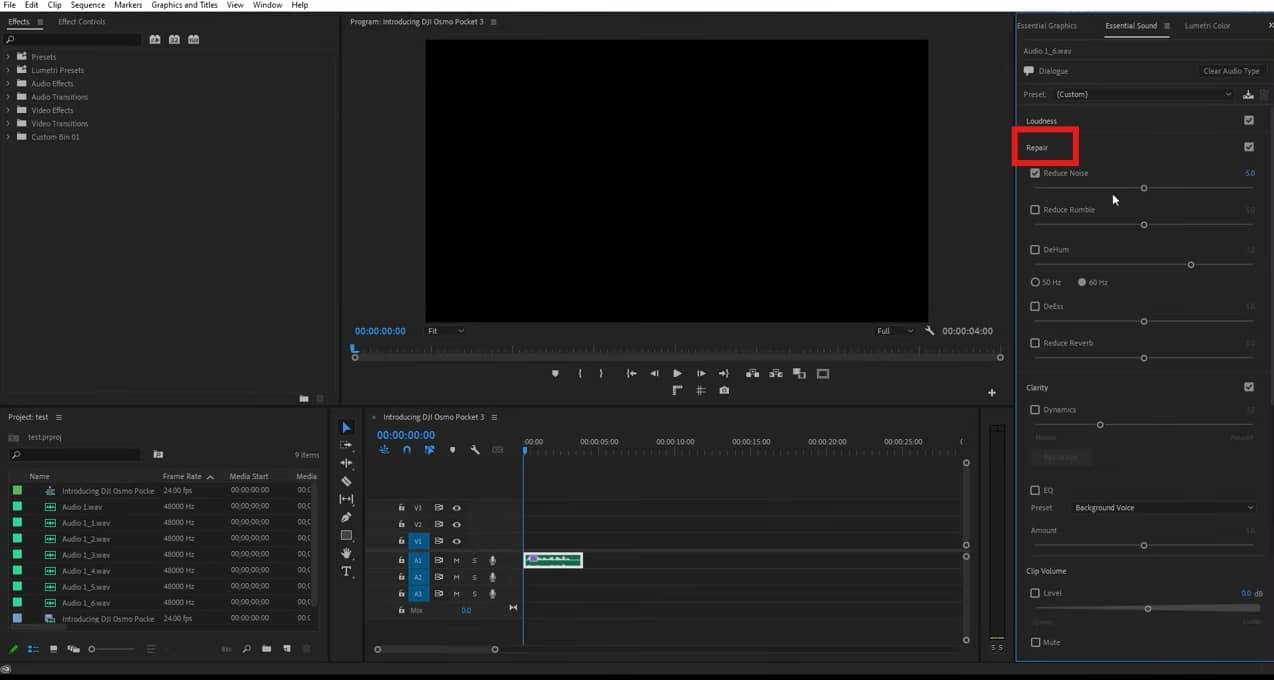
Step 4: Adjust settings and export
Use the slider to fine-tune how aggressively the software cuts the noise. Do not overdo it. If you slide it too far, your speaker will start sounding like they're talking from inside a tin can. Hit play and listen closely to the fix. Go ahead and export the project in whatever format you need.
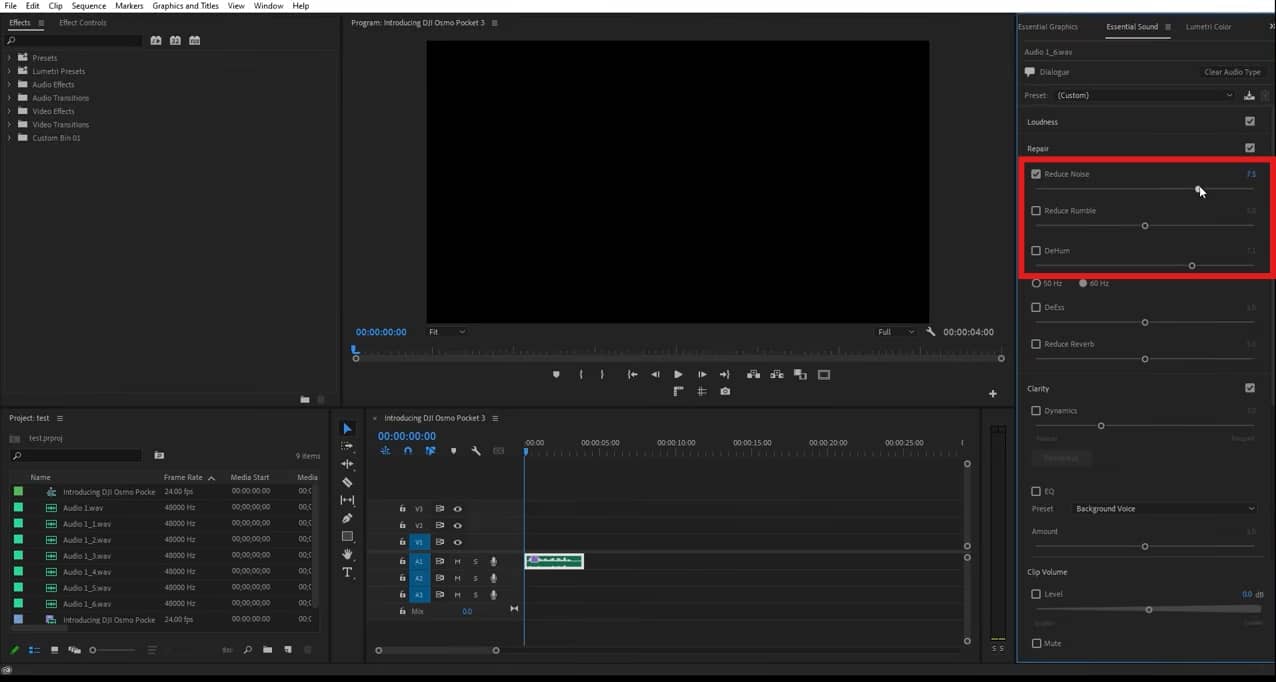
Method 2: Remove background noise in DaVinci Resolve
The native noise reduction tools in DaVinci Resolve are more than capable of stripping out background junk and saving a rough-sounding dialogue track. Here's how to remove background noise from audio in DaVinci Resolve.
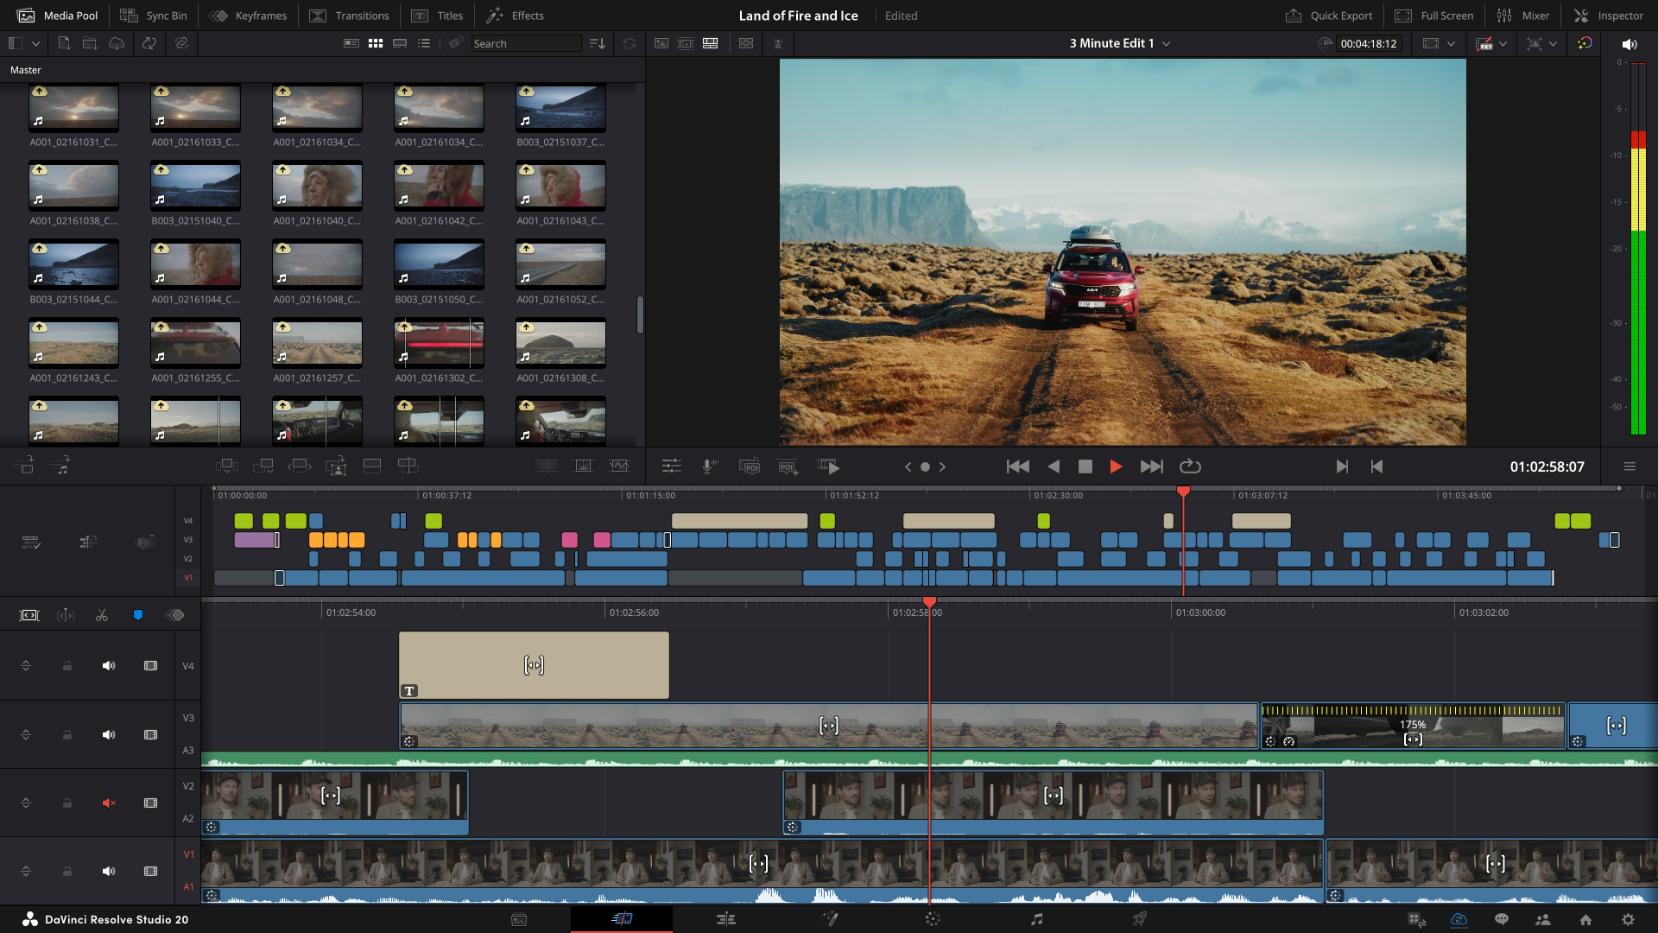
Step 1: Import your audio or video file
To get started, you just need to bring your audio or video file into your Resolve project and drop it onto your timeline. Make absolutely sure your audio is completely synced up with your video before you start touching any of the noise removal tools.
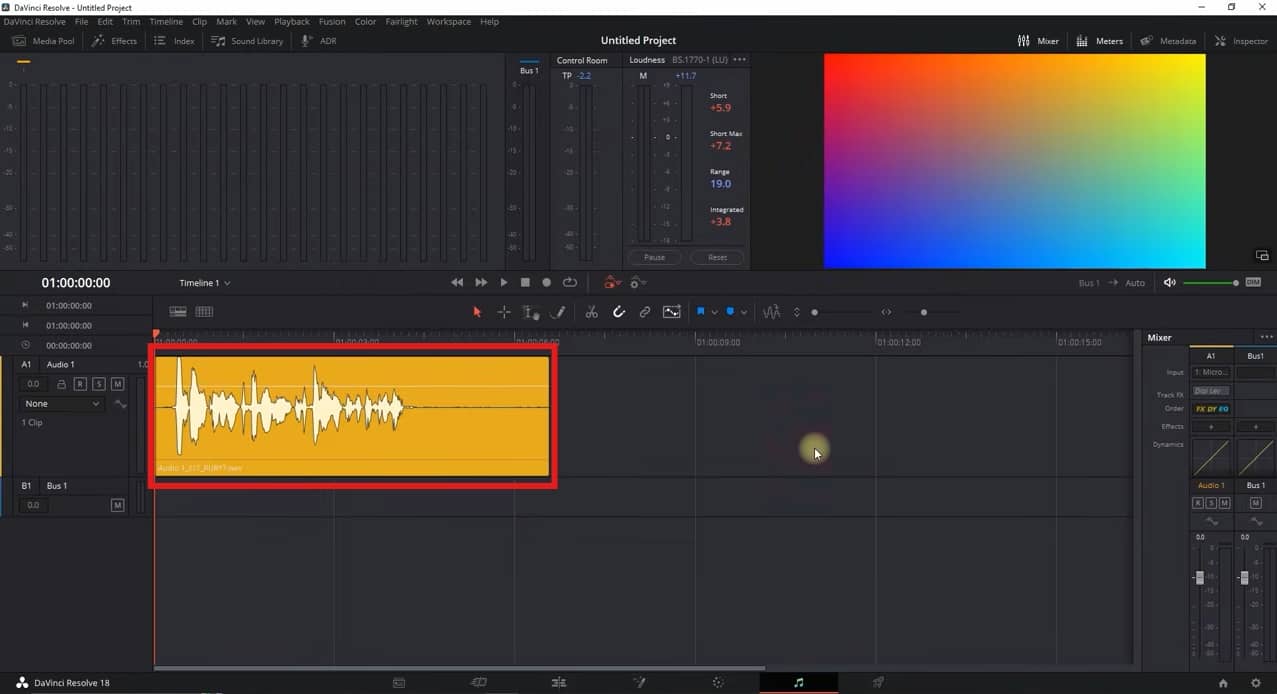
Step 2: Open the Fairlight workspace
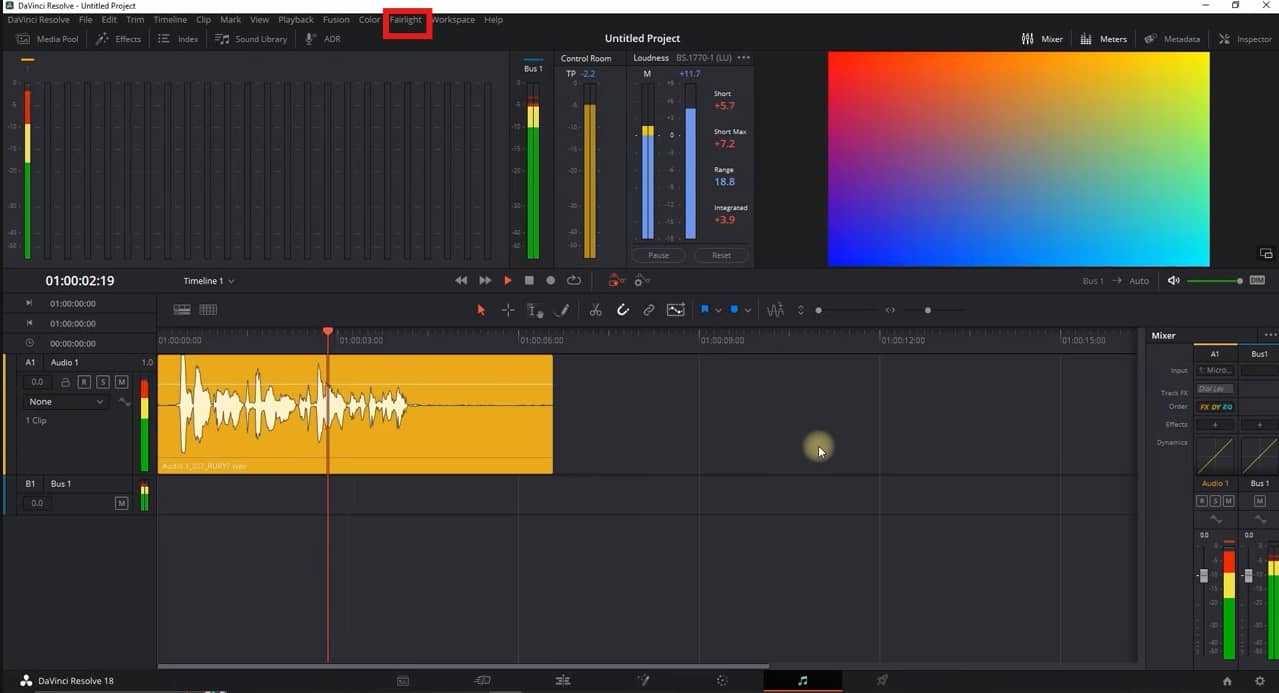
Click on the Fairlight tab at the top of your screen. This takes you out of the standard video editing layout and opens up Resolve's dedicated audio workstation.
Step 3: Select the audio track and enable the noise reduction tool
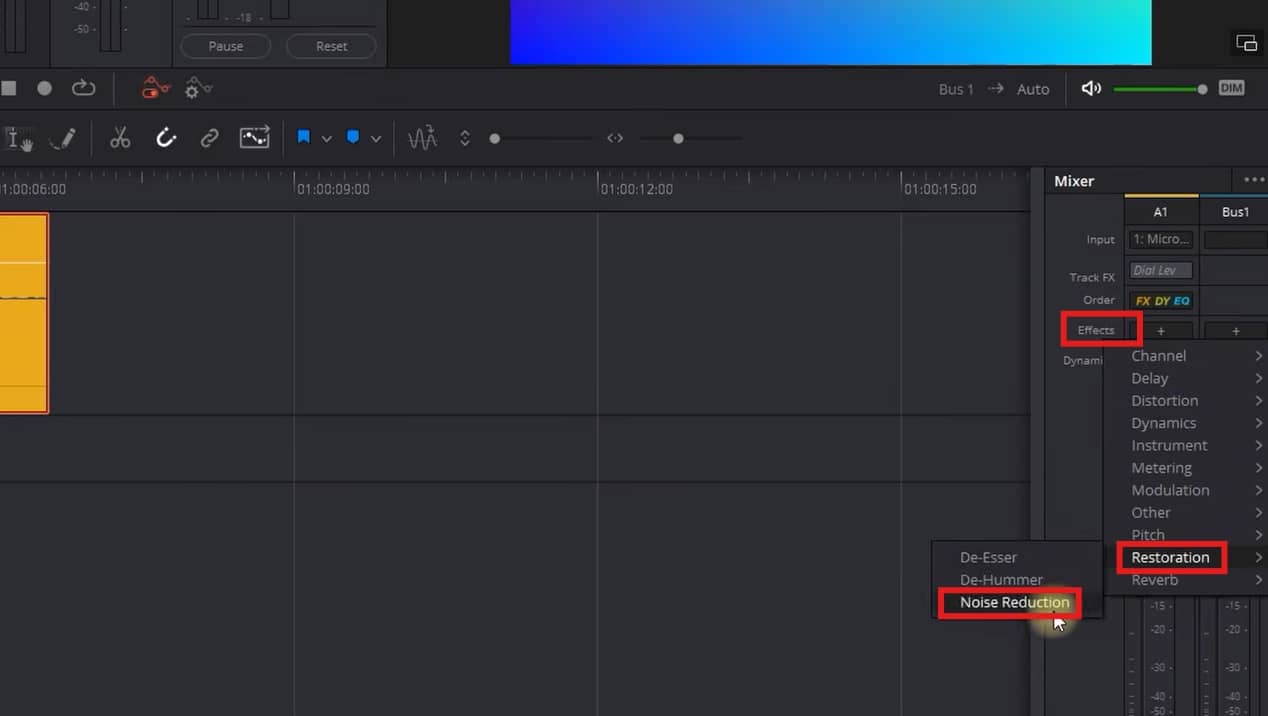
Click on the exact track or individual clip that is ruined by that background noise. Go into your mixer or inspector panel, find the audio effects, and drop the Noise Reduction tool onto your track.
Step 4: Adjust noise reduction settings and export
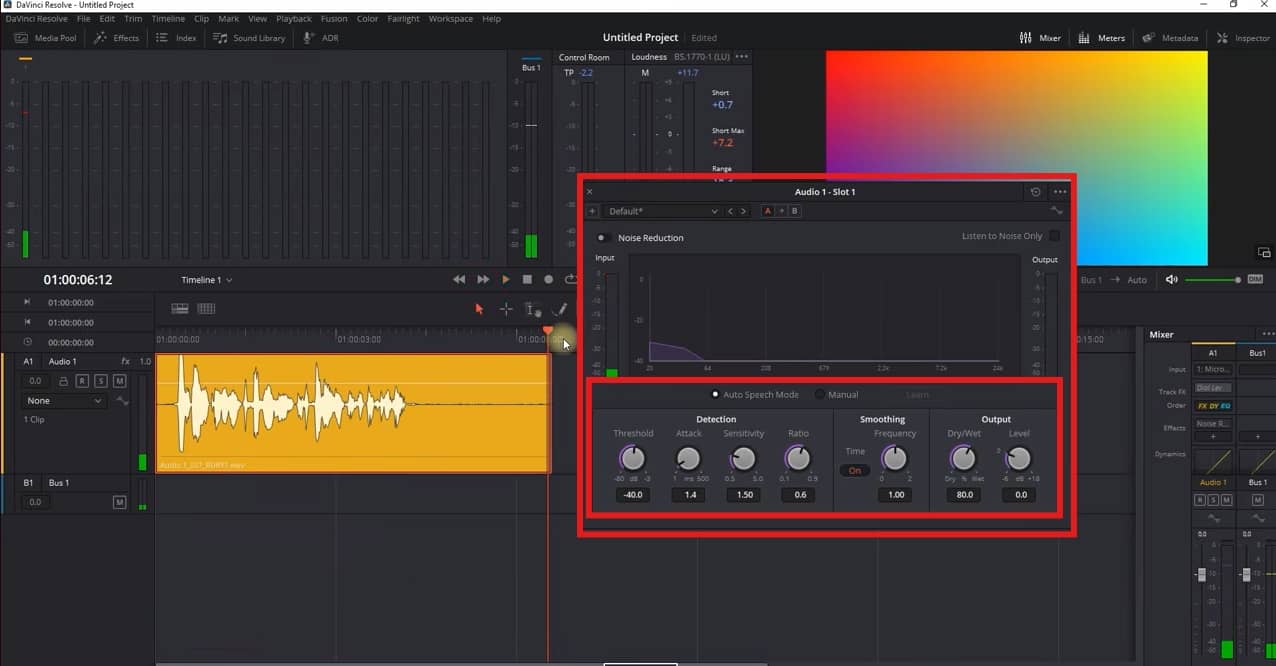
You need to adjust the thresholds and reduction sliders until the background hum drops out. Hit play and listen to a few different sections of the track. Go ahead and export your final video project.
Method 3: Use AI background noise removal tools
If you don't want to mess with complicated editing timelines, Vmake AI Noise Remover is an online option that handles heavy lifting for you. It's an automated, browser-based tool designed to remove the background noise from video files while trying to keep the speech sounding sharp. You just upload your file, wait a minute for the AI to process everything, check out the preview, and download the finished product.
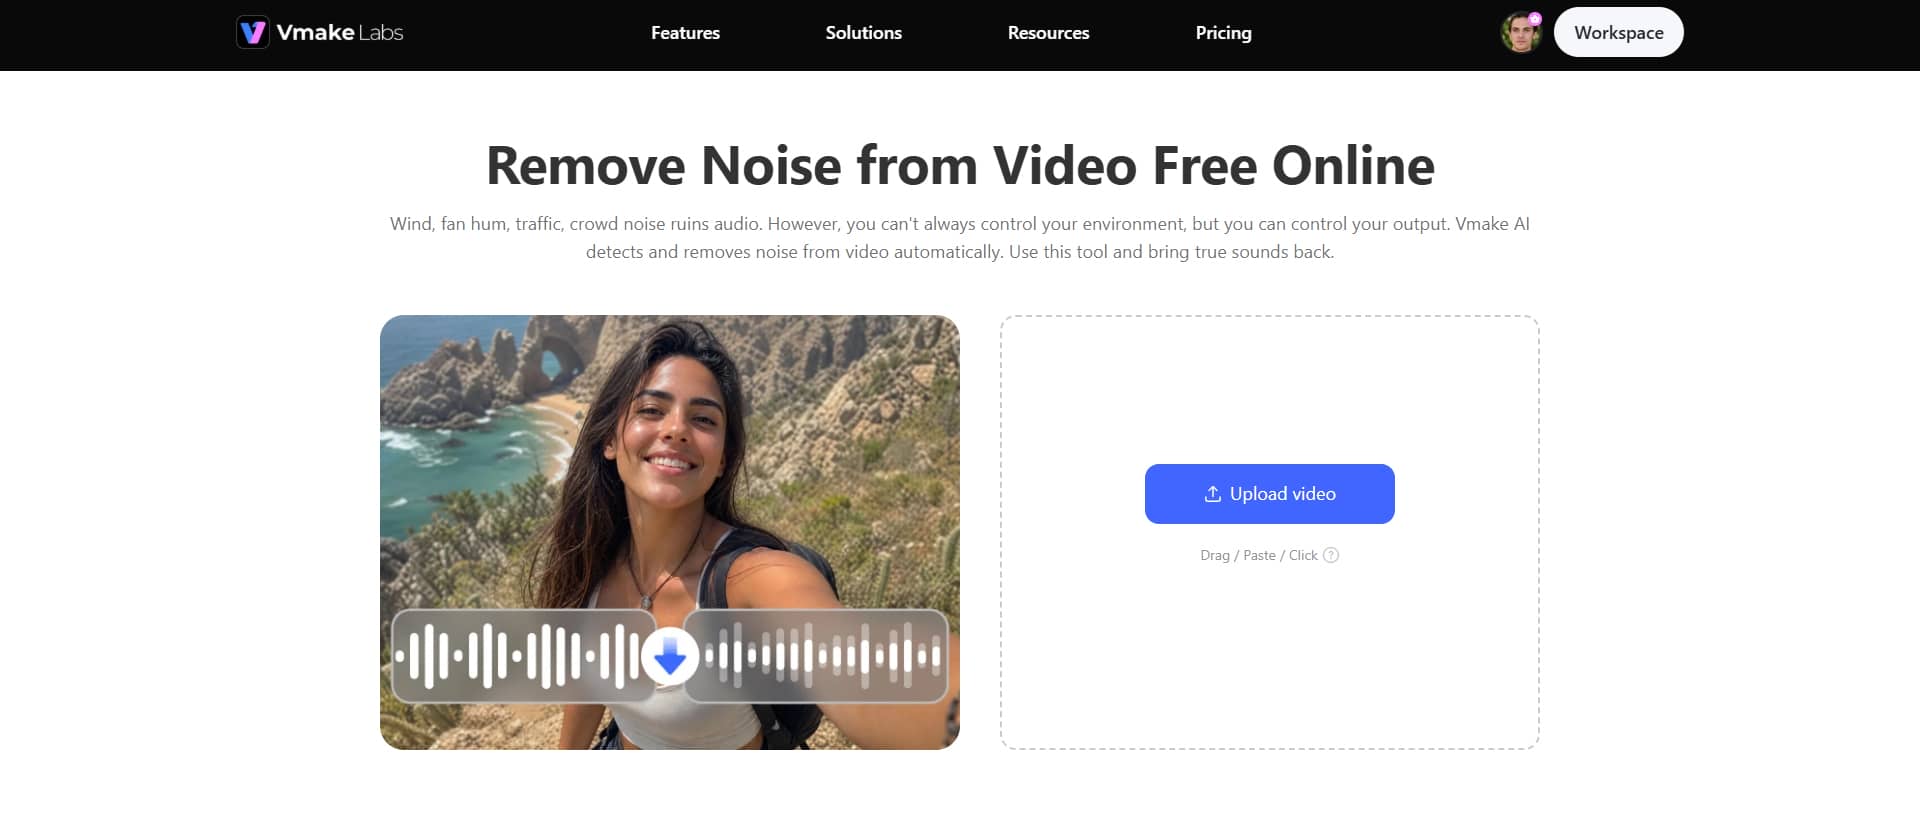
Step-by-step guide
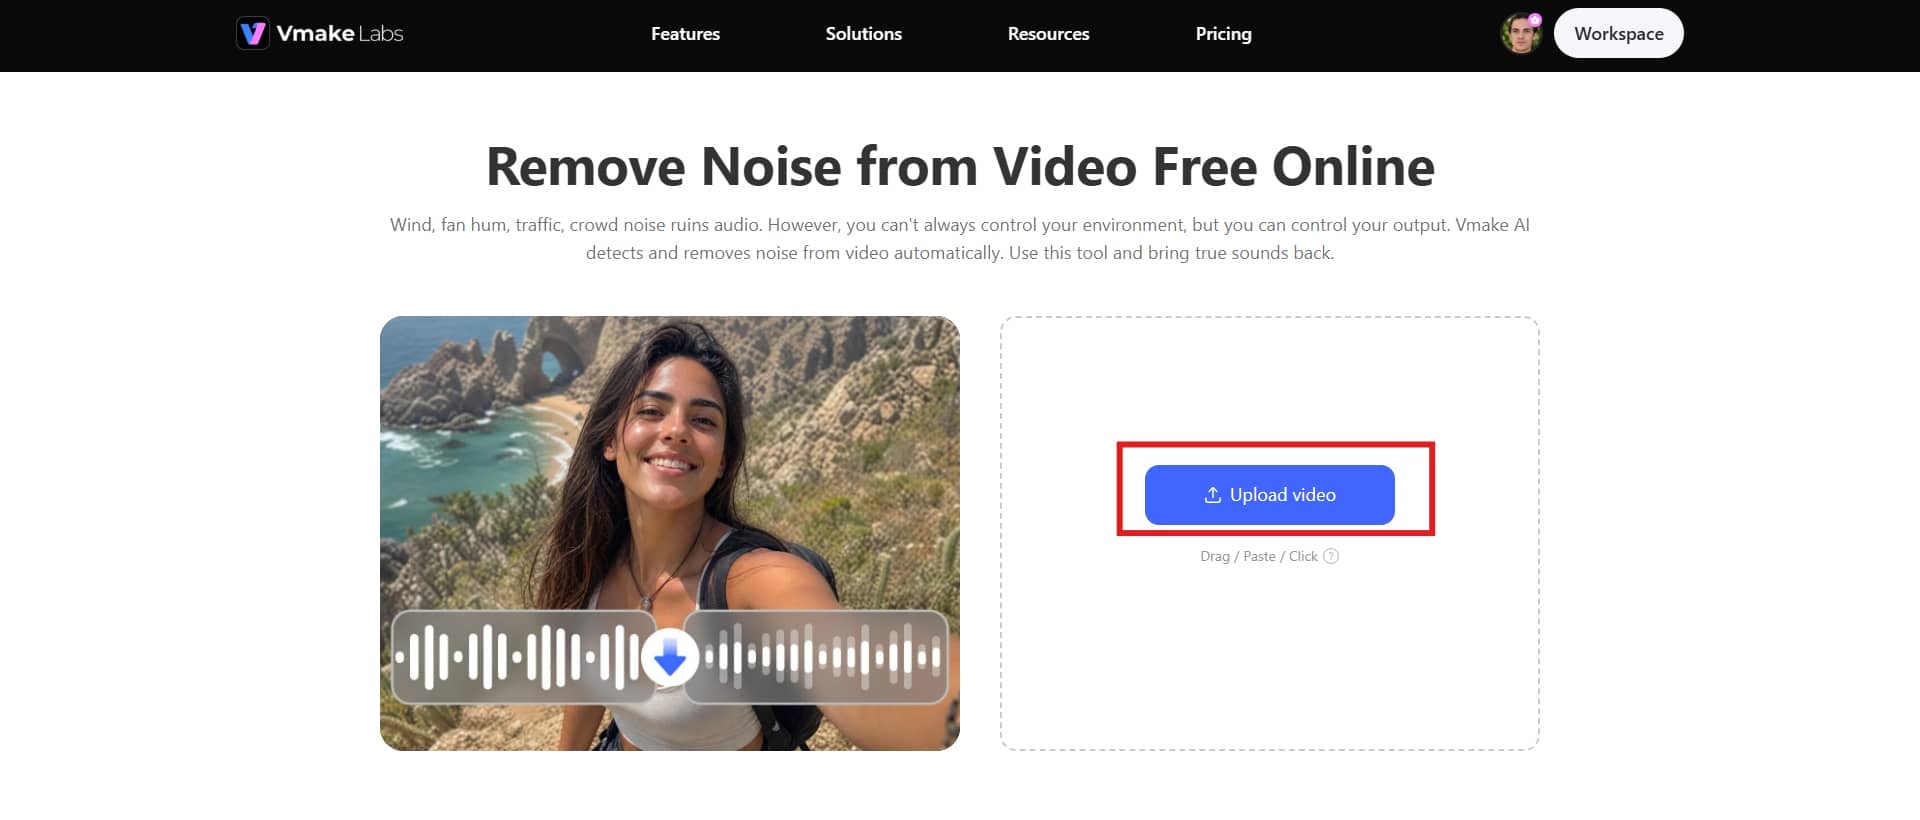
Step 1: Upload your video
First, open up Vmake Labs in your browser and click over to their AI noise removal tool. Drop in the video clip that's ruined by wind, echo, or whatever background junk ruined the take. You don't need to worry about transcoding first, either, as it handles pretty much any video format.
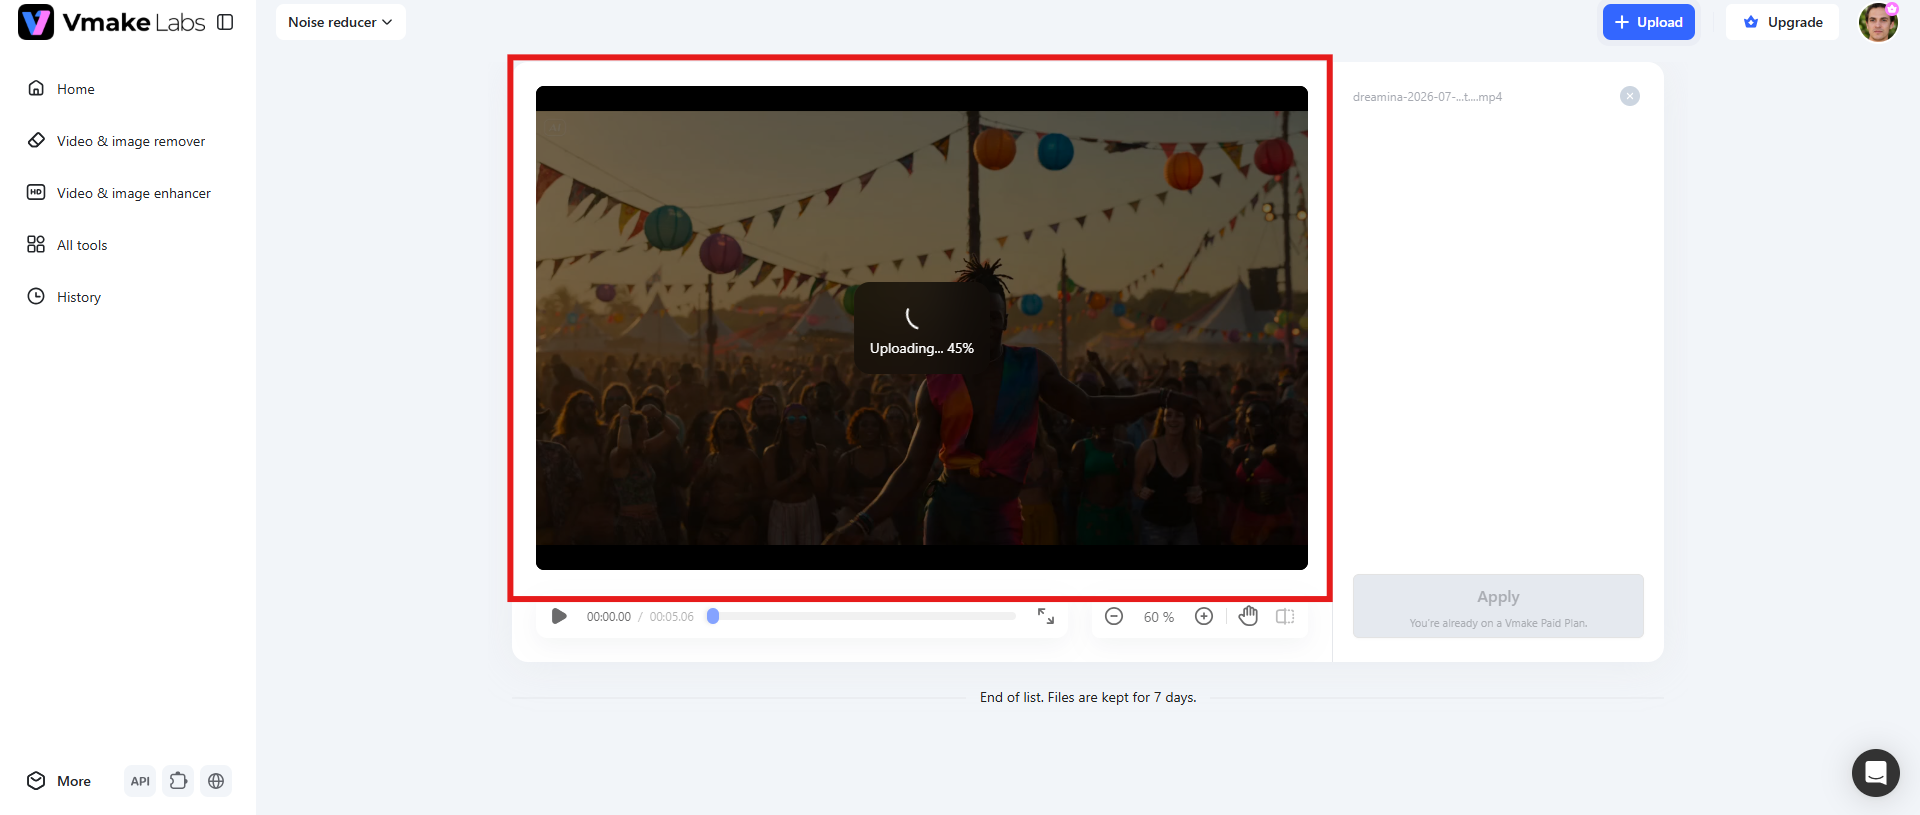
Step 2: AI removes background noise
As soon as the upload finishes, the tool kicks in automatically. It scans the track, isolates the background chaos, and removes it automatically. Just give it a minute or two to finish processing.
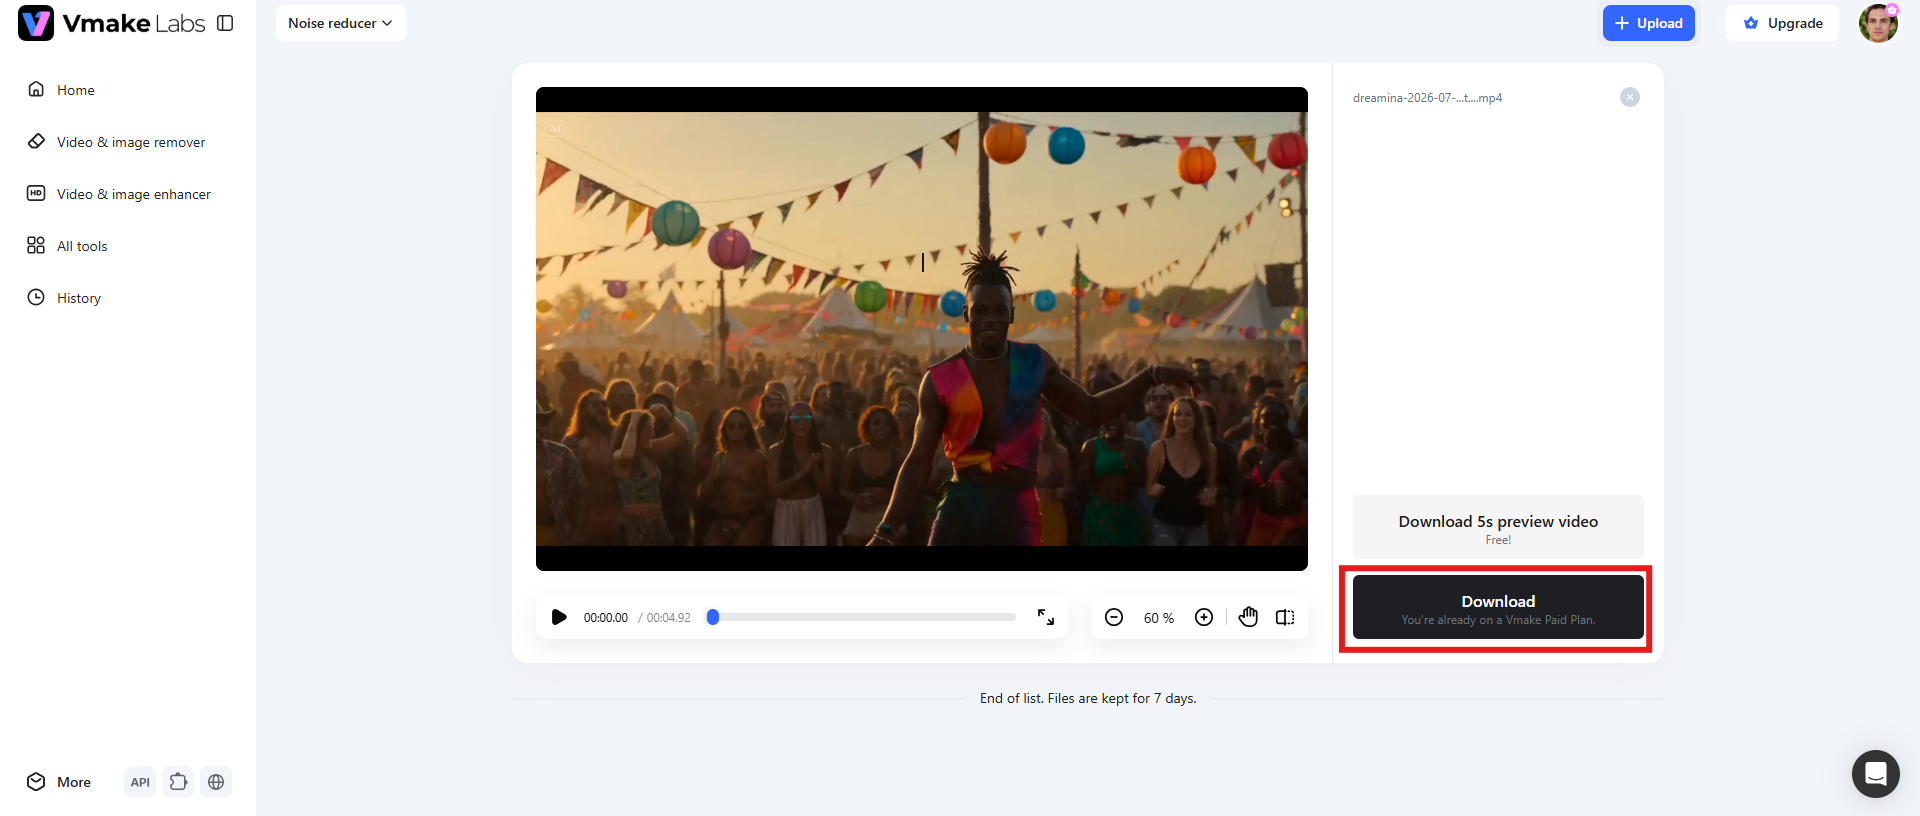
Step 3: Download your clean video
Play through the generated clip to make sure it didn't do anything weird to the vocals. If it sounds clean and natural, just hit the "Download" button to save the fresh file.
Which method is best for removing background noise?
Which path you choose really comes down to three things: how much editing you've actually done, your current workflow, and how much granular control you need over the frequencies. If you want to manually remove background noise from audio recordings, tweak thresholds and carve out specific frequencies, traditional professional editing software is going to give you that deep customization. But if you're up against a tight deadline or just don't want to deal with a steep learning curve, the automated AI tools are incredibly fast.
When to use Adobe Premiere Pro
-
Use this route if you want to manually remove background sound from audio by yourself rather than leaving it up to an algorithm.
-
It's the right call for podcasts, interviews, YouTube videos, or commercial video projects.
-
It works beautifully if you're dealing with average background junk and your main priority is keeping the speaker's voice sounding like a real human being.
-
It's honestly a no-brainer for editors who are already comfortable navigating Premiere Pro's timeline and built-in audio layout.
When to use DaVinci Resolve
-
It's the right choice for complex recordings that are ruined by persistent line hiss, low hums, electrical static, or nasty environmental noise.
-
Choose this if you actually plan to dig into the Fairlight workspace for deeper, more precise audio editing and mixing.
-
It's built specifically for filmmakers, video editors, and creators who are putting together high-quality productions.
-
DaVinci Resolve is a good call if you simply need way more granular control over your tracks
When to use Vmake
-
Use it if you just need to strip background noise out of a video quickly.
-
It's the right fit for social media videos, online lessons, short clips, or casual recordings.
-
Choose this if your goal is to let an AI automatically detect and reduce unwanted noise without intervening.
-
Vmake Labs is ideal for users who prefer a straightforward online tool that requires speech-focused background noise removal with almost zero manual adjustments.
Tips to prevent background noise from recording

You can always remove background sounds from audio, but fixing bad audio in post is a losing game. The real trick is preventing the noise from getting into your microphone in the first place. If you want crisp, high-quality dialogue, taking five minutes to adjust your room setup and position your microphone properly will save you hours of headache later.
-
Record in a carpeted room
While you can remove echo from video, it is still suggested to pick a room with carpets, heavy curtains, or a big fabric couch. Hard surfaces are the absolute enemy of good audio because sound just bounces right off them, creating that cheap, hollow echo. Soft furnishings actually absorb those reflections. It makes a massive difference, leaving you with a much tighter, more natural-sounding track right from the start.
-
Close doors and windows
Before you even hit a record, go around and shut every single door and window. It sounds obvious, but it's easy to forget. You want to seal out as much outside chaos as possible, whether that's distant traffic, neighbor conversations, or just birds chirping right outside.
-
Turn off fans and AC if possible
Ceiling fans, AC units, and air purifiers are absolute killers for audio. They generate this constant, low-frequency hum that you might not even notice while sitting there, but your microphone will track it instantly. Just flip them off while you're rolling.
-
Position the microphone correctly
Make sure your microphone is pointed right at the speaker's mouth. It sounds simple, but angle matters. At the same time, keep an eye on where the back or sides of the mic are facing. Getting the placement dialed in helps you capture a full, crisp voice while naturally keeping the ambient junk out of your track.
-
Keep the microphone close to the speaker
Aim to keep the microphone about 6 to 12 inches away from the speaker's mouth. Getting close means you're capturing a much stronger, fuller voice signal. You're essentially letting the speaker's voice naturally drown out the background junk. Taking an extra second to set this up saves you from having to lean on aggressive digital noise removal later
Conclusion
Removing background noise from audio doesn't have to be complicated. Both traditional manual editing software and these newer AI tools can clean up a track, but they're built for entirely different scenarios. If you're using professional apps like Adobe Premiere Pro or DaVinci Resolve, you're getting deep surgical control and advanced audio toolsets. On the flip side, an automated tool like Vmake AI is just faster. It handles heavy lifting with almost zero effort on your part.
Which path you choose really comes down to your own comfort level, how much time you have, and how messy the audio is in the first place. If you need to fix complex issues or want total customization, stick with professional software. But if you're up against a tight deadline and just want convenience, a solid AI tool can give you surprisingly good results in a couple of clicks.
FAQs
What is the easiest way to remove background noise from audio?
If you want the path of least resistance, your best bet is an AI-powered noise removal tool. The software automatically scans the track to isolate and suppress the background chaos, such as things like wind, annoying fan hums, passing traffic, or random room chatter.
Can I remove background noise without affecting voice quality?
You can, for sure. Honestly, modern AI tools and professional audio software have gotten incredibly good at isolating background noise while keeping the speaker's voice sounding completely natural. But here's the thing: you have to be careful not to overdo it. If you push noise reduction too hard, the person ends up sounding totally artificial and robotic.
What causes background noise in recordings?
Multiple things can cause background noise, including traffic outside, wind hitting the glass, or the constant hum of an AC or a desk fan. Then you've got electrical hiss from cables, empty room echo, or people talking downstairs. Half the time, it's just the cooling fan on your own computer sitting too close to the microphone.
How can I prevent background noise during recording?
If you want to prevent all that background junk while you're actually rolling, you have to lock down your space. Pick a quiet room, shut the doors, and close the windows. Turn off the AC or any fans while you tape. Watch your microphone placement. Keep it close to whoever is talking.
Which free software is best for reducing audio noise?
You don't have to empty your wallet to get clean audio. There are a handful of free tools out there that do a surprisingly heavy amount of lifting. Vmake Labs is the classic example. The platform has an AI-powered noise removal feature that handles the heavy lifting by automatically removing unwanted background noise.
What types of background noise can be removed?
Most modern software can actively target and suppress typical background offenders. It can be anything, including fan whir, AC hums, wind rumbles, or distant traffic outside. It can also clean up keyboard clicks, electrical buzz, low-level static, room echo, or the general murmur of a crowd.

You May Be Interested

[2026] How to Blur Background in Zoom: Desktop & Mobile
[2026 Updated] Ultimate Guide to OBS Background Removal
How to Remove People from Background: Fast AI Tools
How to Remove Background Noise from Video: Best AI Tools in 2026
How to Transcribe Audio to Text: Efficient Guide