How to Make Stickers at Home (Easy DIY & Custom Guide)
Ready to design unique stickers in seconds? Discover how to make custom stickers for crafts, branding, or personal use. Turn your ideas into high-quality sticker designs with Vmake Labs AI Image Generator.

Making your own stickers is easier than ever. Whether you're decorating a journal, creating planner stickers, branding your small business, or selling sticker packs online, you don't need expensive equipment to get started. This guide explains how to make stickers at home using simple DIY techniques, a printer, an iPhone, or AI-powered design tools for professional-looking results.
What you'll need to make stickers
Before you begin, gather the right materials. The supplies you need depend on whether you're making stickers by hand or creating them for printing and selling.
Essential supplies usually include:
-
Sticker paper (matte or glossy) or printable vinyl sticker material
-
A printer (laser or inkjet)
-
Scissors or a craft knife for hand-cutting; a cutting machine like a Cricut or Silhouette if you want clean, repeatable shapes
-
Clear packing tape or laminating sheet/film for waterproofing
-
Parchment paper or silicone mat as a work surface
-
Designing tools: free apps, Canva, Procreate for iPad, or AI image generator
Sticker paper (often glossy) has an adhesive backing and is perfect for making stickers. Vinyl is a bit harder to cut, but it produces stickers that are more durable. A cutting machine can make designing stickers much simpler, but it's not necessary if you only need a few stickers.
How to make your own stickers at home (No machine needed)
DIY stickers using clear packing tape are an affordable and accessible option that can be applied to paper and other surfaces. They are great for journaling, handmade cards, or decorating plain notebooks.
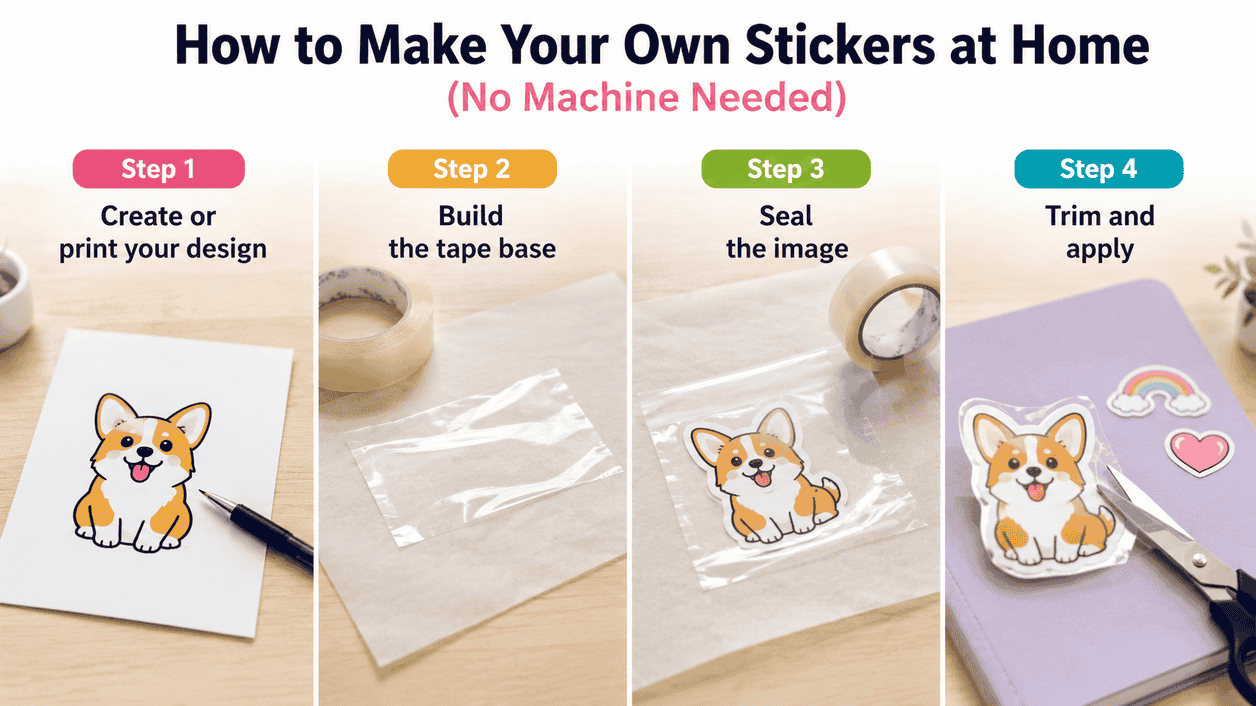
Step 1: Create or print your design
Draw freehand on regular paper or print a digital image at a size that fits the sticker you want. Keep the design relatively simple, so the edges stay clean when you cut. If you're printing, ordinary printer paper is fine. No special sticker stock required.
Step 2: Build the tape base
Tear off a piece of clear packaging tape that is slightly larger than your sticker design. Place it sticky-side up on a sheet of parchment or silicone baking paper.
Step 3: Seal the image
Place the printed or drawn image, face up, on the sticky side of the tape. Smooth out any air bubbles, then cover with a second strip of clear tape. Make sure to remove excess air from the second layer of tape.
Step 4: Trim and apply
Cut out the design with scissors, leaving a small clear border of tape. Remove the finished sticker from the parchment and press it onto the surface. The adhesive on the bottom layer of tape is usually strong enough for paper goods and indoor use.
How to make custom stickers with a printer and cutting machine
Creating stickers using a printer and cutting machine produces neater results, particularly if you plan to make more than a few designs. The following steps will explain how to make stickers with a printer and cutting machine:
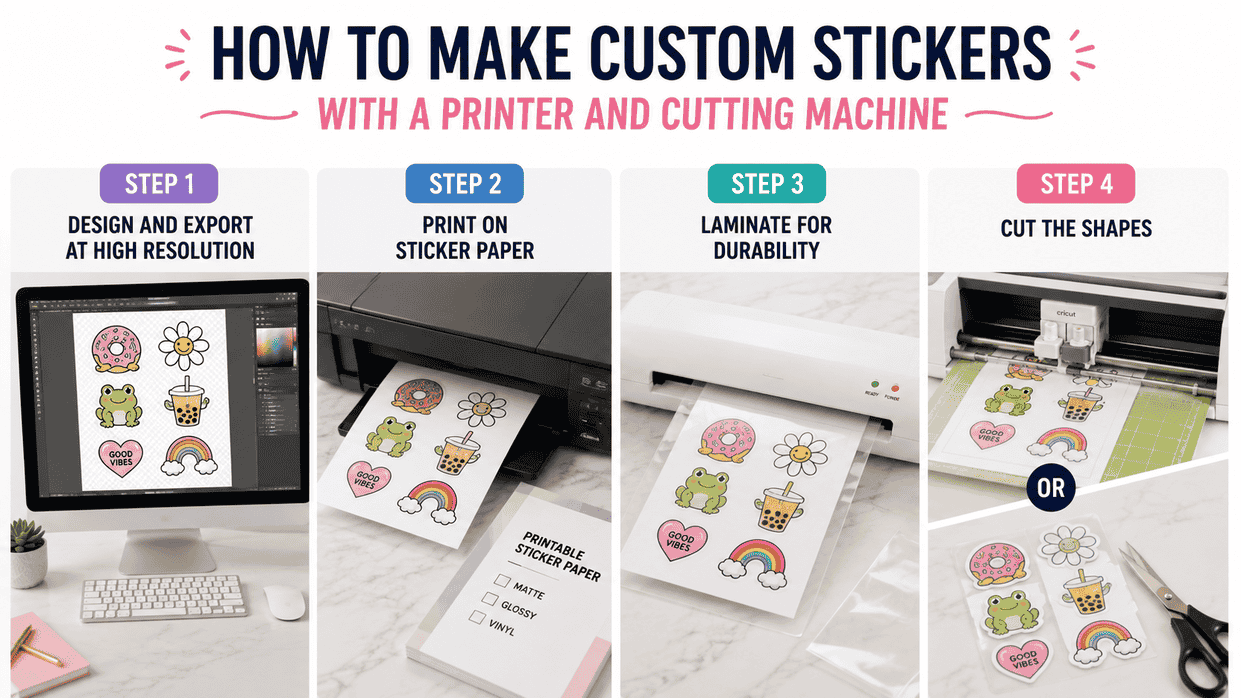
Step 1: Design and export at high resolution
Create a sticker design using your preferred graphic design software. Images must be at least 300 DPI, so they don't appear blurry when printed. Save the graphic as a PNG file with a transparent background or a JPG with a white background if you're going to cut out the image.
Step 2: Print on sticker paper
Load matte, glossy, or printable vinyl sticker paper into your printer. Pigment-based ink holds color better and resists fading once the sticker is laminated. Print a single test page first to check alignment and color.
Step 3: Laminate for durability
Use a self-adhesive clear laminating sheet or a cold laminator to laminate the printed design. This step seals the ink, adds body, and gives the sticker better resistance to moisture and everyday wear.
Step 4: Cut the shapes
Use a cutting machine like a Cricut, Silhouette, or similar for accurate, repeatable outlines. If you don't have a machine, sharp scissors or a craft knife are still fine for simple shapes and small batches.
How to make stickers on iPhone
The iPhone's built-in sticker tool makes it easy to turn any image into a sticker. The steps below will show you how to make a sticker out of a photo on your iPhone:
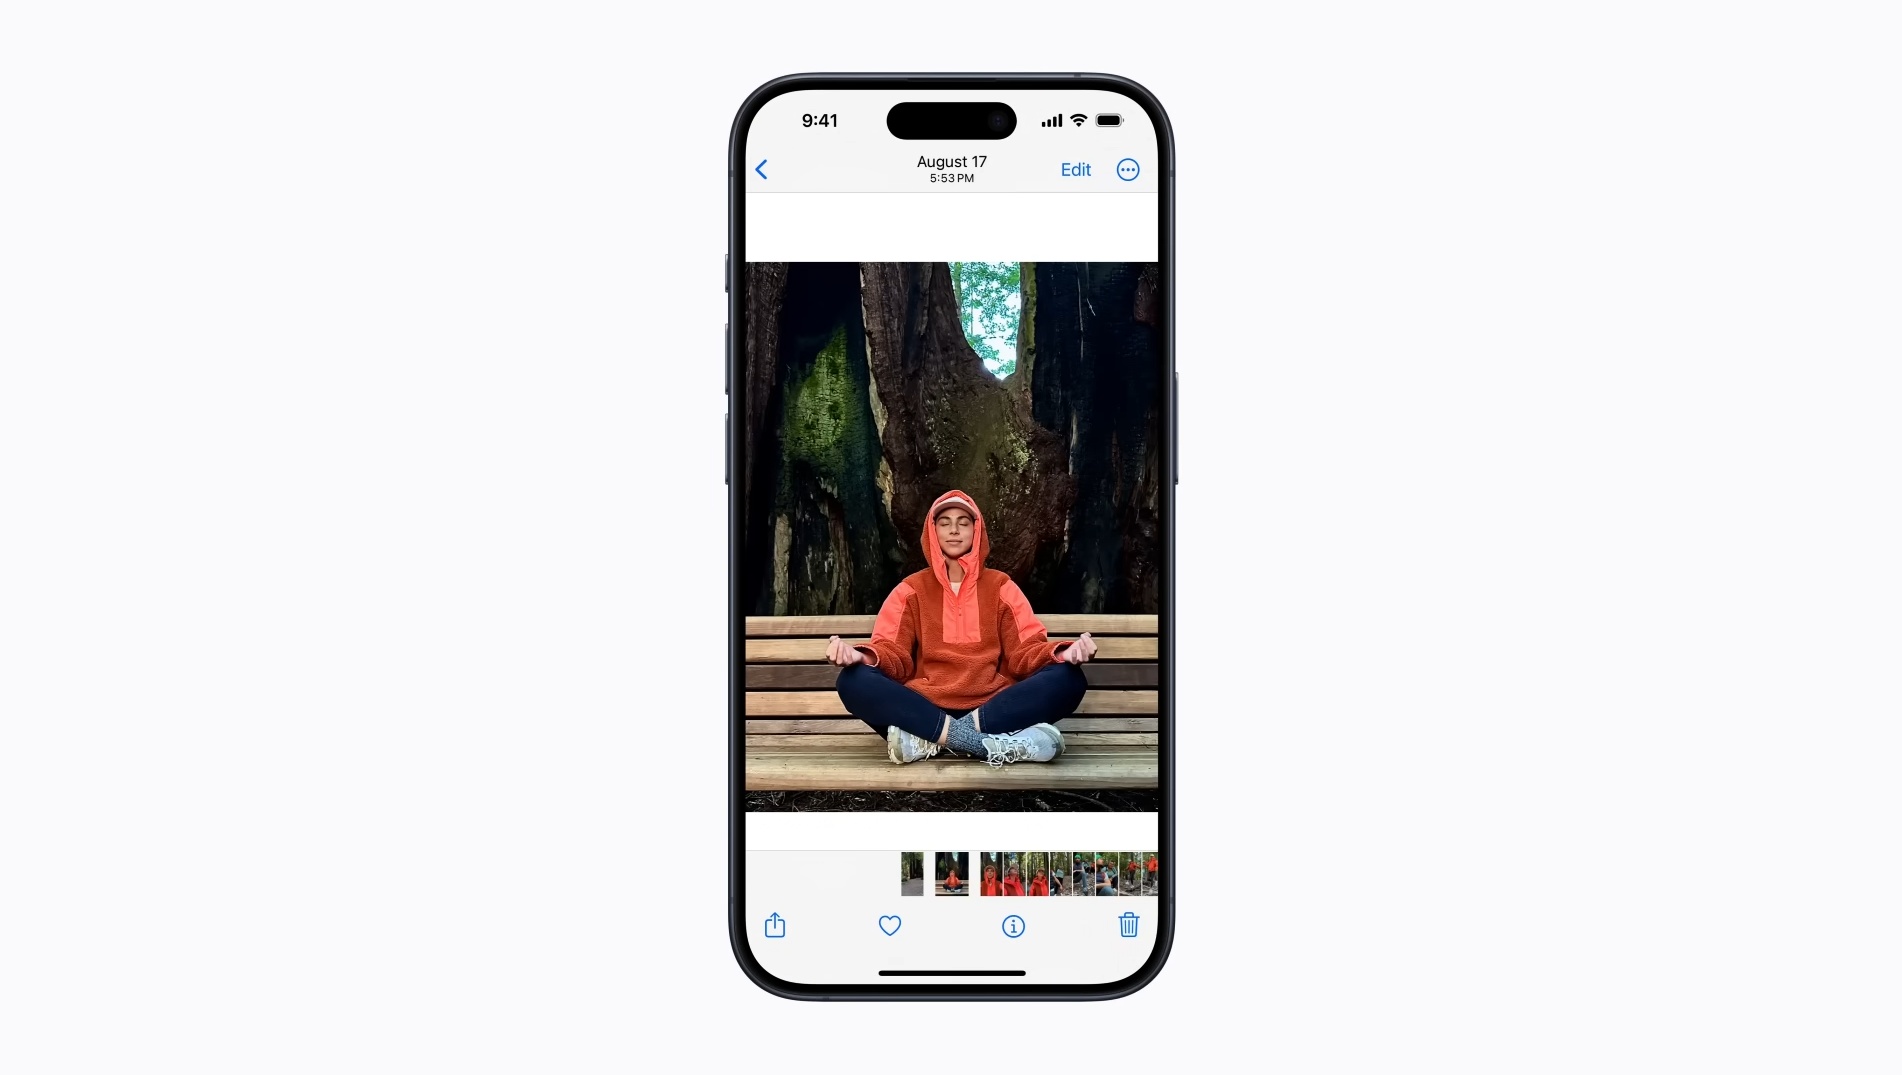
Step 1: Select the subject
Open the Photos app on your iPhone, then open up a full-screen view of an image. Tap and hold on a subject within the image until a translucent outline appears around it.
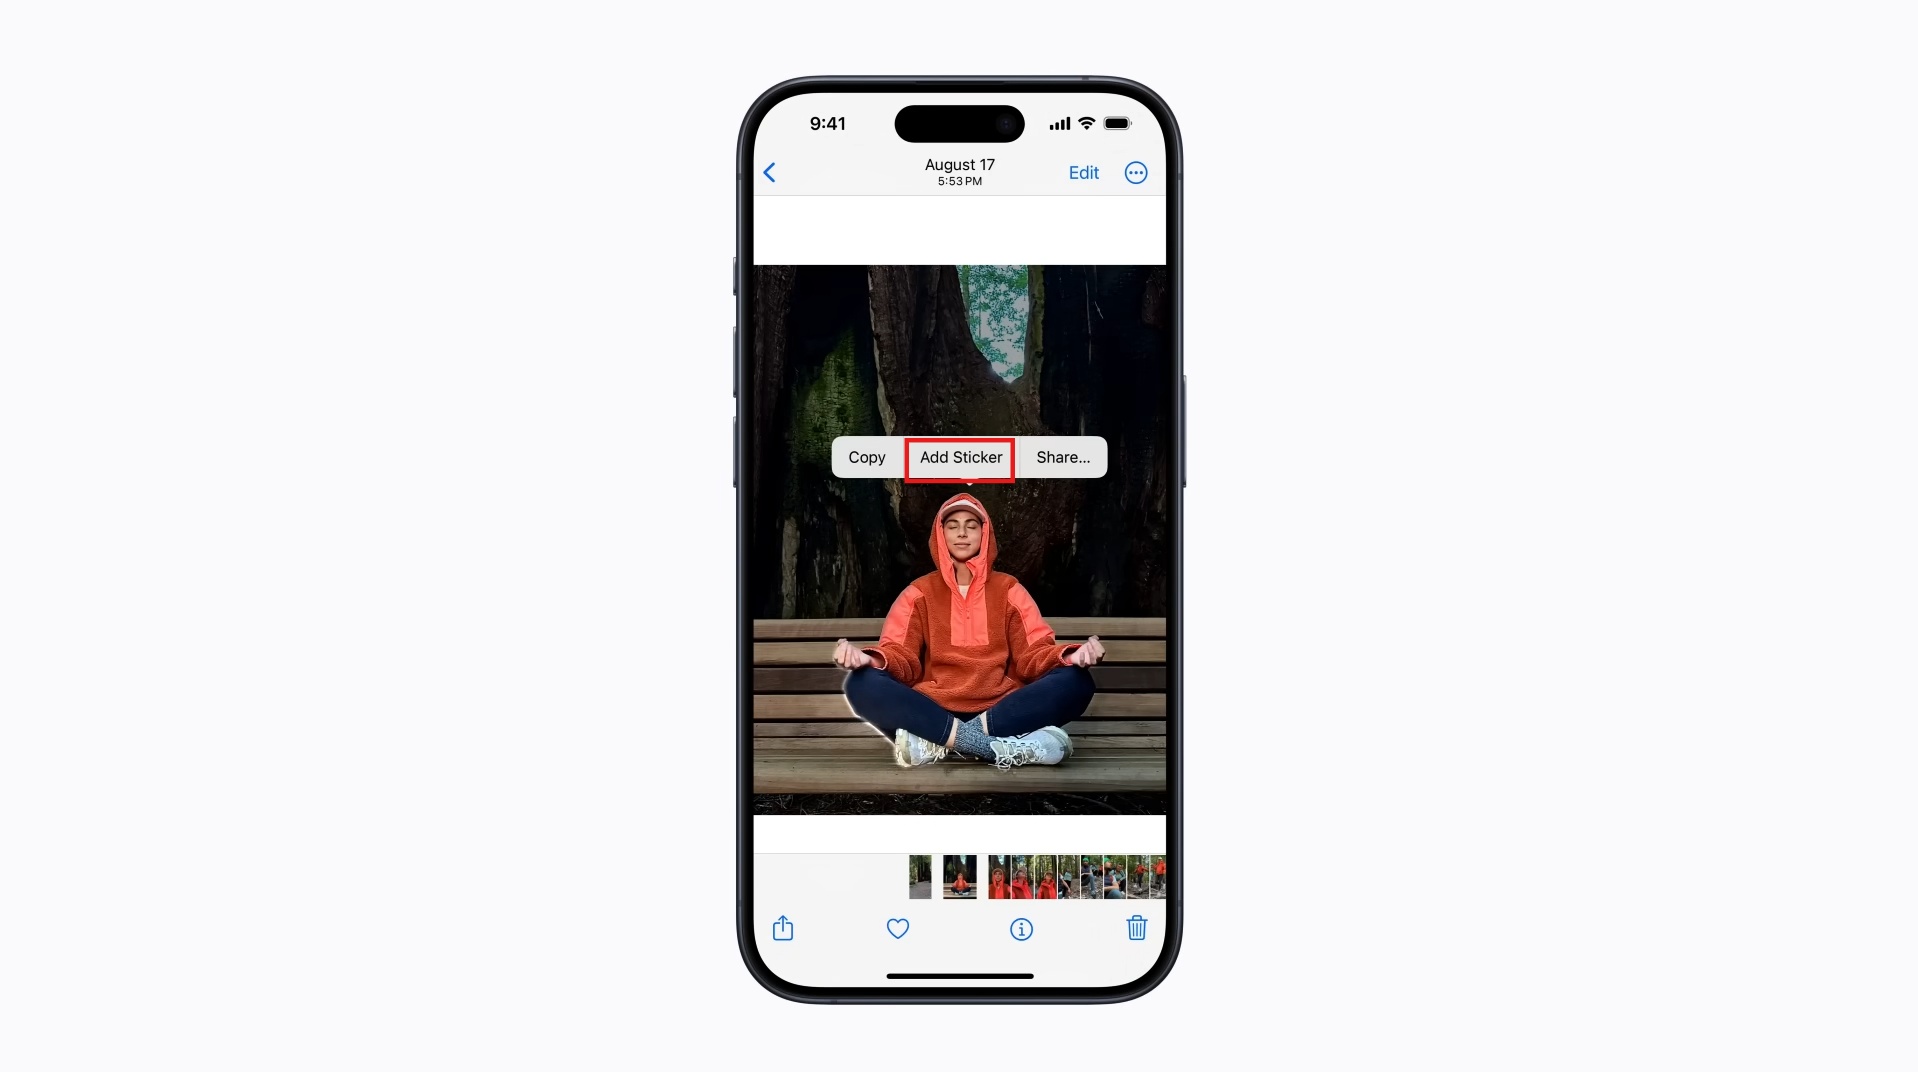
Step 2: Save as a sticker
Let go of your finger on the screen and tap Add Sticker from the pop-up menu. The subject of the image will be lifted from the background and saved as a sticker.
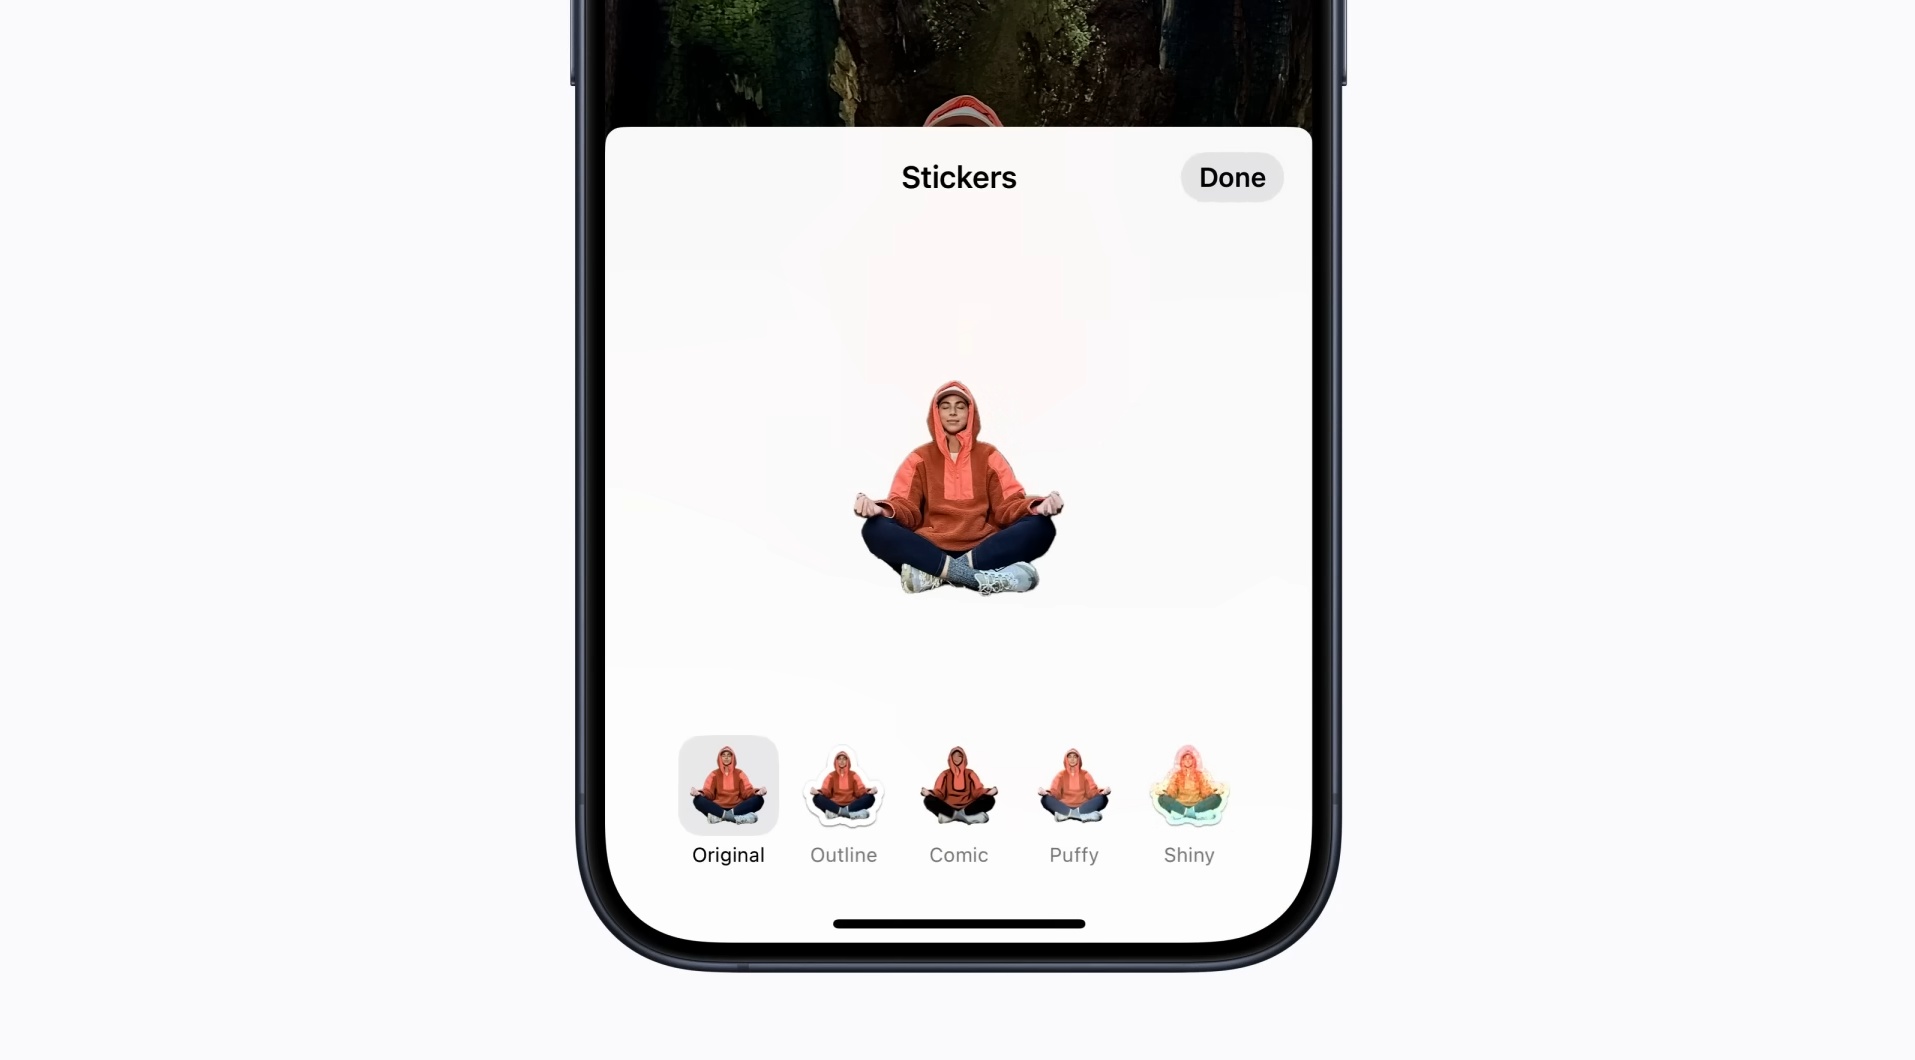
Step 3: Add effects (Optional)
Tap on Add Effect to stylize your newly created sticker. You can choose from several popular styles, including Outline, Comic, Neon, and Puffy.
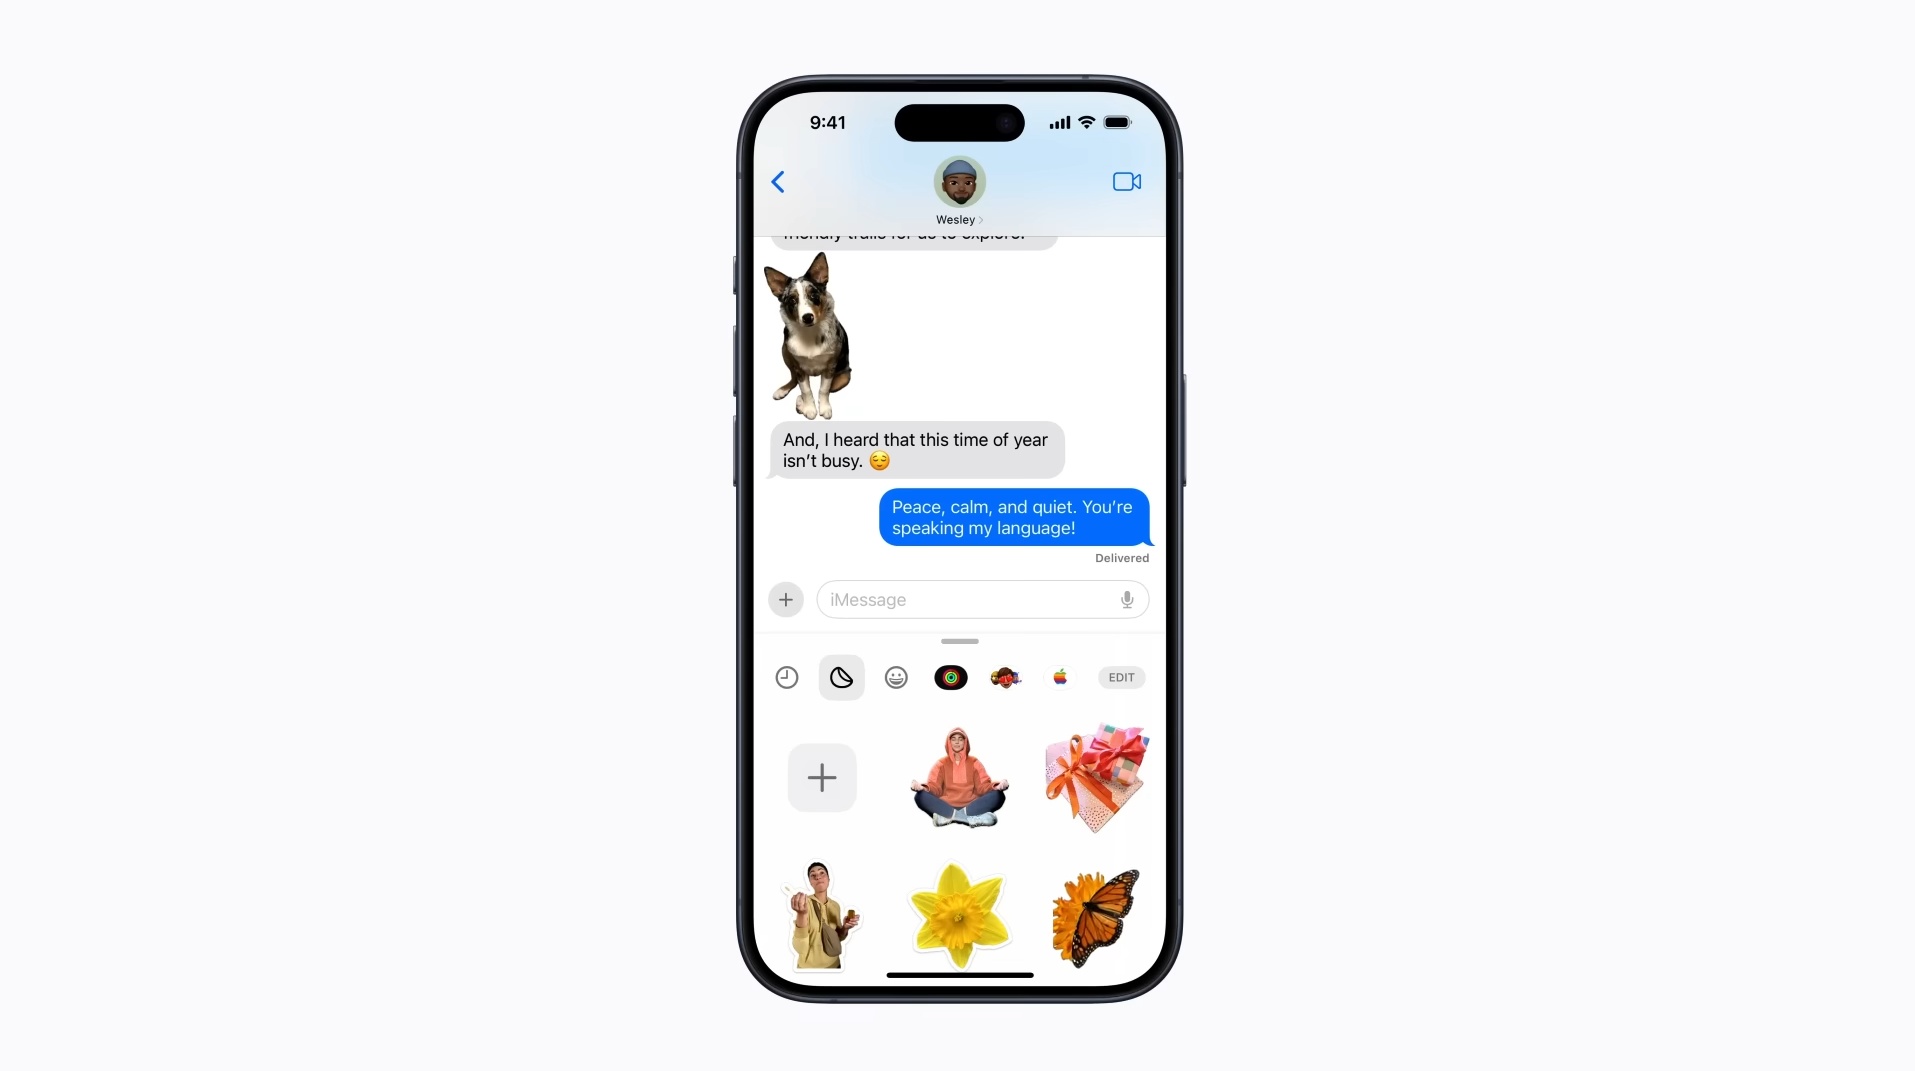
Step 4: Find and use your sticker
Open the sticker menu from the iPhone keyboard in Messages or from the Markup tools in Photos and Notes. Select your new sticker and place it on messages, photos, or documents whenever you want.
How to design custom stickers with Vmake Labs
Not everyone wants to draw or hunt for the perfect photo. When you need original sticker artwork quickly, an AI image generator takes a lot of the friction out of the process. Vmake Labs lets you create print-ready designs within a few minutes by selecting a model, describing a clear prompt and downloading the output. It is especially helpful for series that are consistent, themes or illustrations that you could not do by hand.
Step 1: Choose an AI model
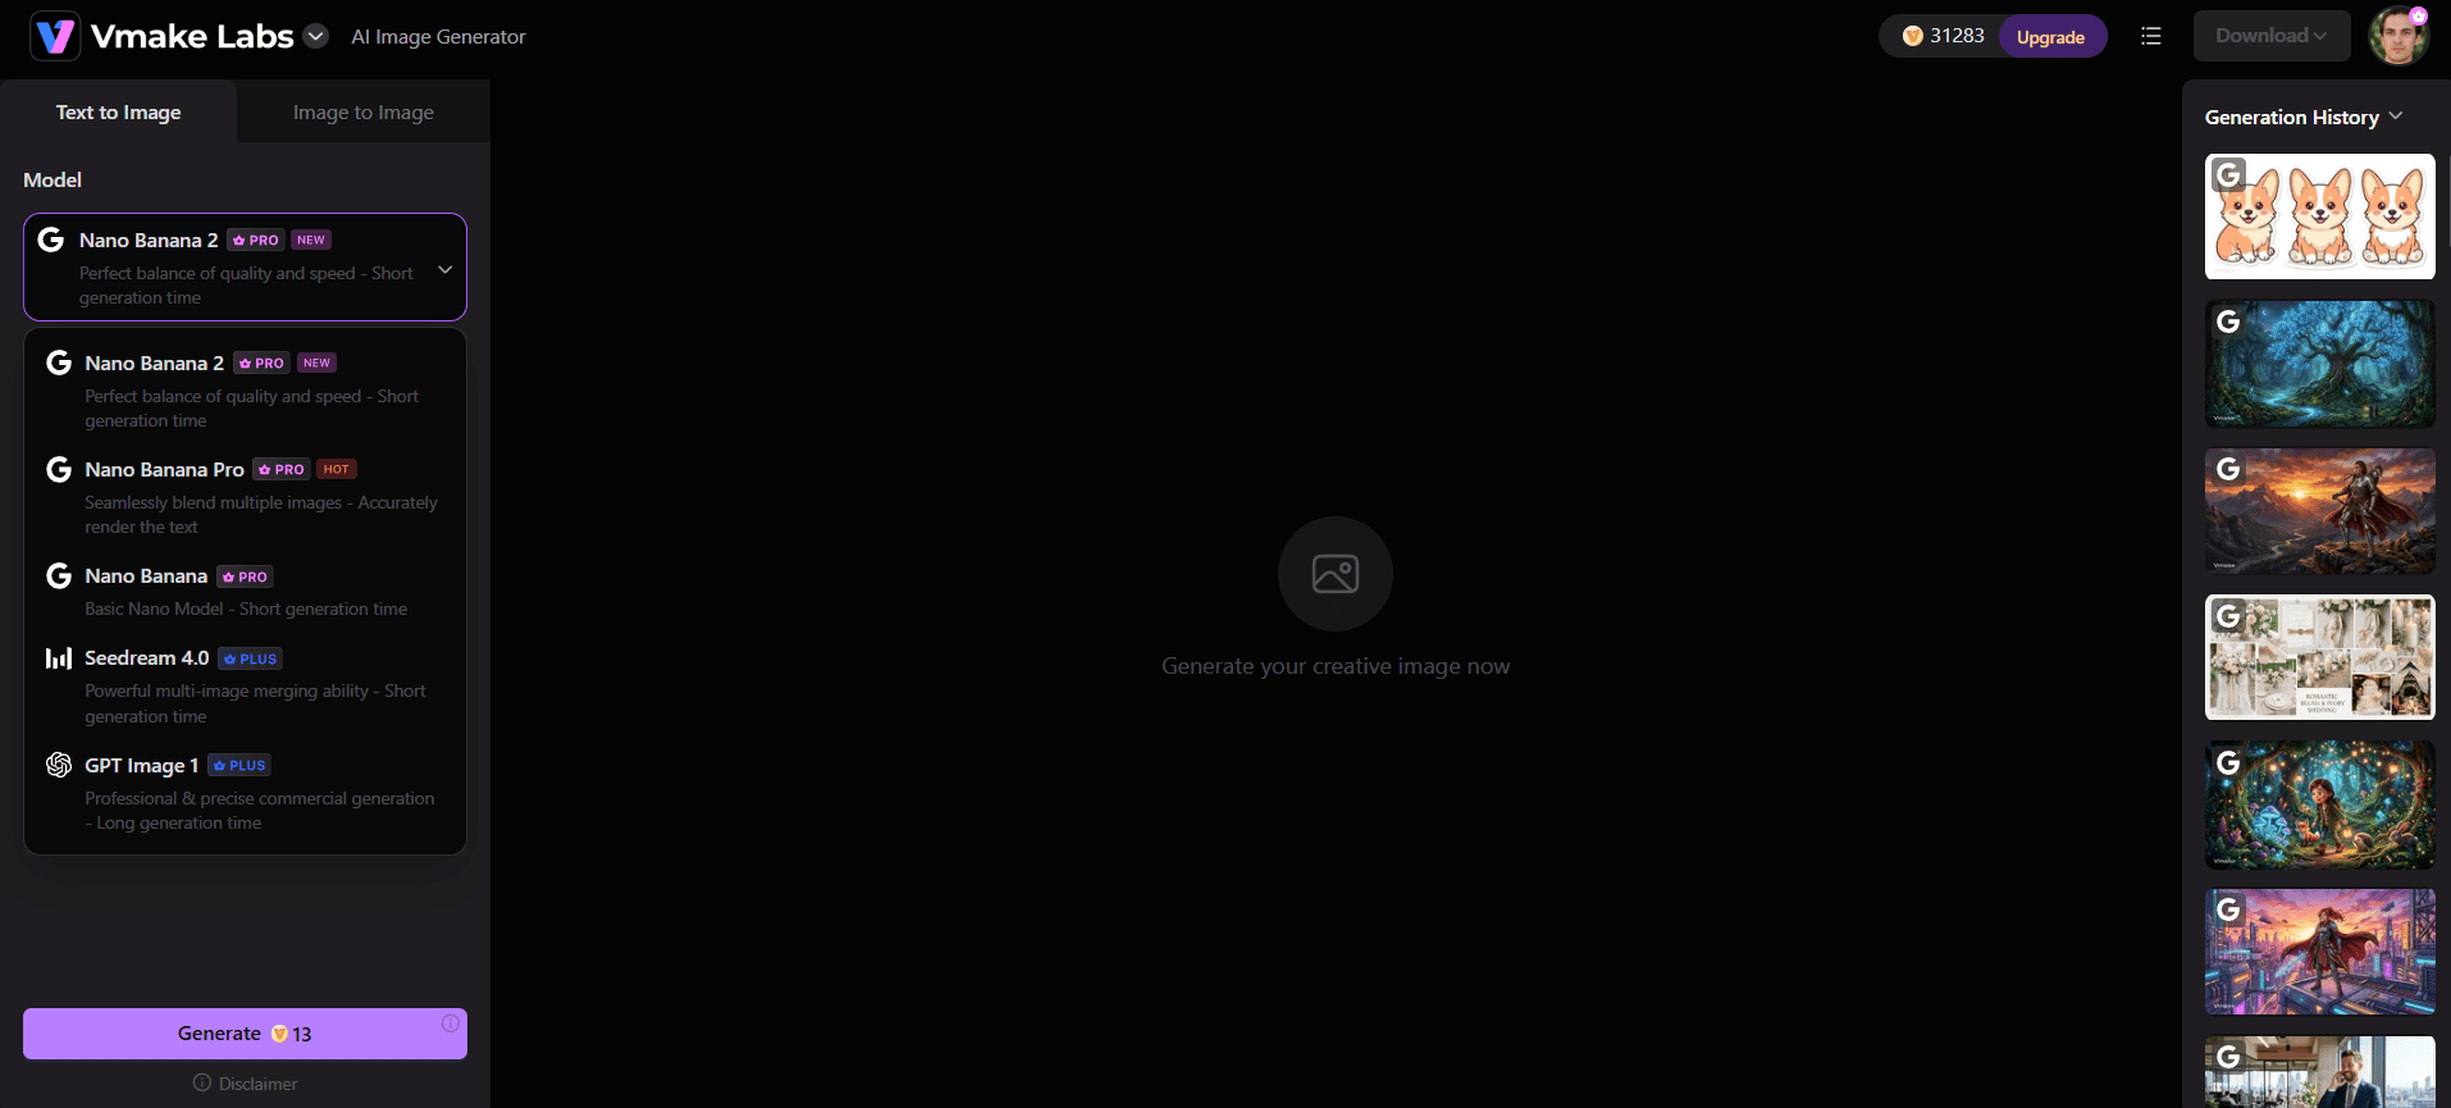
Open Vmake Labs AI Image Generator and pick a model like Nano Banana, Seedream, or GPT Image. Each model has a slightly different artistic style, so it's worth playing with a few options.
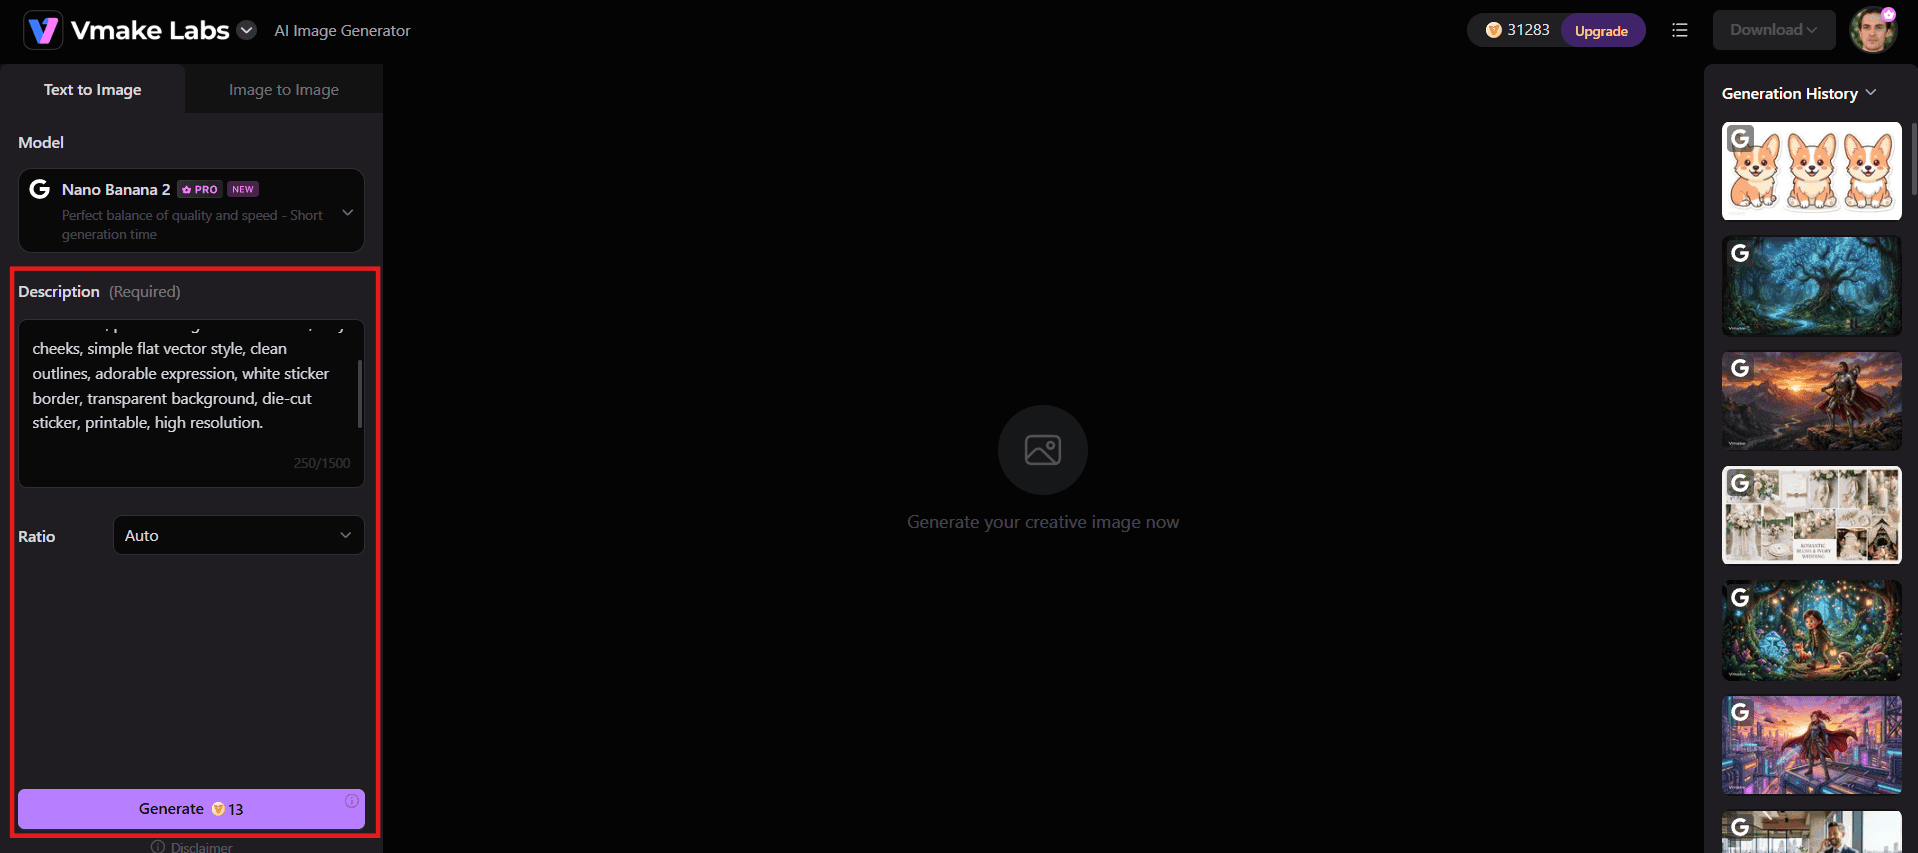
Step 2: Write a detailed prompt
Type a detailed prompt for your custom sticker design into the search bar. Include the subject, style, colors, and background, and aspect ratio. For example: "Cute smiling corgi, flat vector style, pastel colors, white sticker border, transparent background."
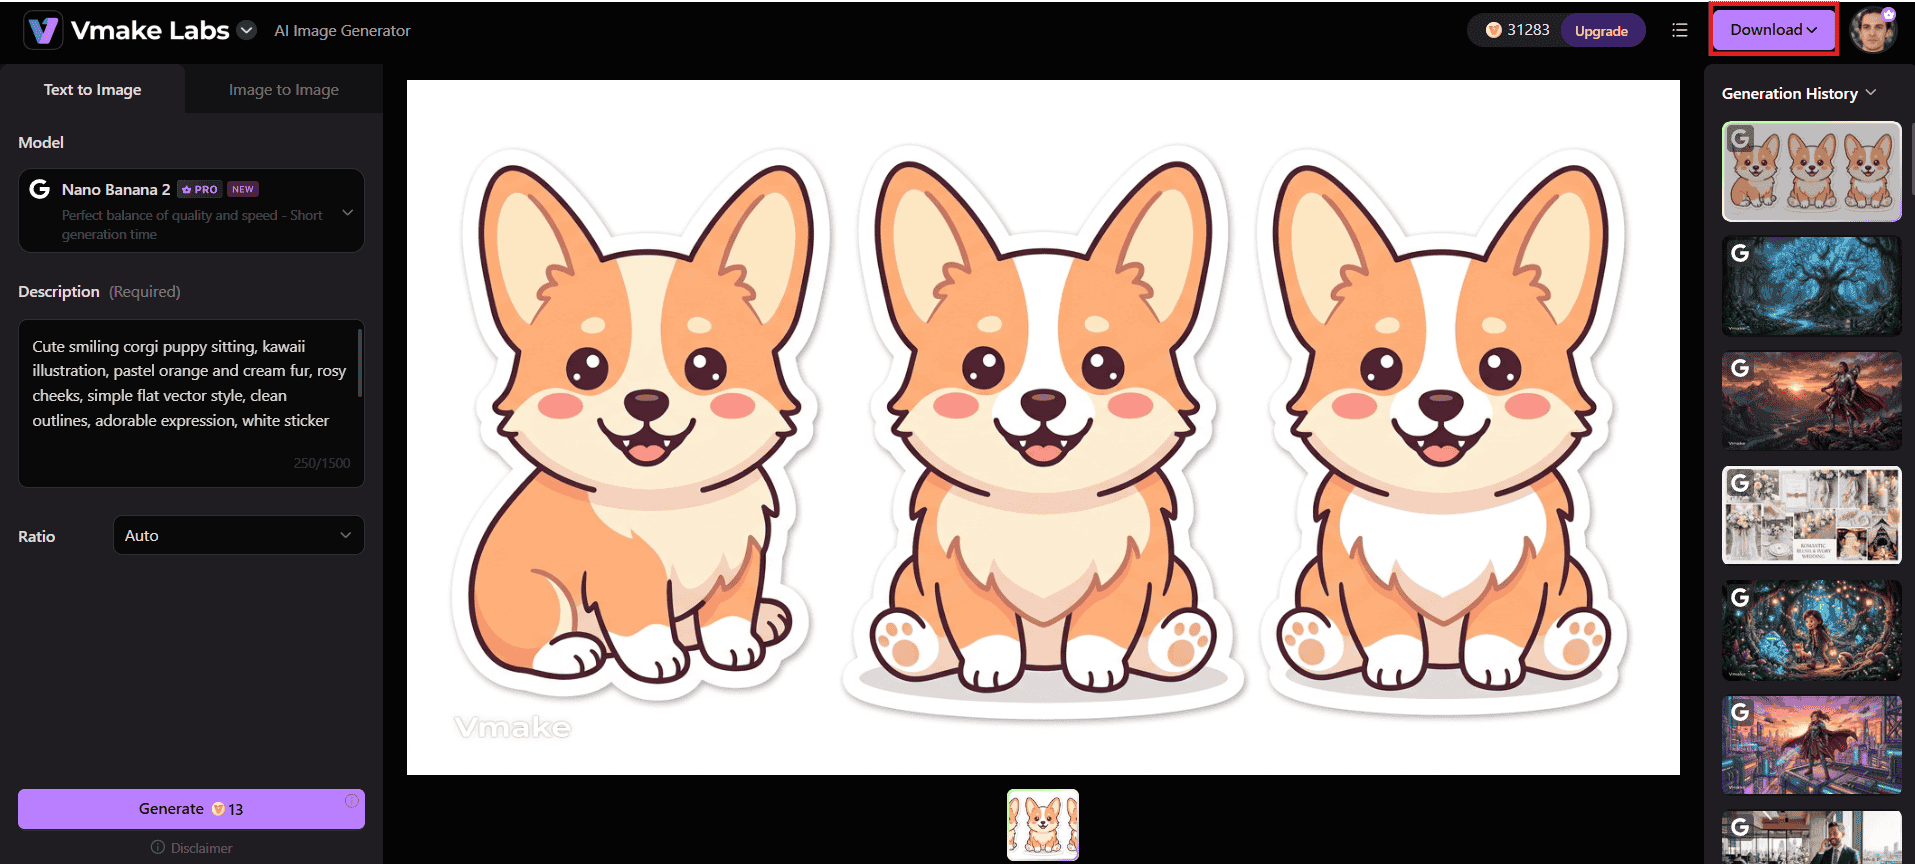
Step 3: Generate and download
Click Generate and review the results. Download the version you like best in high resolution, then print it on sticker paper or vinyl and cut it by hand or with a cutting machine.
Key features of Vmake Labs
-
Multiple AI models: Vmake Labs AI Image Generator provides access to multiple AI models, including Seedream AI, Nano Banana Pro, and GPT Image. This allows you to experiment with different AI art styles and select the most appropriate one for your needs.
-
Text-to-image generation: Describe what you want in a detailed text prompt and Vmake Labs will create original sticker artwork in seconds. This allows users to generate unique designs without being able to draw and saves time, encourages creativity and helps to explore ideas fast.
-
Image-to-image transformation: Upload an image file and ask the AI to stylize it in a different way. This allows you to generate unique variations of an existing image, which can be helpful when you need to tweak a design concept or experiment with different styles.
-
Aspect ratio selection: Select from multiple aspect ratios prior to generation for your design to match your intended sticker size or print layout. It cuts cropping, enhances composition, and makes your art fit on sticker sheets or digital platforms.
-
High-resolution outputs: Export sharp, crisp images that preserve fine details and bold outlines, ensuring your custom stickers print cleanly without blurriness, pixelated edges, or quality loss when enlarged for physical vinyl or paper production.
Advanced tips for professional-looking stickers
A few practical habits make the difference between homemade stickers that look rough and ones that feel intentional and well-finished.
-
Design in high resolution (300 DPI or higher): Export or create artwork at 300 DPI to keep the edges sharp when printed. Fine lines and small text, in particular, tend to look soft or pixelated when scaled to sticker size at lower resolutions.
-
Add a consistent white border: Leave a narrow, even border around the design. It makes the sticker easier to peel, gives a cleaner finished look, and helps the shape stand out against whatever surface it lands on.
-
Choose premium sticker materials: For indoor use, either matte or glossy sticker paper is fine; printable vinyl and laminate will be more resistant to moisture and handling. Matching the paper type to your target surface ensures better adhesion and a longer-lasting finish.
-
Test print before mass printing: Run a single sheet first to check for color, alignment, and cut lines. Minor tweaks at this point don't waste a whole pack of paper or vinyl if something is just a little bit off.
-
Use AI to create unique sticker designs: When drawing every idea is impractical, an AI image generator, like Vmake Labs, can produce original artwork quickly. It helps maintain a consistent style across a set and fills gaps when you need more designs than you can illustrate by hand.
Conclusion
Making your own custom stickers is simple, whether you use desk supplies, mobile apps, or advanced cutting machines. By combining high-resolution printing with quality vinyl and protective laminates, you can create durable, professional-grade decals for branding, gifts, or personal crafts.
Ready to bring your sticker concepts to life without drawing from scratch? Create unique, high-resolution sticker art in seconds. Try the Vmake Labs AI Image Generator for free today and turn your ideas into print-ready designs!
FAQs
What is the best paper for making stickers at home?
Printable vinyl is a durable sticker material, but it is not automatically waterproof or suitable for outdoor use. Water resistance depends on the vinyl, printer ink, protective laminate, and exposure conditions. For best results, check the product specifications and test a small sticker before applying it to bottles, laptops, or outdoor equipment.
Can I make stickers without a cutting machine?
Yes. Sharp scissors or a craft knife handle simple shapes and small batches without trouble. The packing-tape method also works with regular paper and requires no special cutting tools at all.
How do I make my stickers waterproof?
Print your design onto printable waterproof vinyl using pigment ink, allow it to dry completely, and apply a clear self-adhesive laminating sheet over top before cutting. This seals the ink against moisture and scratches.
How can I make custom stickers if I can't draw?
Use AI tools like Vmake Labs to generate original graphics from text prompts, convert personal photos using the native iPhone sticker tool, or edit royalty-free stock vectors to build unique, print-ready sticker art quickly.
What is the best image resolution for printing stickers?
For sharp, professional-looking stickers, design and export your artwork at 300 DPI or higher. This resolution preserves fine details, prevents pixelation, and ensures your stickers print clearly on both standard sticker paper and printable vinyl.
You May Be Interested
How to Make an Instagram Story: A Complete Beginner's Guide

How to Remove an Emoji From a Picture: Step-by-Step Guide
How to Make a Flyer: Easy Step-by-Step Guide for Beginners
[2026] How to Make Background Transparent (Free & Easy)
AI Art Styles Explained: Stunning Styles with Ready-to-Use Prompts