How to Use Speech to Text on Mac: The Ultimate Setup Guide
Discover how to use Mac speech to text with built-in dictation. Learn shortcuts, setup steps, tips for accuracy, and powerful alternatives like Vmake Labs for video & audio transcription.

Mac speech-to-text helps you write faster by converting your spoken words into text in real time. Whether you're drafting emails, taking notes, or creating documents, Apple's built-in Dictation makes voice typing simple. This guide explains how to set it up, use it effectively, and when a dedicated AI transcription tool like Vmake Labs gives you better results.
What is Mac speech to text?
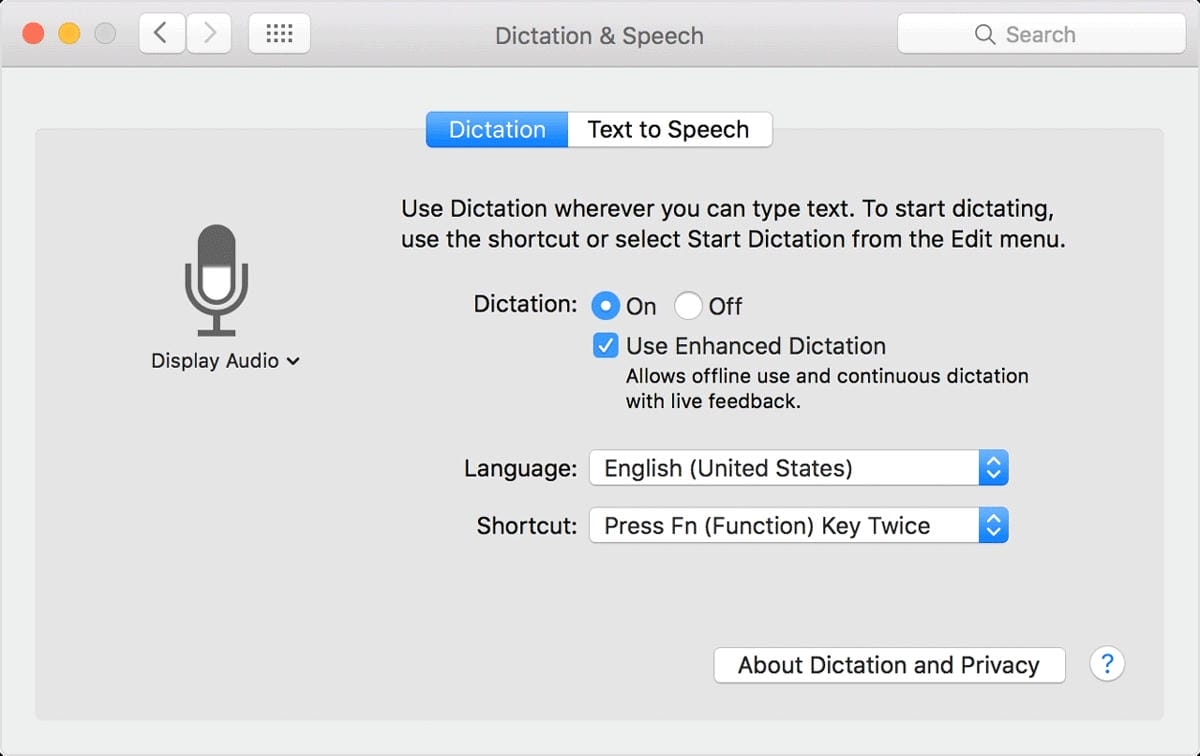
Mac speech-to-text is Apple's built-in voice typing feature that converts your spoken words into written text in real time. Using Dictation, you can write emails, notes, documents, messages, and search queries simply by speaking into your Mac's microphone instead of typing on the keyboard.
Apple offers two main voice features: Dictation and Voice Control (for full hands-free computer navigation).
-
Dictation: Designed strictly for text entry. It places text wherever your cursor is flashing.
-
Voice Control: A full-fledged accessibility tool that lets you control the entire operating system (e.g., "Open Safari," "Click File") using your voice.
Mac speech to text is ideal for writing emails, notes, documents, and messages, but it isn't designed to transcribe prerecorded audio or video files. For those tasks, you'll need a dedicated transcription tool.
How to enable speech to text on Mac
Enabling speech-to-text on Mac only takes a few simple steps. Once Dictation is turned on, you can start voice typing in most apps across macOS.
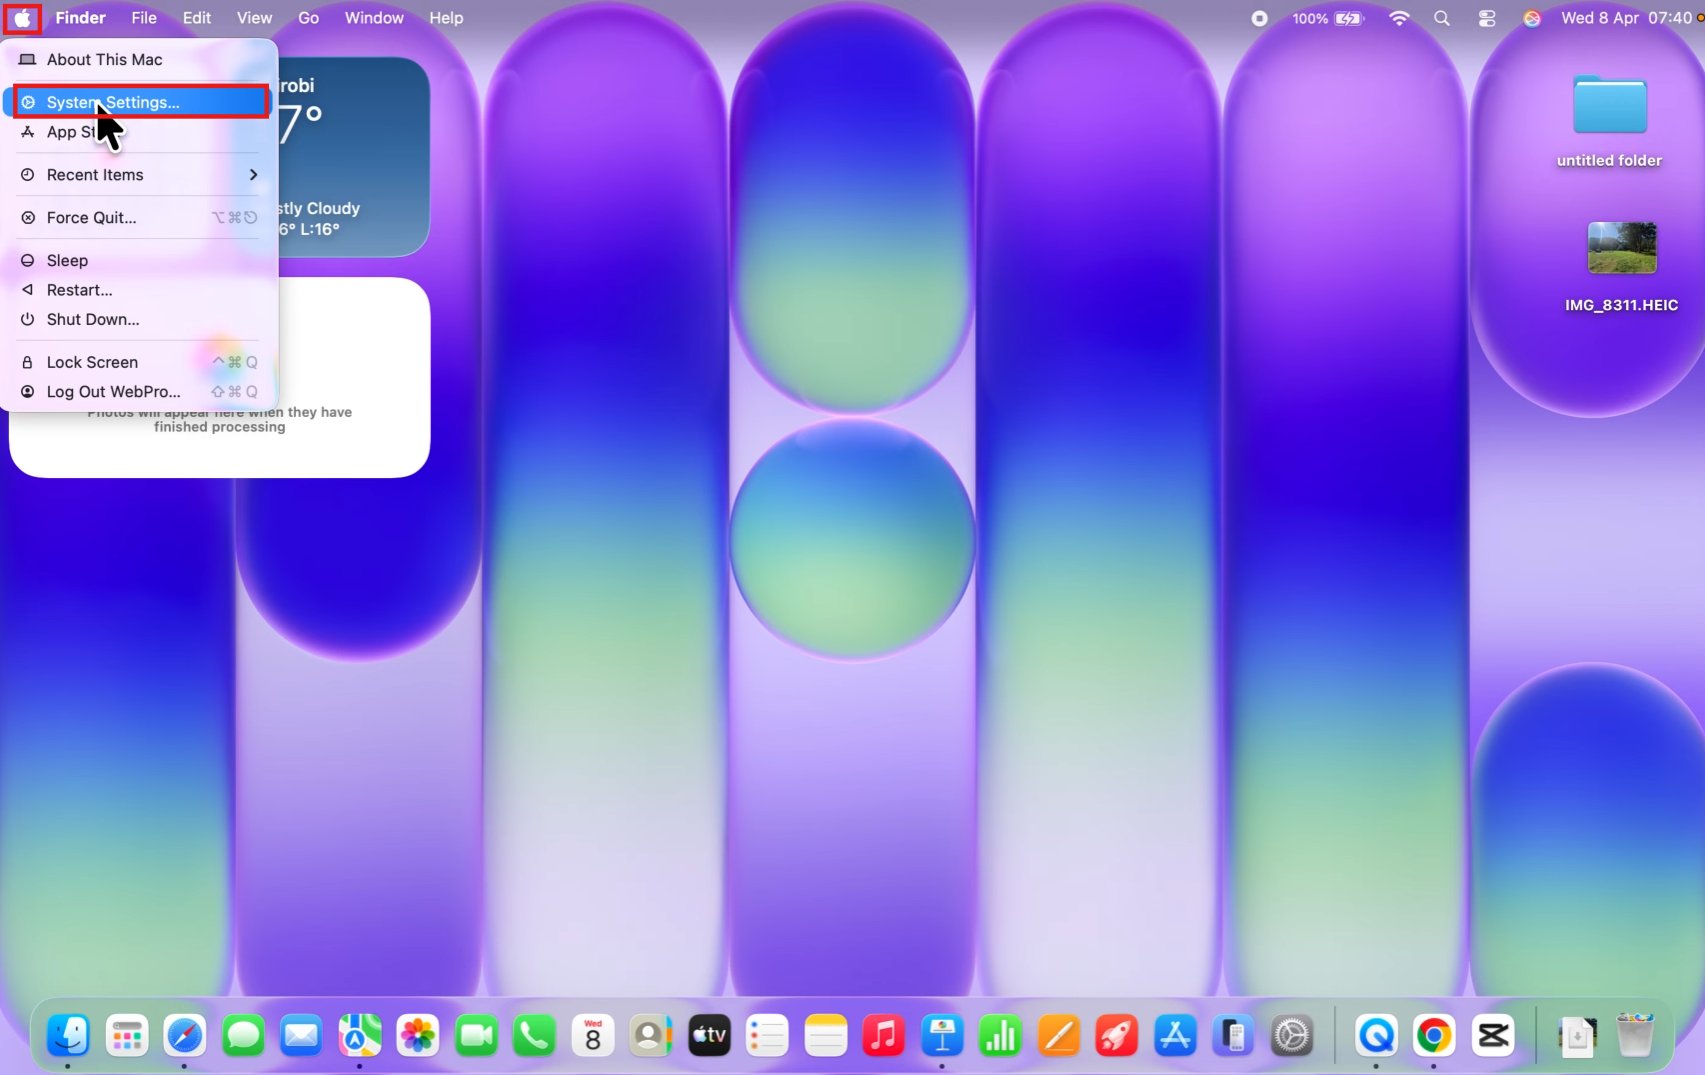
Step 1: Open System Settings
Click the Apple menu in the top-left corner of your screen and select "System Settings."
Step 2: Go to Keyboard > Dictation
In the sidebar, click "Keyboard," then scroll down to find the "Dictation" section.
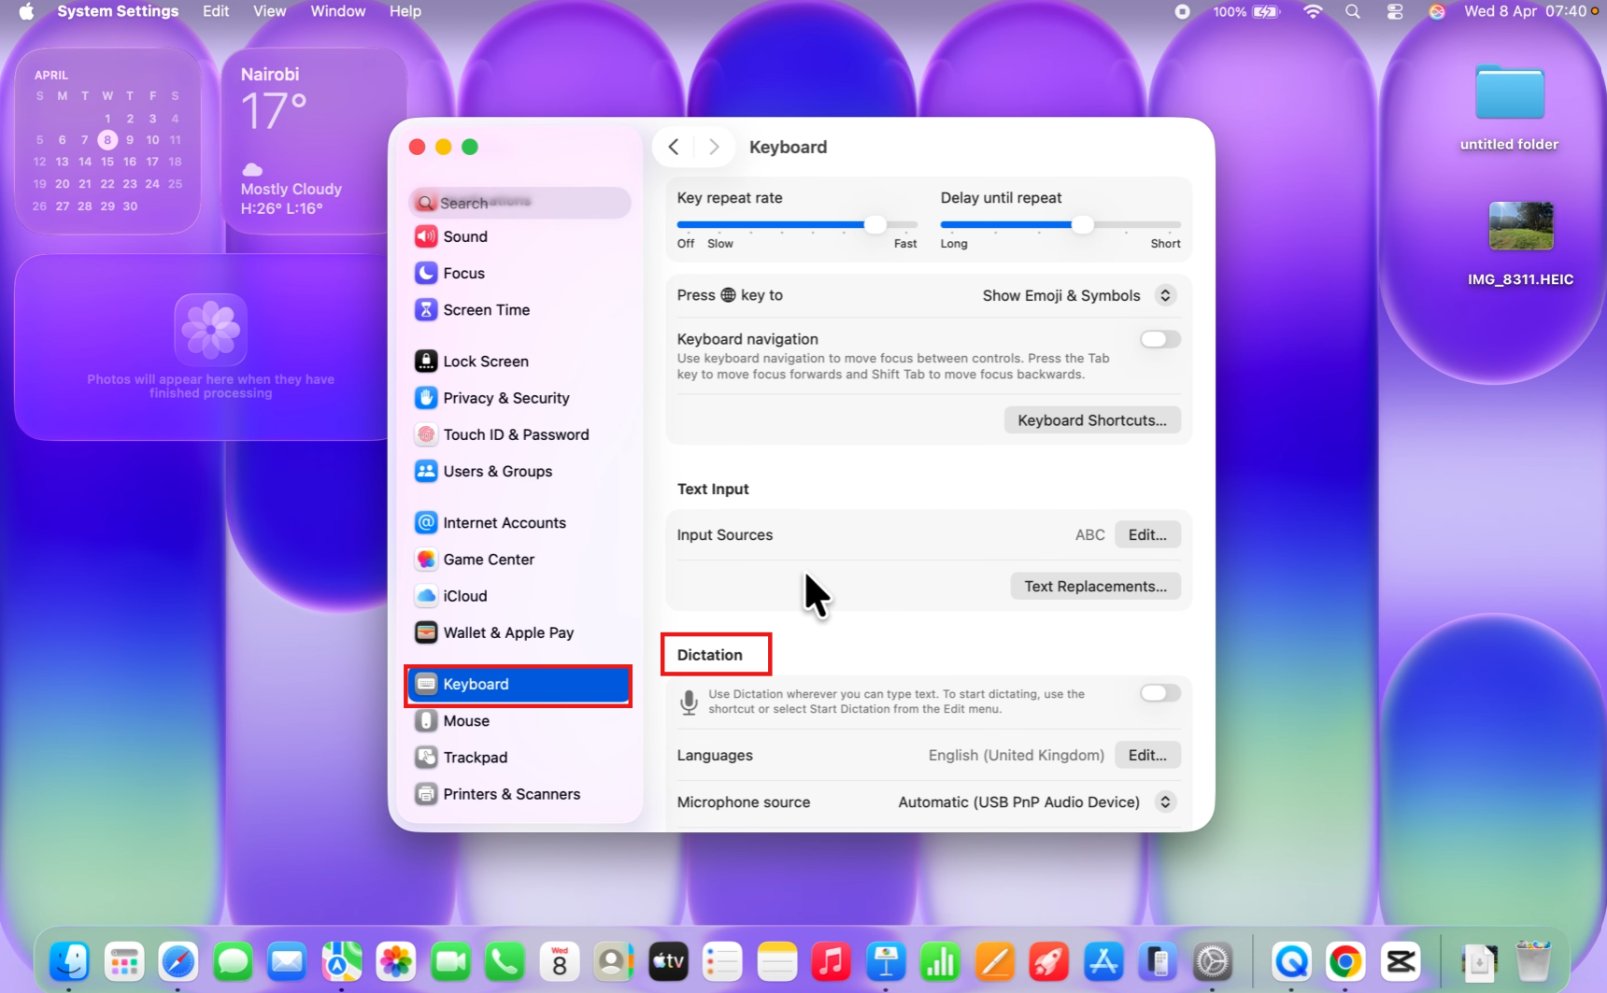
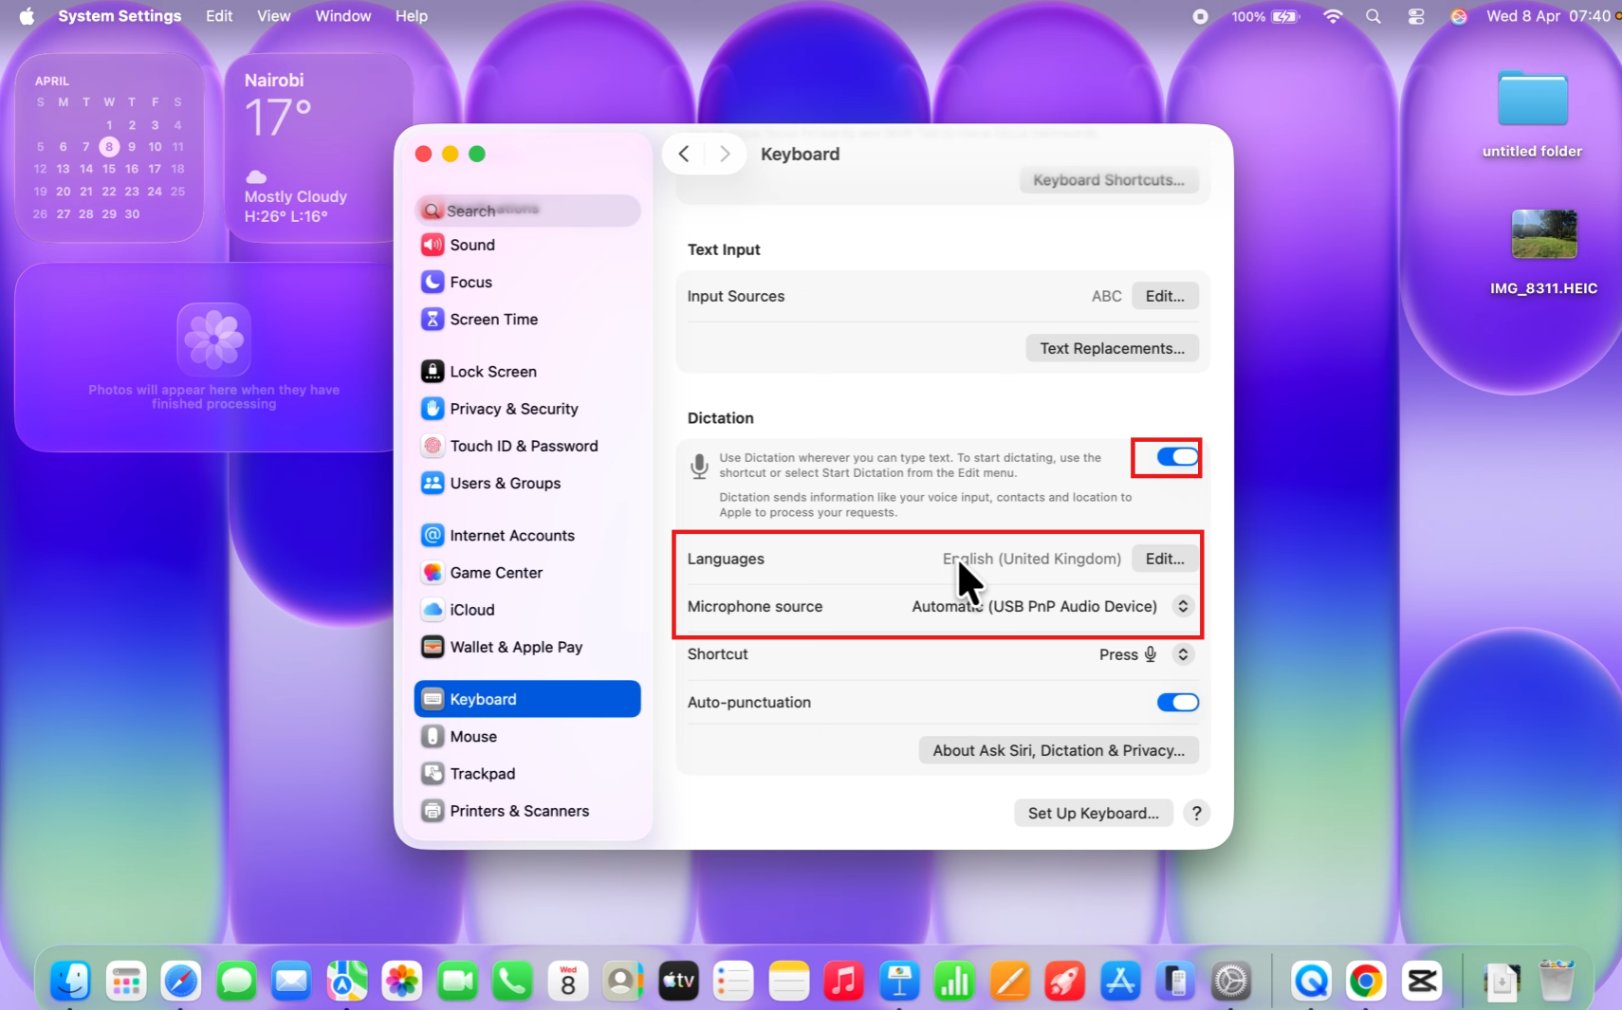
Step 3: Turn Dictation on, choose language/mic
Switch "Dictation" to on, choose your preferred language, then select your microphone. If prompted, grant microphone permission to complete the setup.
How to use speech to text on Mac
Once Dictation is enabled, using speech-to-text on your Mac is simple and works in almost any app. Here's how to do it quickly and effectively.
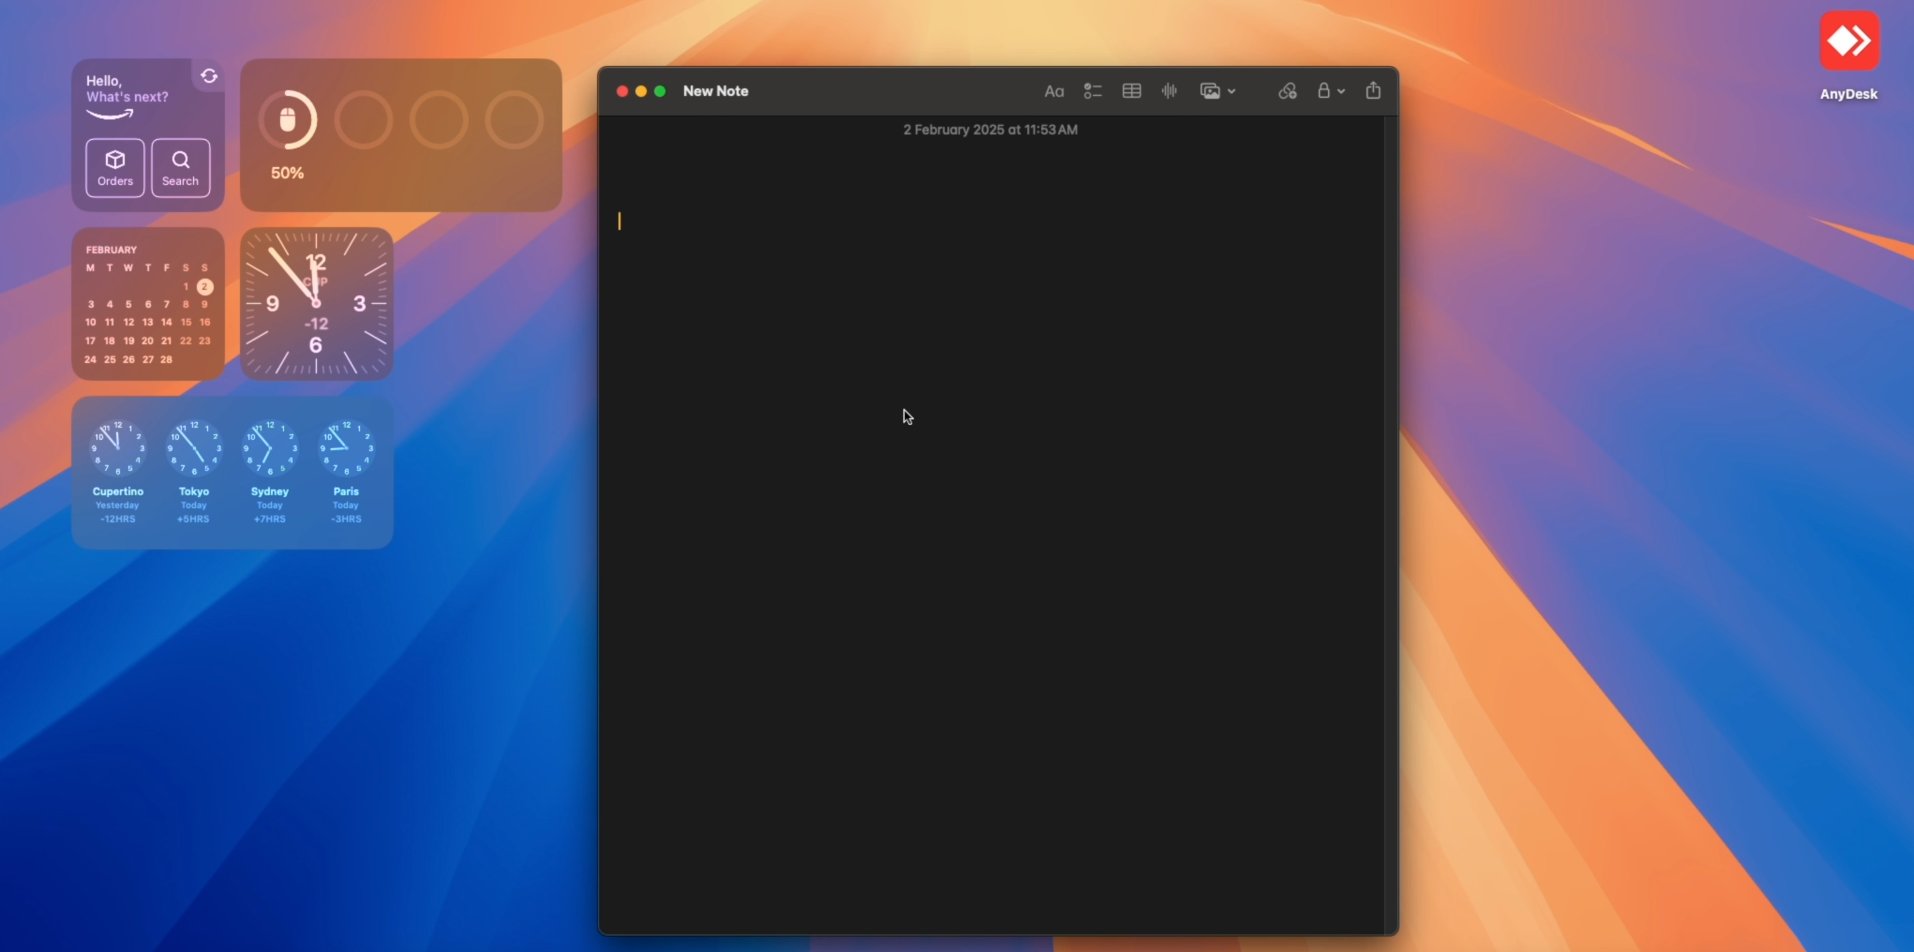
Step 1: Position your cursor
Open the app where you want to type (e.g., Notes, Mail, Messages, or a web form) and click to place your cursor in the text field or document.
Step 2: Start dictation
Start Dictation using either of these methods:
-
Press your Dictation shortcut (Fn key twice by default on many Macs)
-
Alternatively, go to the top menu bar and select Edit > Start Dictation.
Step 3: Speak clearly, review and edit
Speak at a natural pace into your microphone. You can say commands like "comma," "period," "new line," or "new paragraph" to add punctuation and formatting.
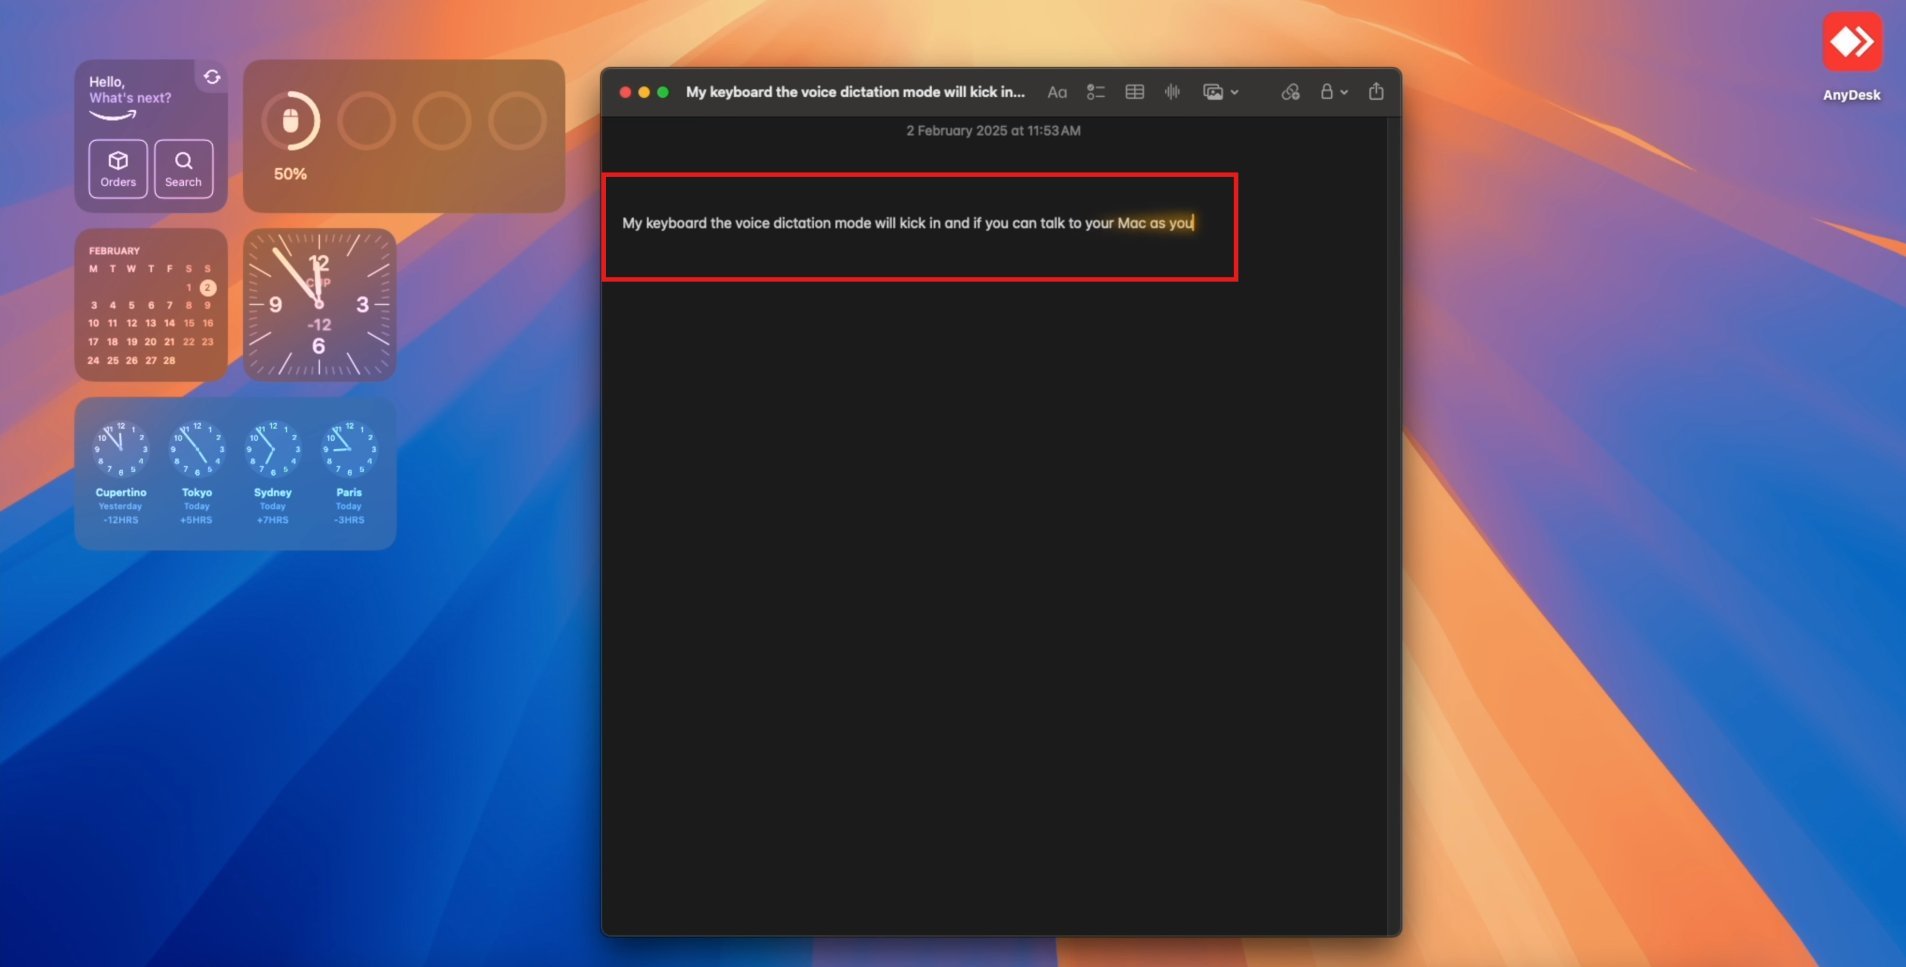
When you're finished, stop Dictation using the same shortcut or by clicking "Done." Read through the transcript and make any necessary corrections before saving or sending it.
How to transcribe audio and video on Mac with Vmake Labs
Mac Dictation works well for live speech, but it isn't built to handle audio or video files you've already recorded. If you need to convert a meeting, interview, lecture, or podcast into text, you need a tool made for that job. Vmake Labs is an AI-powered transcription tool built for exactly this. It turns any audio or video file, or even a video link, into an accurate, editable transcript within minutes, no manual typing required.
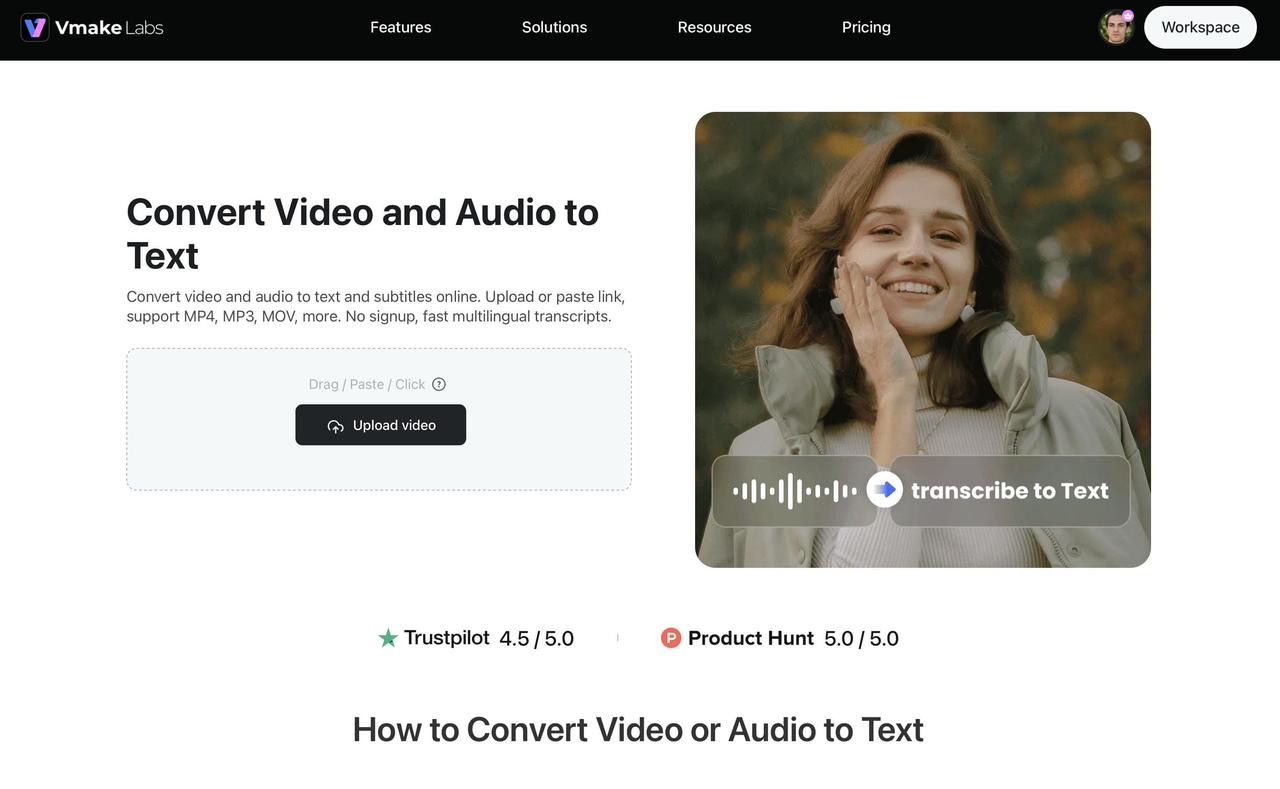
Step 1: Upload your audio, video, or link
On your Vmake Labs dashboard, navigate to "Video & audio to text." Now click "Upload" to find an audio or video file on your Mac, or paste supported video URL to load file. Once the file is uploaded, preview it to confirm you've selected the correct content before moving to the next step.
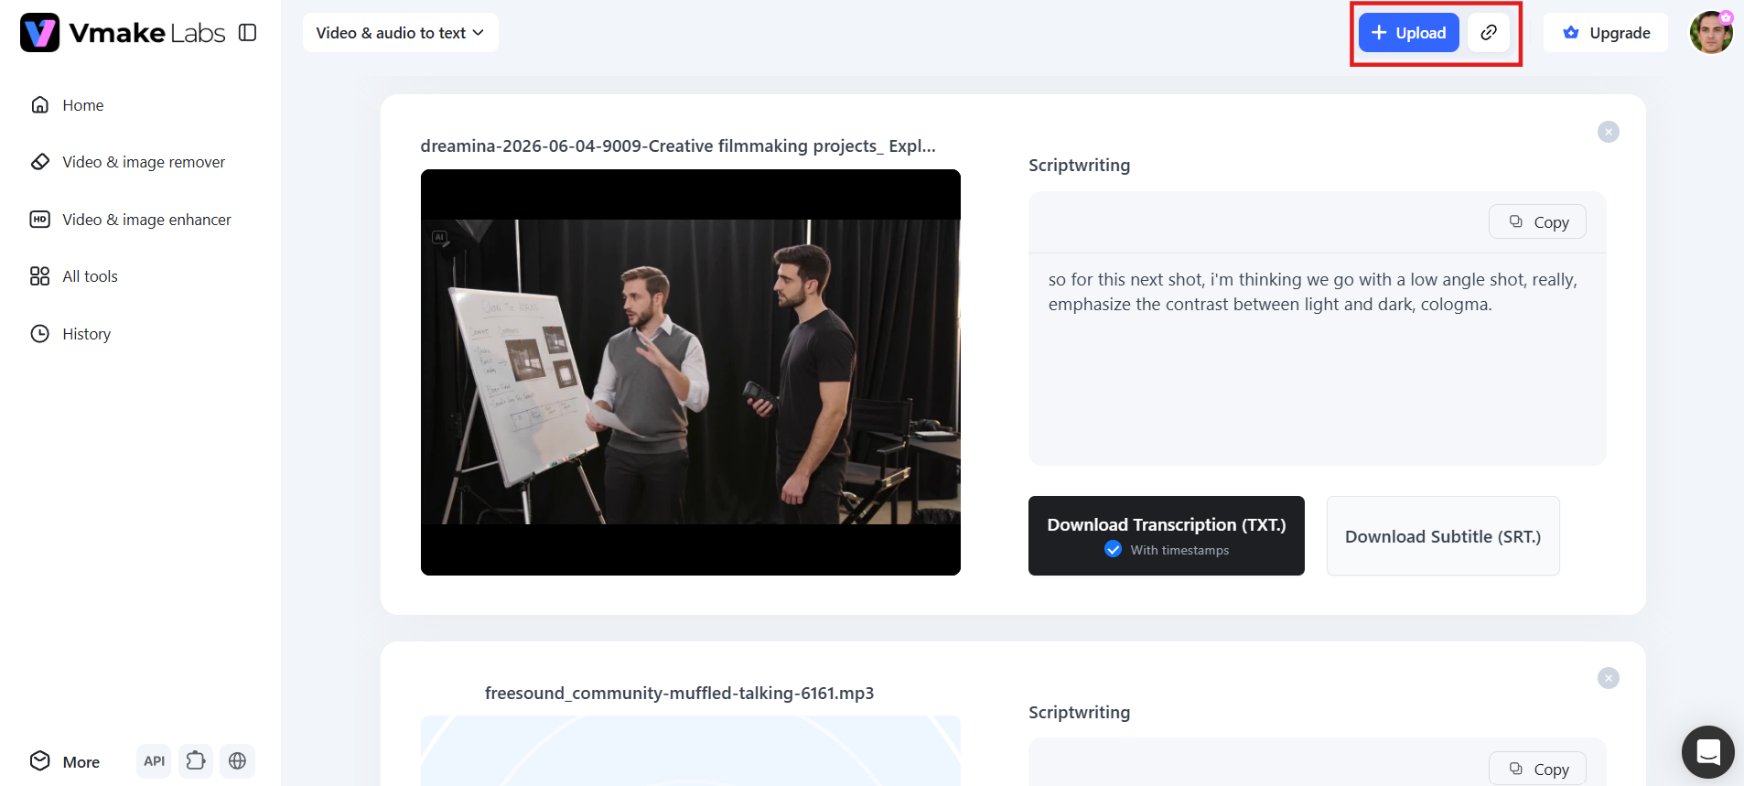
Step 2: Generate the transcript automatically
Pick the language spoken in your recording for the best transcription accuracy. If you require a transcript in another language, turn on the translation option and select your desired language. Once you have configured your settings, hit the Transcribe button.
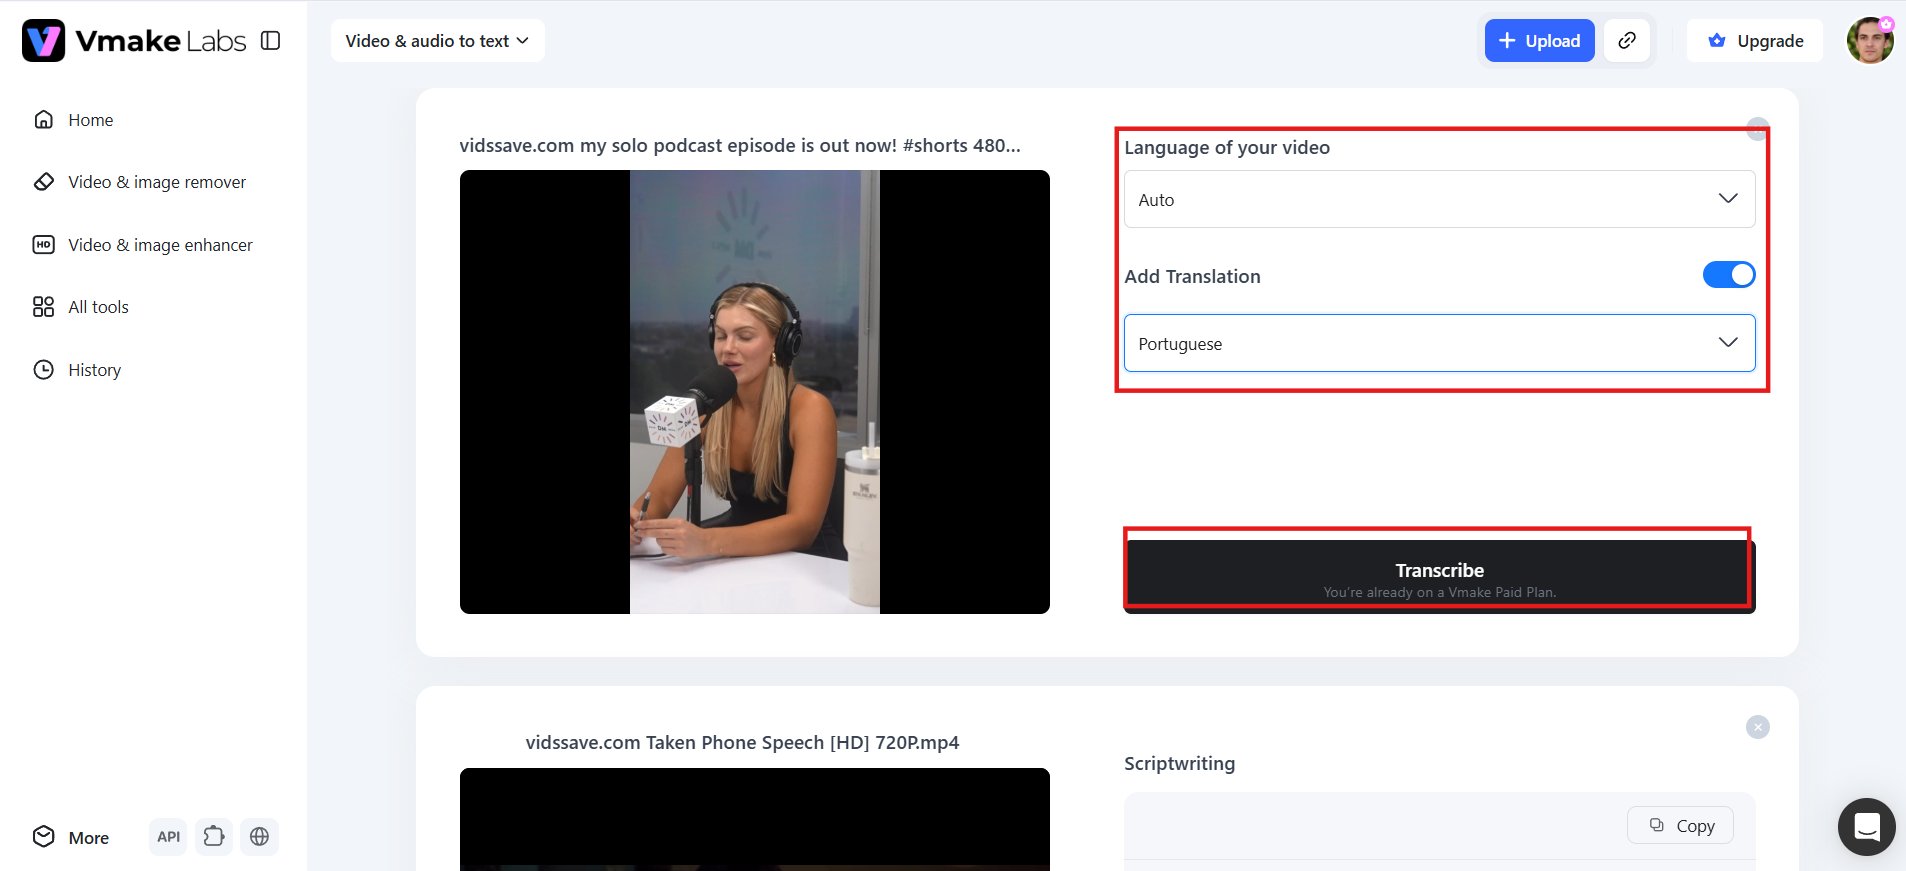
Step 3: Edit and export your transcript
After the AI finishes transcribing your content, review the generated text and make any necessary edits. You can copy the transcript or download it as a TXT file. If you need subtitles for your video, export the transcript as an SRT file.
Why choose Vmake Labs for speech to text
-
Fast & accurate AI transcription: Vmake Labs uses advanced AI models trained to accurately recognise your speech even with multiple speakers, accents, or background noise. So you get a reliable transcript without wasting time fixing errors.
-
Wide format and link support: Supports almost any audio or video format (MP4, MP3, MOV, etc.) and lets you transcribe directly from YouTube or other video links without downloading files first. Super convenient for Mac users.
-
Multi-lingual transcription: Handles multiple languages effortlessly and offers translation options. Whether your content is in English, Spanish, French, or other languages, Vmake Labs provides reliable transcription and cross-language results.
-
Editable transcript exports: Review your transcript online, make edits if needed, then download it as a TXT file or export subtitles in SRT format for easy editing, sharing, or publishing.
When to use Mac Dictation vs Vmake Labs
Both tools convert speech into text, but they're built for different situations. Here's how to know which one to reach for.
Here's a comparison table you can drop in:
| Feature | Mac Dictation | Vmake Labs |
|---|---|---|
| Input type | Live speech, real-time | Existing audio/video files |
| Best for | Quick messages, emails, notes | Meetings, interviews, lectures, podcasts |
| Offline support | Yes | No |
| Works hands-free | Yes | Not applicable (file-based) |
| Subtitles/SRT with timestamps | No | Yes |
| Language conversion (different output language) | No | Yes |
| YouTube/video URL support | No | Yes |
| Typical use case | In-app voice typing, forms, search bars | Converting recordings into readable, shareable transcripts |
The comparison gives a quick overview, but the right choice ultimately depends on what you're trying to accomplish. Here's when each tool makes the most sense.
Use Mac Dictation when you need to:
-
Type a quick message, email, or note in real time
-
Fill in a form or search bar hands-free
-
Work offline with basic voice typing
-
Add short voice input inside an app you're already using
Use Vmake Labs when you need to:
-
Transcribe an existing audio or video file, not live speech
-
Convert a recorded meeting, interview, lecture, or podcast into text
-
Generate subtitles or SRT files with accurate timestamps
-
Get a transcript in a different language than the one you're speaking
-
Turn a YouTube video or video URL into readable text without downloading it first
Tips for better speech recognition on macOS
To get the absolute highest accuracy from your Mac speech-to-text software, a few minor tweaks to your setup and speaking habits can make a massive difference in your daily workflow.
-
Use a quality microphone: A good external microphone or headset will pick up your voice better than built-in microphones, helping macOS recognise words accurately and reducing distortion and background noise you don't want.
-
Speak naturally: Speak at a steady, conversational pace without rushing. Clear pronunciation and consistent volume help Dictation recognize your words more accurately and reduce unnecessary transcription mistakes.
-
Reduce background noise: Use Dictation in a quiet environment whenever possible. Minimizing conversations, fans, music, and other background sounds helps improve speech recognition and overall transcription quality.
-
Choose the correct language: Choose the language or regional accent that reflects how you talk. When the correct language settings are used, vocabulary, pronunciation, and punctuation recognition accuracy is improved.
-
Review transcripts: Always proofread your transcript before sharing or saving it. Checking names, numbers, technical terms, and punctuation helps ensure your final text is accurate and professional.
Conclusion
Speech-to-text on Mac makes writing faster, easier, and more accessible, whether you're drafting a quick note, filling out a form, or working hands-free throughout your day. Apple's built-in Dictation covers most everyday typing needs with a simple setup and a few voice commands. But when you need to transcribe existing recordings, like meetings, interviews, lectures, or podcasts, Vmake Labs steps in with faster, more accurate results. It also supports multiple languages, various file formats, and SRT subtitle generation for video content.
Ready to save time on transcription? Try Vmake Labs for free and turn your audio and video files into clean, usable text in minutes.
FAQs
Does Mac speech to text work offline?
Yes, Mac speech to text can work offline on supported versions of macOS after the required language files are installed. However, some advanced speech recognition features and language support may still require an internet connection depending on your macOS version.
What is the default speech to text Mac shortcut?
Double-clicking the Fn button will start Dictation on Macs by default, allowing you to start dictating straight away. If this shortcut doesn't suit you, you can customize it anytime in System Settings under Keyboard > Dictation to fit your workflow.
Why isn't Dictation working on my Mac?
If Dictation isn't working, make sure it's enabled in System Settings, your microphone is connected and selected correctly, microphone permissions are granted, and your macOS is up to date. Restarting your Mac can also resolve temporary issues.
What is the difference between Dictation and Voice Control on Mac?
Dictation converts your spoken words into text for writing emails, notes, and documents. Voice Control goes further by letting you operate your Mac entirely with voice commands, including opening apps, clicking buttons, and navigating the interface.
What is the best speech-to-text tool for Mac?
Apple Dictation is ideal for quick, real-time voice typing, while Vmake Labs is better for transcribing recorded audio and video. It offers AI-powered transcription, multilingual support, subtitle generation, and editable transcripts for more advanced speech-to-text workflows.

You May Be Interested
Speech to Text App: Best Picks and How to Choose One
Best Speech to Text Software: Top 5 AI Tools Evaluated
Google Docs Speech to Text: Complete Guide for Beginners
How to Transcribe Audio to Text: Efficient Guide
How to Transcribe Audio Recording to Text in Minutes